Adding aNinja Form to Squarespace Website

After creating your form in aNinja, adding it to your Squarespace Website becomes easy with the use of the aNinja Form Embed Code.

Find your aNinja Form Embed Code in your aNinja install before getting started.

Adding aNinja Form to Squarespace Website

You can do this yourself or give this code to your developer.

  • In the “Home Menu“, click “Pages
  • Locate the contact us page on the top toolbar.
  • Scroll down to the section where you want to add the contact form and click Edit
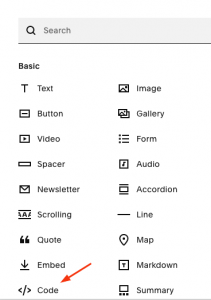
  • Then hit the + sign
  • And choose Code

  • Replace “hello world” by your Form Embed code.
  • You might not be able to see the form in the edit mode – it says “Script disabled”.
  • Just go to your website to see and test the form.

Where does the imported data appear

After the integration, you can search your aNinja CRM for the imported leads. You can also search for any custom field, opportunities, and any other info that you have imported.

  • Lead contacts appear in the leads contact section in the lead view
  • Opportunities also appear in the opportunity section in the lead view
  • The company’s info appears on the top left of the lead view, in the Company section.
  • Custom fields appear in the custom field section of the lead view.
  • Lead Search is a field that also appears in the bottom left of the lead view. Specifically, these are info/links on the lead or the organization found in Google search.

Send us your request to support@aninja.com and we will happily assist.

Adding aNinja Chatbot to your UENI website

You can add your aNinja Chatbot to your UENI website by using a simple Javascript code. Which is the aNinja Chatbot Embed Code.

Find your aNinja Chatbot Embed Code in your aNinja install before getting started.

Adding aNinja Chatbot to UENI Website

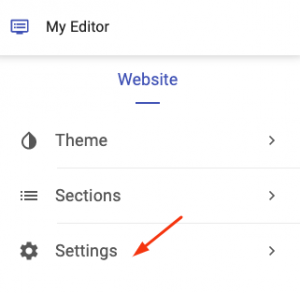
  • Then, click on the Settings section

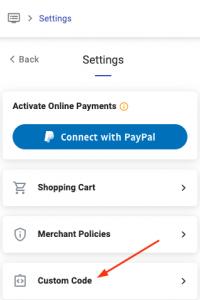
  • And then Custom Code

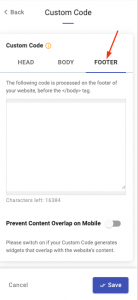
  • The custom code is not rendered in the editor Preview.
  • Visit your website to see the Chatbot.

Where do the Chatbot Conversations appear in aNinja

After he integration, the chatbot captures lead data in the conversation and injects a new lead into your aNinja account.

You can see these conversations:

  • In your Inbox. Just select “Chatbot” from the All types dropdown.Add aNinja Chatbot to your UENI website
  • And in your Dashboard widget “Chatbot Conversations”. If you can’t see this widget, just enable it from the little gear on the top right of the dashboard.

If the user closed the chatbot conversation before your reply, your message will appear in a bubble next to the chatbot on the website:

Chatbot behavior

The chatbot pop-up gets triggered only for the first user visit to your site. It doesn’t automatically re-pop up on their subsequent visits, mainly because it gets annoying for repeat users. However, they can see that it’s in the bottom right section.

We can customize the below Chatbot behaviors:

  • Exposing the Chatbot initial greeting on every visit
  • Hiding the initial greeting message on page load
  • Delay showing the Chatbot widget for a number of seconds
  • Customizing widget container style to fit on the load page

Send us your request to support@aninja.com and we will implement the changes for you.

Webflow Integration using Zapier

Webflow integration can be done either through Zapier or through webhook. In this article, we’re going to show you the Webflow integration using Zapier.

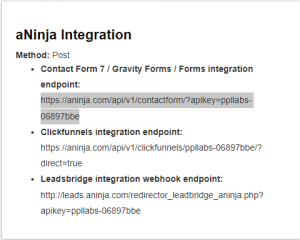
Find your aNinja embed code before you get started. It is the form integration endpoint from aNinja. This is different for each form.

Sending Webflow form submissions to aNinja through Zapier

  • Log in to your Zapier account
  • Click on Make a Zap
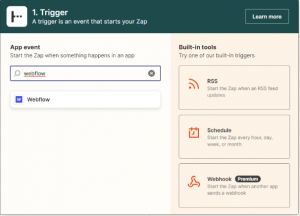
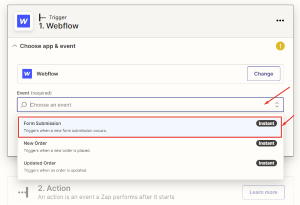
  • ‍Choose Webflow as your Trigger App event
  • Connect the Webflow account. Make sure you are logged in to Webflow on the same browser.
  • Select Form Submission as Webflow trigger
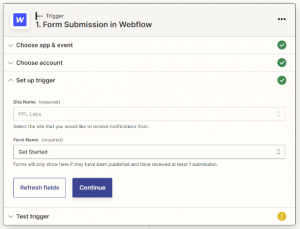
  • Choose your Webflow Account
  • Set up Webflow Form Submission by selecting the site you want to receive notifications from and the Form Name
  • Test Trigger
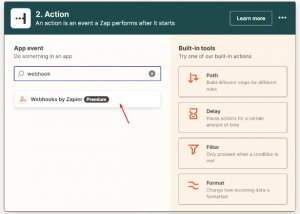
  • For Action, choose Webhook.
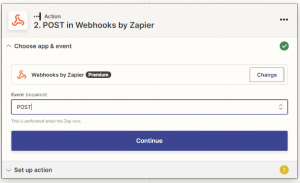
  • For Event, select POST
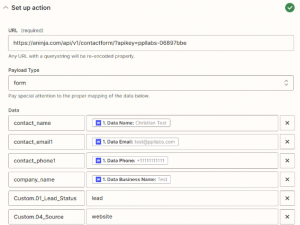
  • Set up action
  • URL: Copy here the aNinja Form Embed code.Webflow Integration using Zapier
  • Payload Type: form

Mapping Fields

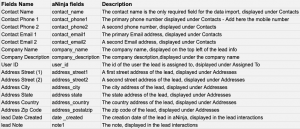
Map the Data on the aNinja fields and Form fields

These are the default aNinja fields:

Testing the Integration

  • Click Fetch & Continue to test the Webflow connection. Make sure you have at least one recent form submission created or submit a new form submission on your website before testing the connection. If there’s an issue with the connection troubleshoot your Webflow connection with Zapier (see below).
  • Check aNinja if the test lead got through.
  • Rename the Zap.
  • Publish Zap

Where does the imported data appear

After the integration, you can search your aNinja CRM for the imported leads. You can also search for any custom field and any other info that is collected from the forms. All the data appear in the Lead View.

  • Lead’s contact (Name, address, email, phone, and email) appears in the leads contact section in the lead view
  • The company’s info appears on the top left of the lead view, in the Company section.
  • Custom fields appear in the custom field section of the lead view
  • Lead Search is a field that also appears in the bottom left of the lead view. Specifically, these are info/links on the lead or the organization found in Google search.

Need help with the Webflow Integration using Zapier? Leave us an email at support@aninja.com. We’re more than happy to assist you.

Adding aNinja Chatbot to your Godaddy Website

Adding aNinja Chatbot to Godaddy Website can be done by using a simple Javascript code. Which is the aNinja Chatbot Embed Code.

Find your aNinja Chatbot Embed Code in your aNinja install before getting started.

Adding aNinja Chatbot to Godaddy Website

  • Log in to your GoDaddy account
  • Then, go to the Product page.
  • Scroll down to Websites + Marketing and select Manage next to your website to open your site.
  • Select Edit Website or Edit Site to open your website builder.
  • Then, select the page of your website where you would like the widget to appear.
    • Or alternatively, you can add a new page for the widget. Click the + button or Add.

User-added image

  • Search for the HTML section and select Add.
  • Then, click Embed custom code on the page.

User-added image

  • Click inside the new section to open up the HTML editor.

User-added image


  • Here, in the “Custom Code” box, paste the aNinja Chatbot Embed Code along with the following Chatbot widget code’s attribute:

data-platform="godaddy" e.g. <script async data-chatplaybook_id="<CHATPLAYBOOK_ID>" data-tenant="<TENANT>" data-platform="godaddy" src="https://aninja.com/chatbot/chatwidget_embed_script.js"> </script>

  • When you’re finished, click the Done at the top of the HTML panel. And your changes are automatically saved.
  • Click on Preview to see the results.
  • Lastly, make any additional changes, and when you’re ready click Publish.
  • Now, you should be able to see the chatbot on your website.

Where do the Chatbot Conversations appear in aNinja

Integrating your Chatbot with your website creates a new lead in your aNinja account after each conversation, with the lead data captured in the conversation.

You can see these conversations:

  • In your Inbox. Just select “Chatbot” from the All types drop down.
  • And in your Dashboard widget “Chatbot Conversations”. If you can’t see this widget, just enable it from the little gear on the top right of the dashboard.

If the lead closed the chatbot conversation before your reply, your message will appear in a bubble next to the chatbot on the website:

Chatbot behavior

The chatbot pop-up gets triggered only for the first user visit to your site. It doesn’t automatically re-pop up on their subsequent visits, mainly because it gets annoying for repeat users. However, they can see that it’s in the bottom right section.

We can customize the below Chatbot behaviors:

  • Exposing the Chatbot initial greeting on every visit
  • Hiding the initial greeting message on page load
  • Delay showing the Chatbot widget for a number of seconds
  • Customizing widget container style to fit on the load page

Send us your request to support@aninja.com and we will implement the changes for you.

Adding aNinja Chatbot to Squarespace Website

Adding aNinja Chatbot to Squarespace Website can be done by using a simple Javascript code. Which is the aNinja Chatbot Embed Code.

Find your aNinja Chatbot Embed Code in your aNinja install before getting started.

Adding aNinja Chatbot to Squarespace Website

You can do this yourself or give this code to your developer.

  • In the “Home Menu“, click “Settings
  • Then hit  “Advanced
  • Click “Code Injection
  • Add the aNinja Chatbot embed code into the appropriate Code Injection fields for the footer.
  • After adding your code, click on the “Save” button.

Custom code doesn’t appear

Custom code may not appear for a few reasons:

  • You’re logged in – As a security measure, code in a code block may not appear for you when you’re logged in, even if visitors can see it. This happens when you try to view embedded JavaScript over a secure connection (https://). To test this, visit your site in an incognito browser.
  • The code is on an index page – Your code might not render if you’ve added it to a page within an index. To test this, remove the page from the index within the Pages panel, then visit your site in an incognito browser.

If the code still isn’t working, reach out to support@aninja.com.

Where do the Chatbot Conversations appear in aNinja

Now that you’ve added your Chatbot to your website, as a result, after every chatbot conversation, a new lead is created into your aNinja account with the info captured in the conversation.

If the lead closed the chatbot conversation before your reply, your message will appear in a bubble next to the chatbot on the website:

You can see these conversations:

  • In your inbox. Just select “Chatbot” from the All types drop down.
  • And in your Dashboard widget “Chatbot Conversations”. If you can’t see this widget, just enable it from the little gear on the top right of the dashboard.

Chatbot behavior

The chatbot pop-up gets triggered only for the first user visit to your site. It doesn’t automatically re-pop up on their subsequent visits, mainly because it gets annoying for repeat users. However, they can see that it’s in the bottom right section.

We can customize the following Chatbot behaviors:

  • Exposing the Chatbot initial greeting on every visit
  • Hiding the initial greeting message on page load
  • Delay showing the Chatbot widget for a number of seconds
  • Customizing widget container style to fit on the load page

Send us your request to support@aninja.com and we will implement the changes for you.

Adding aNinja Chatbot to Wix Website

Below are the steps for adding aNinja Chatbot into a Wix Website by using a simple Javascript code.

Find your Chatbot embed code, you’re going to use it for the integration.

Adding aNinja Chatbot to a Wix Website

You can do this yourself or give this code to your developer.

  1. On your Wix Website, go to Dashboard > Settings
  2. Click the Custom Code tab in the Advanced section.
  3. Then hit + Add Custom Code at the top right.
  4. Paste the aNinja Chatbot Embed code snippet in the text box.
  5. Enter a name for your code.
    Tip: Give it a name that is easy to recognize so you can quickly identify it later.
  6. Here, select an option under Add Code to Pages:
    • All pages: This adds the Chatbot’s code to all of your site’s pages, including any new pages that you create in the future. Choose whether to load the Chatbot only once per visit or on each page your visitor opens.
    • Choose specific pages: Use the drop-down menu to select the relevant pages.
  7. Specify where to place your code under Place Code in:
    • Head
    • Body – start
    • Body – end
  8. Lastly, click Apply.

Your Chatbot is now embedded into your website. As a result, a new lead is created into your aNinja account after every chatbot conversation.

Where do the Chatbot Conversations appear in aNinja

Now that you’ve added your Chatbot to your website, as a result, after every chatbot conversation, a new lead is created into your aNinja account with the info captured in the conversation.

If the lead closed the chatbot conversation before your reply, your message will appear in a bubble next to the chatbot on the website:

You can see these conversations:

  • In your inbox. Just select “Chatbot” from the All types dropdown.
  • And in your Dashboard widget “Chatbot Conversations”. If you can’t see this widget, just enable it from the little gear on the top right of the dashboard.

Chatbot behavior

The chatbot pop-up gets triggered only for the first user visit to your site. It doesn’t automatically re-pop up on their subsequent visits, mainly because it gets annoying for repeat users. However, they can see that it’s in the bottom right section.

We can customize the following Chatbot behaviors:

  • Exposing the Chatbot initial greeting on every visit
  • Hiding the initial greeting message on page load
  • Delay showing the Chatbot widget for a number of seconds
  • Customizing widget container style to fit on the load page

Send us your request to support@aninja.com and we will implement the changes for you.

Using Bootstrap design for aNinja forms

Bootstrap is a CSS library that you use to create modern websites and web apps. It’s open-source and free to use, yet features numerous HTML and CSS templates for UI interface elements such as buttons and forms. Bootstrap also supports JavaScript extensions. It is used for developing responsive websites.

In aNinja, Bootstrap is used to give aNinja forms a nice-looking design when embed on the website.

However, when embedding aNinja’s forms on your website, it might overwrite the Bootstrap used there.

The Form embed code for the Website

After creating your aNinja form, it generates a Javascript code that you need to embed your aNinja form on your website. It looks like this:

<script id=”aninja-form-1″ data-aninjaform=”true” data-skip_bootstrap=”false” charset=”utf-8″ type=”text/javascript” src=”https://aninja.com/forms/widgets/w1.js?v=”></script><script>aNinja.forms.create({ant:”demo”,form_id:”1″});</script>

We’ve added a data attribute inside this code that enables you to either include or skip Bootstrap design in the form.

Setting the Bootstrap design

  • If you set the Bootstrap design to False, then it excludes aNinja’s Bootstrap design in the form. This allows the website embedding the script to use the Bootstrap design used there, and it doesn’t get overridden. However, if there’s no Bootstrap design used in the website, then the form design will be off, as there won’t be any styling.
  • If you set the Bootstrap design to True, then it uses aNinja’s Bootstrap design and overwrites the one used on the website.
  • Now that you’ve decided whether to include or skip Bootstrap design; just copy the Javascript code and paste it on your website to post your aNinja form there.

If you need any assistance with this, just leave us an email at support@aninja.com. Our Support team will happily assist you!

Building your aNinja Chatbot Playbook

Building your aNinja Chatbot Playbook is an easy yet tricky thing to do. Our team is available to assist you with building it.

Let’s have an overview of a Chatbot.

What’s a Chatbot

A Chatbot is a live chat program that you can embed on your website. It answers the website visitor’s simple questions. A lead is added to your aNinja account with every chatbot conversation.

The conversations in the Chatbot take the form of questions & answers. You define the questions according to the frequently asked questions about your website. You can also choose to show a brief introduction and guidance on your website. All this is defined in the chatbot playbook.

We recommend that you write down the sequence of the questions before you start to create the steps in the playbook.

Creating a Chatbot in aNinja

Creating the steps of the Playbook

  • From the left sidebar, go to Marketing > Chat Bots
  • On the right side next to the chatbot name, click on Edit Playbook.
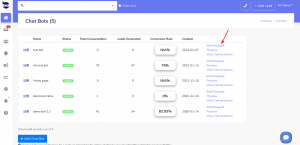
  • Toolbar options:
    • Manage Step Templates: This is where you create the steps of the playbook.
    • Preview the steps created to test how the playbook runs.
    • Save the Layout every time you add a step.
    • Reset the Layout: This resets the design of the Layout to default (in case you dragged and relocated steps).

Note!

If you hit Reset the Layout without saving your changes, it will be reset to the last step saved.
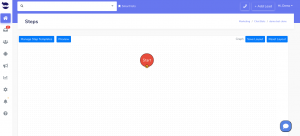
Managing the step templates

  • On the right side next to the chatbot name, click on Edit Playbook.
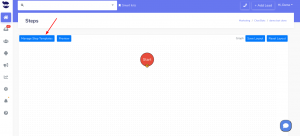
  • Choose “Manage Step Templates“. Here you create all the steps of the playbook to be used in the layout.
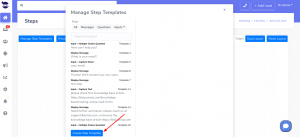
  • Click “Create Step Template” to create a step.
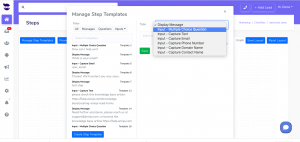
  • Types of step templates:
    • The display messages: Type a message to link it to a step in the playbook.
    • The Inputs is a field where the user enters his answer to the chatbot question, which could be a text, an email, a phone number, a domain name, or a contact name.
      • Questions are considered Inputs as we expect an input or reply from the user.
      • The questions can have one or multiple choice answers.
Example:

  • Message:

Hello, My name is bot.

  • Input – Multiple choice question:

How can I help you?

– Need a CRM

– Technical question

– Contact Support

  • Input – Capture Email: Chatbot doesn’t execute the step linked to this input before the user enters a valid email address.

Building the Layout / Graph

To access the layout, click “Edit Playbook” from the right side next to the chatbot name.

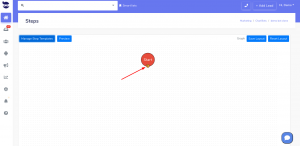
  • The Start button indicates the beginning of the playbook.
  • To add a step, click on the + plus sign.
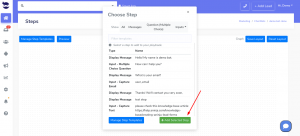
  • Choose a step template and +Add Selected Step.
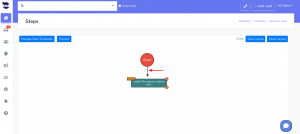
  • The added step will show in the layout linked by an arrow to the previous step.
  • Keep on adding the steps to the playbook according to the sequence you want the conversation to follow.
  • You can drag the steps to relocate them for a better view of the layout.
  • To delete a step, click on the X that’s on its border.
    • If a step is deleted, the steps linked to it will remain in the graph. You can either link them to any step in the layout or delete them.
  • To change a step in the Layout, click on “change” that’s on its border.
    • You can only change a step with a similar type (change message with a message type).
  • In the Layout, to link steps to each other, hover over the step you want to link. When the little white cross appears, drag it towards the step you want. Then, an arrow links the 2 steps together.
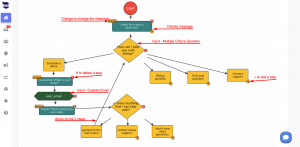
  • We recommend you Save the Layout after each step you add to prevent losing the changes.

Previewing the Chatbot

  • Click on Preview from the toolbar to test the playbook.
  • It will open a new page. Click on “clear cache and reload” to reset the chatbot in case you have tested it before.
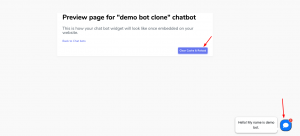
  • The chatbot icon starts running the steps created in the playbook.
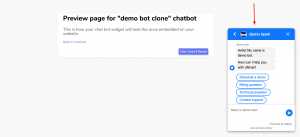
  • Click on “back to chat bot” to leave this page.

When the playbook is tested and approved to go live, you can embed the chatbot on your website.

Where do the Chatbot Conversations appear in aNinja

After adding the Chatbot that you created in aNinja to your website, as a result, after every chatbot conversation, a new lead is created into your aNinja account with the info captured in the conversation.

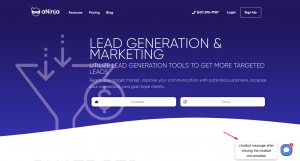
If the lead closed the chatbot conversation before your reply, your message will appear in a bubble next to the chatbot on the website:
You can see these conversations:

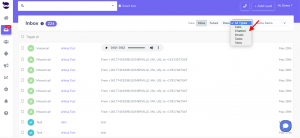
  • In your inbox. Just select Chatbot from the All types drop down.
  • And in your Dashboard widget “Chatbot Conversations”. If you can’t see this widget, just enable it from the little gear on the top right of the dashboard.

Chatbot behavior

The chatbot pop-up gets triggered only for the first user visit to your site. It doesn’t automatically re-pop up on their subsequent visits, mainly because it gets annoying for repeat users. However, they can see that it’s in the bottom right section.

We can customize the following Chatbot behaviors:

  • Exposing the Chatbot initial greeting on every visit
  • Hiding the initial greeting message on page load
  • Delay showing the Chatbot widget for a number of seconds
  • Customizing widget container style to fit on the load page

Send us your request to support@aninja.com and we will implement the changes for you.
aNinja keys & codes

In aNinja, you have private keys and codes that you use for your integrations.

It’s important to know your aNinja keys & codes, know how to use them, and where to find them in your aNinja install.

aNinja Keys & Codes

Find your aNinja Forms Embed Code

Find your aNinja Forms Embed Code. You need this code to embed the forms that you’ve created in aNinja on the website.

Find your aNinja Forms Embed Code

  • On the left sidebar, click on Marketing > Forms
  • Select and copy the Embed Code For WebsiteFind your aNinja Forms Embed Code
  • We’ve added a data attribute inside this code that allows you to manage the Bootstrap design in the form. Set it to True or False to either skip or include the Bootstrap design in the form.
  • Paste this Javascript code on your website to add the aNinja form.
  • If you need assistance with embedding your aNinja form on your website, just leave us an email at support@aninja.com. Our Support team will happily assist you!