Connect your Microsoft Office 365 (Hotmail) with aNinja

Connect your Microsoft Office 365 – Outlook (Hotmail) with aNinja to start sending emails to your leads.

Office 365 email integration with aNinja allows you to use your Hotmail account in aNinja app to send, receive, and view all the email interactions in parallel with your email client.

To secure your email account, and for the integration with aNinja to work, you want to create an App Password.

When connecting your Hotmail account with aNinja, it’s important to complete the 2 steps for your email to sync correctly.

Connect your Microsoft Office 365 (Hotmail) with aNinja

Before you go ahead and connect your Microsoft Office 365 email with aNinja, make sure to enable the two-step verification and generate an app password.

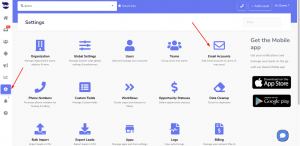
  • On the left sidebar, click on Settings > Email Accounts
  • If you already have an email account saved in aNinja, and want to complete the authorization, click on the edit pen next to the email. Then go to step 2 —> Connect/Re-auth.
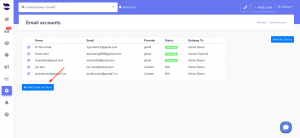
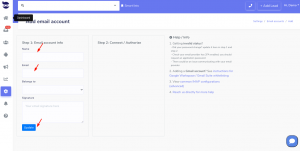
  • Otherwise, go ahead and create an email account. Click Add Email Account
Step 1
  • Fill in the following fields: Name and Emailconnect your email with aNinja
  • And hit Update
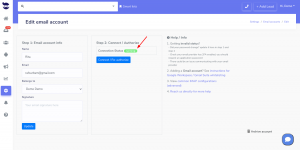
Step 2
  • Click Connect / Re-auth

Connect your Gmail with aNinja

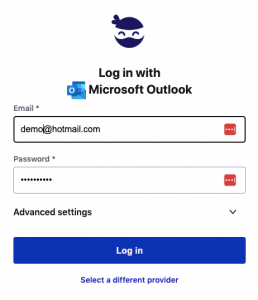
  • Enter the app password that you generated for aNinja, and hit Login.

Connect your Microsoft Outlook (Hotmail) with aNinja

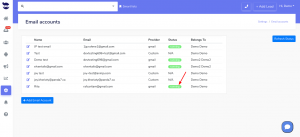
  • Once set up, your Email account would show up running under the status.Connect your Microsoft Outlook (Hotmail) with aNinja

You can also connect your email using IMAP settings

Note! It is very important to complete the 2 steps for the email to sync correctly.

Unable to authorize the Microsoft Office 365 account 

The error Unable to Authorize Microsoft/Office365 account may occur when an account has an issue with the connected mailbox.

Instructions on how to resolve this problem.

After which please restart your authentication flow in aNinja.


Connect your Gmail with aNinja

Connect your Gmail with aNinja to start sending emails to your leads. It’s important to complete the 2 steps of the authorization for your email to sync properly.

Connect your Gmail with aNinja

  • On the left sidebar, click on Settings > Email Accounts
  • If you already have an email account saved and want to complete the authorization, click on the edit pen next to the email. Then go to step 2 —> Connect/Re-auth.
  • Otherwise, go ahead and create an email account. Click Add Email Account
Step 1
  • Fill in the following fields: Name and Emailconnect your email with aNinja
  • And hit save
Step 2
  • For Google Workspace, it’s required to whitelist aNinja before you continue.
  • Click Connect / Re-auth

Connect your Gmail with aNinja

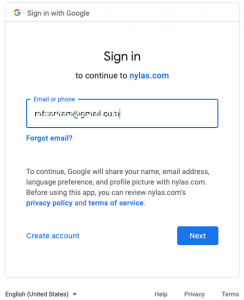
  • Enter your email then hit NextConnect your Gmail with aNinja
  • Enter your password then hit Next
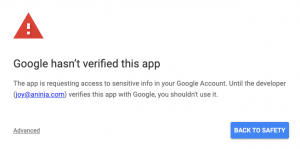
  • You will receive a security message “Google hasn’t verified this app”
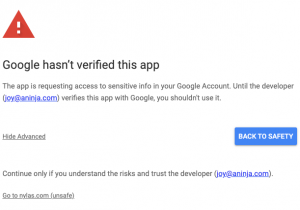
  • Click AdvancedConnect your Gmail with aNinja
  • Then hit “Go to Security Nylas (unsafe)”Connect your Gmail with aNinja
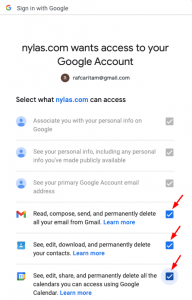
  • Toggle all the checkboxes to allow Nylas to access your Google accountConnect your Gmail with aNinja
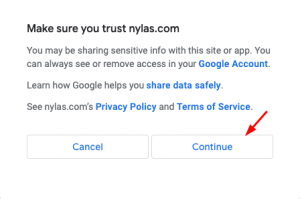
  • Lastly, click “Continue”Connect your Gmail with aNinja
  • Once set up, your Gmail account would show up running under the status.

Note! It is very important to complete the 2 steps for the email to sync properly.

Enabling IMAP in AOL mail

Enabling IMAP in AOL mail allows you to use IMAP (Internet Message Access Protocol) to sync your AOL Mail into aNinja app.

Overview of IMAP protocol

IMAP allows us to sync aNinja and your account to keep the information in both places identical. This means that anything you do with messages or folders in your account at mail.aol.com will also occur in the app (and vice versa).

Below are the IMAP server settings you’ll need to use for AOL Mail and links to common email app setup instructions.

Incoming mail server (IMAP): imap.aol.com

Outgoing mail server (STMP): stmp.aol.com

Enabling IMAP in AOL mail

Please follow these steps to enable IMAP in AOL mail:

Check that IMAP is turned on
  1. Sign in to your AOL account information page.
  2. Click Account Security
  3. Turn on “Allow apps that use less secure sign in”
IMAP/SMTP password in AOL mail

Follow these steps only if you have 2-Step-Verification enabled.

  1. Go to the Account security page.
  2. If prompted, sign in to your account.
  3. Click Generate App Password
  4. Then, click Genetate
  5. Use the generated password which is being displayed both in IMAP and SMTP section, in your email account settings in Hotter.

Syncing your Godaddy email into aNinja

Syncing your Godaddy email into aNinja automatically syncs all email communication between you and any contact in aNinja.

Once your GoDaddy email is linked to your aNinja account, you can easily send, receive and check messages directly from your aNinja account.

You can also use aNinja features to automate your emails and target your leads with your best campaigns and sequences.

In this article, we’re going to show you the steps to syncing your Godaddy email into aNinja.

1- Enable and enforce MFA

First, please click this link to enable and enforce MFA

https://www.godaddy.com/help/enable-or-disable-multi-factor-authentication-32039

2- Create an App password

Now, the App Password option will show-up at the top of the page when you follow here these steps:
https://www.godaddy.com/help/create-app-passwords-40980

Syncing your Godaddy email into aNinja

3- Add the App password

Lastly, choose “Add method” to add the App password.

Note: After that, please wait 1-24 hours of the propagation time (this is a Godaddy constraint).

As a result, you are now able to send automations to your leads and target them with your email sequences.

Have any specific questions on the syncing process? Please leave us an email to the Support team at support@aninja.com. We’re always happy to assist you!

Generating an App password for Office365

In this article, we show you how generating an App password for Office365 can be done.

You want to enable the two-step verification before you move forward and create an app password.

Create an App Password to secure your Office 365 email account, and for the integration with aNinja to work.

Overview of the app passwords

App passwords are created for each MFA-enabled account to allow signing in to non-browser applications.

In which case you are unable to use additional security verification methods, such as providing a code sent via a text message or approving a notification through the Microsoft Authenticator app.

Those passwords don’t expire, and you can use them in different programs at the same time.

Enabling Two-Step verification

To be able to generate an app password, you want to enable two-step verification first.

  • Login to https://login.live.com
  • Then, go to “Advanced Security Options
  • Here, make sure you enable “Two-Step verification” under Additional Security.
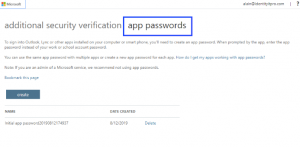
  • Once you’ve completed step 3, then, you’ll see an “App passwords section” on the Additional security page at the bottom. This allows you to create a new app password.

Creating the App Password in the Office 365 Admin Center

  • Sign in to your user account.
  • Go to Admin Center by clicking the Admin icon in the Apps launcher.
  • Then, go to your account and select ‘My Account.
  • And select ‘Security & privacy.’
  • Click ‘Additional security verification.’
    • Note: You’ll see this option only when your admin has set up multi-factor authentication for your account.
  • Hit App Passwords
  • And click Create.

  • Here, type the name of the app that requires the app password (aNinja) and select Next.
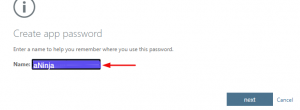
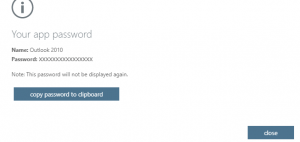
  • Now, an app password is created successfully. Hit ‘copy password to clipboard

  • Lastly, go to the aNinja application and use this app password to login into your Office account and complete the integration.

Enabling App Passwords at your Office365 Organization level

Enabling the App password for Office365 is giving permission to an app to access your Office365 account. After you generate an app password, enable it at your Office365 Organization level.

If you can’t see app passwords at your user level, so, they might be disabled at your office365 organization level.

However, your administrator can expose them following these steps:

  • Go to https://admin.microsoft.com/
  • Then, go to Users > Active Users
  • And, choose “Multi-factor Authentication” in the table options (above the table of users).
  • Lastly, choose “Service Settings” (in the top menu) and choose “Allow users to create app passwords“.

Changing your Office 365 app password

  • Click My Account.
  • Then, hit Security and Privacy menu to the left or the Manage Security and Privacy link on the main area of the page.
  • Choose Additional Security Verification.
  • And click Create and manage app passwords.
  • Lastly, create yourself an additional app password and give it a description.

Unable to authorize the Microsoft Office 365 account

The error Unable to Authorize Microsoft/Office365 account may occur when an account has an issue with the connected mailbox.

Instructions on how to resolve this problem.

After which please restart your authentication flow in aNinja.

Need help with generating an App password for Office365? Please leave us an email at support@aninja.com. We will happily assist you!