Connect your Gmail with aNinja

Connect your Gmail with aNinja to start sending emails to your leads. It’s important to complete the 2 steps of the authorization for your email to sync properly.

Connect your Gmail with aNinja

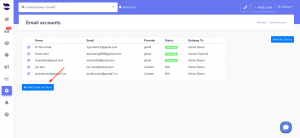
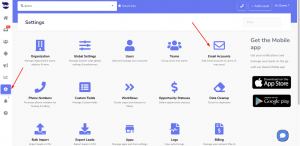
  • On the left sidebar, click on Settings > Email Accounts
  • If you already have an email account saved and want to complete the authorization, click on the edit pen next to the email. Then go to step 2 —> Connect/Re-auth.
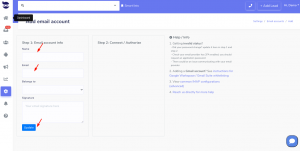
  • Otherwise, go ahead and create an email account. Click Add Email Account
Step 1
  • Fill in the following fields: Name and Emailconnect your email with aNinja
  • And hit save
Step 2
  • For Google Workspace, it’s required to whitelist aNinja before you continue.
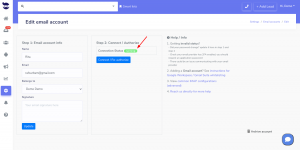
  • Click Connect / Re-auth

Connect your Gmail with aNinja

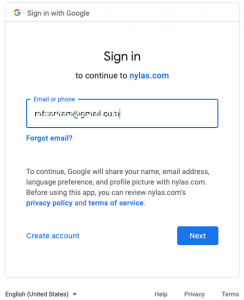
  • Enter your email then hit NextConnect your Gmail with aNinja
  • Enter your password then hit Next
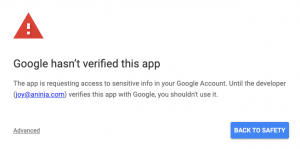
  • You will receive a security message “Google hasn’t verified this app”
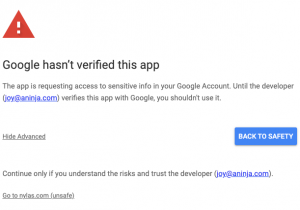
  • Click AdvancedConnect your Gmail with aNinja
  • Then hit “Go to Security Nylas (unsafe)”Connect your Gmail with aNinja
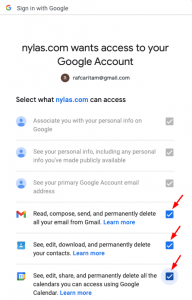
  • Toggle all the checkboxes to allow Nylas to access your Google accountConnect your Gmail with aNinja
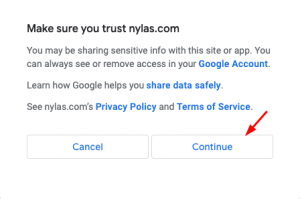
  • Lastly, click “Continue”Connect your Gmail with aNinja
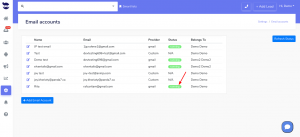
  • Once set up, your Gmail account would show up running under the status.

Note! It is very important to complete the 2 steps for the email to sync properly.

Email-sending limit

Every email server has an Email-sending limit and it predefines how many messages it allows you to send each day.

aNinja was designed to make sending and receiving Emails easy, using your Email server.

Through aNinja, you can send a bulk email sequence to all your leads, or a group of leads that you pull out using a Smartlist.

Bulk Email sequences stopped sending out

When you’ve reached the daily Email-sending limit allowed by your Email server, it stops sending Emails from your account.

The daily sending limits of the different Email service providers

Godaddy Workspace

500 SMTP relays per day

GSuite

10,000 sent Email messages per 24-hour period. However, this can be lower if your Google Workspace account is still in a trial-like period.

Gmail

2,000 sent Email messages per day

Office 365 / Outlook

Daily recipients: 5,000

Maximum recipients per message: 500

What to do to send a large bulk of Emails

The best recommendation would be to connect aNinja with a Transactional Email service provider (such as Sendgrid). You’ll then be able to send 10K to 1M+ eventually Emails without affecting your Email provider.

Moreover, Sendgrid adds Unsubscribe links to the Emails you send through it. It also tracks spam scores and notifies you.

SendGrid is usually used to send out bulk email sequences and it works well with aNinja.

Connecting Sendgrid with aNinja

To connect Sendgrid with aNinja:

  • Create a Sendgrid account (so you get an API key that we place in aNinja). You can start with a free tier or their basic tier.
  • Authenticate your outgoing domain DNS (we can assist with this).

Please let us know if you’d like to Integrate with Sendgrid. Leave us an email at support@aninja.com. We’re more than happy to assist you!

Creating Leads in aNinja

In aNinja, creating leads can be done in several ways.

A growing database of leads means more potential engagement. So import your leads from different sources and keep them engaged with newsletters and product or service updates.

Creating leads in aNinja

In aNinja, you can create leads in multiple ways:

  1. Manually one at a time.
  2. Importing Leads in Bulk using CSV file.
  3. Third-party Integration using aNinja API (including Chatbot conversations, form submissions, and website integration).
  4. Importing leads from your Phone Contacts.
  5. Importing leads from your Gmail account.
  6. Creating leads using BCC email address.
  7. Generating a lead from incoming SMS.

1- Creating Leads manually

  • First, log in to your aNinja account.
  • Then, on the top right, click on + add lead

2- Importing leads from a CSV file

Another way to add leads to your aNinja account is importing contacts in a CSV or XLSX file directly to your aNinja account.

3- Third-party integration using aNinja API

In simple words, API is a set of functions that allow applications to interact with each other by exchanging data.

Basically, you can forward leads from your different marketplaces into your aNinja app using API.

  • Here, you need your aNinja API key for the integration.
  • After the integration, you start receiving leads in your aNinja account from the different integration channels, including Chatbot conversations, Form submissions, and website integration.

4- Importing contacts from your Gmail account

Importing contacts from your Gmail account is another way to expand your leads database.

5- Importing your Phone contacts

You can also get your phone contacts to your aNinja account.

6- Creating new leads using BCC email

By BCC’ing your private BCC email address, the system automatically creates new leads from the recipients.

After all, you want to get all your leads into one place to target them with your sales and marketing strategies.

7- Generating a lead from incoming SMS

This is a basic function in aNinja that generates a lead from an incoming SMS, if the phone number is not already saved in the system.

However, this practice is not available for incoming emails. So if the sender’s email is not saved in your system, you will not be able to see the email in aNinja. But it still shows in your email client (Gmail, Outlook, etc…).

Search for more help articles in aNinja Knowledge base.

Or reach us at support@aninja.com. Our support team will happily assist you.
Gmail/Google Workspace email Setup With aNinja

Gmail/Google Workspace email setup with aNinja requires whitelisting aNinja to allow it to run in your systems.

Gsuite (aka Google Workspace) is supported. So, you must be the administrator of your Gsuite / Google Workspace account to enable “whitelisting”.

Enabling Whitelisting

The goal of having a whitelist is to protect a private network and its devices from outside attacks. Whitelisting aNinja means allowing it to run on your systems.

  • Then, click on Configure new app dropdown. And choose OAuth App Name Or Client ID

Gmail Setup With aNinja

  • Here, search for “Acquisition Ninja”

Gmail Setup With aNinja

Gmail Setup With aNinja

  • Then, hit Select to Enable

  • Lastly, mark as trusted

Gmail Setup With aNinja

Gmail Setup With aNinja

Once done with Gmail setup with aNinja, please follow the instructions here to connect your Gmail with Aninja.

Connect your Email with aNinja

Connect your email with aNinja to start sending email sequences to your leads.

It’s important to complete the 2 steps of the authorization for your email to sync properly.

Connect your email with aNinja

  • On the left sidebar, click on Settings > Email Accounts
  • If you already have an email account saved and want to complete the authorization, click on the edit pen next to the email. Then, go to step 2 —> Connect/Re-auth.
  • Otherwise, go ahead and create an email account. Click Add Email Account
Step 1
  • Fill in the following fields: Name and Email
  • And hit Update
Step 2
  • Click Connect / Re-auth

Connect your email with aNinja

Note! It is important to complete the 2 steps for the email to sync properly.
Data Import/Export from Phone or Gmail

In this article, we show you how the Data Import/Export from Phone or Gmail can be done.

aNinja allows you to inject your phone and Gmail contacts into your aNinja account to create more leads and expand your database.

Exporting phone contacts 

  • Open the Contacts app.
  • And tap the three-line menu icon in the top left corner.
  • Then choose Settings.
  • Hit Export under Manage Contacts.
  • And select every account to ensure you export every contact on your phone.
  • Lastly, tap Export to VCF file.

Importing phone contacts into aNinja

  • Send us the VCF file. We will handle importing your contacts from our side.

Exporting Gmail contacts

Here are the simple steps you can follow to export your Gmail contact and import them into aNinja:

  1. Log into the Gmail account you want to export from.
  2. Point your Browser URL to: https://contacts.google.com
  3. In the left sidebar click on “More” (to expand it).
  4. Click Export.
  5. Select a group of contacts or all.
  6. Select the “Outlook CSV” format.
  7. Click Export.

Importing Gmail contacts into aNinja

  • Send us the CSV file. We will handle importing and deduping from our side! 

Note: these are the guidelines, they can change from Android/iOS phone device version to the other.

Where does the imported data appear

After the integration, you can search your aNinja CRM for the imported leads. You can also search for any custom field, opportunities, and any other info that you have imported.

  • Lead’s contacts appear in the leads contacts section in the lead view
  • Opportunities also appear in the opportunity section in the lead view
  • The company’s info appears on the top left of the lead view, in the Company section.
  • Custom fields appear in the custom field section of the lead view
  • Lead Search is a field that also appears in the bottom left of the lead view. Specifically, these are info/links on the lead or the organization found in Google search.

Need help with the data Import/Export from Phone or Gmail? Leave us an email at support@aninja.com. We will happily assist you!