Adding aNinja Form to Squarespace Website

After creating your form in aNinja, adding it to your Squarespace Website becomes easy with the use of the aNinja Form Embed Code.

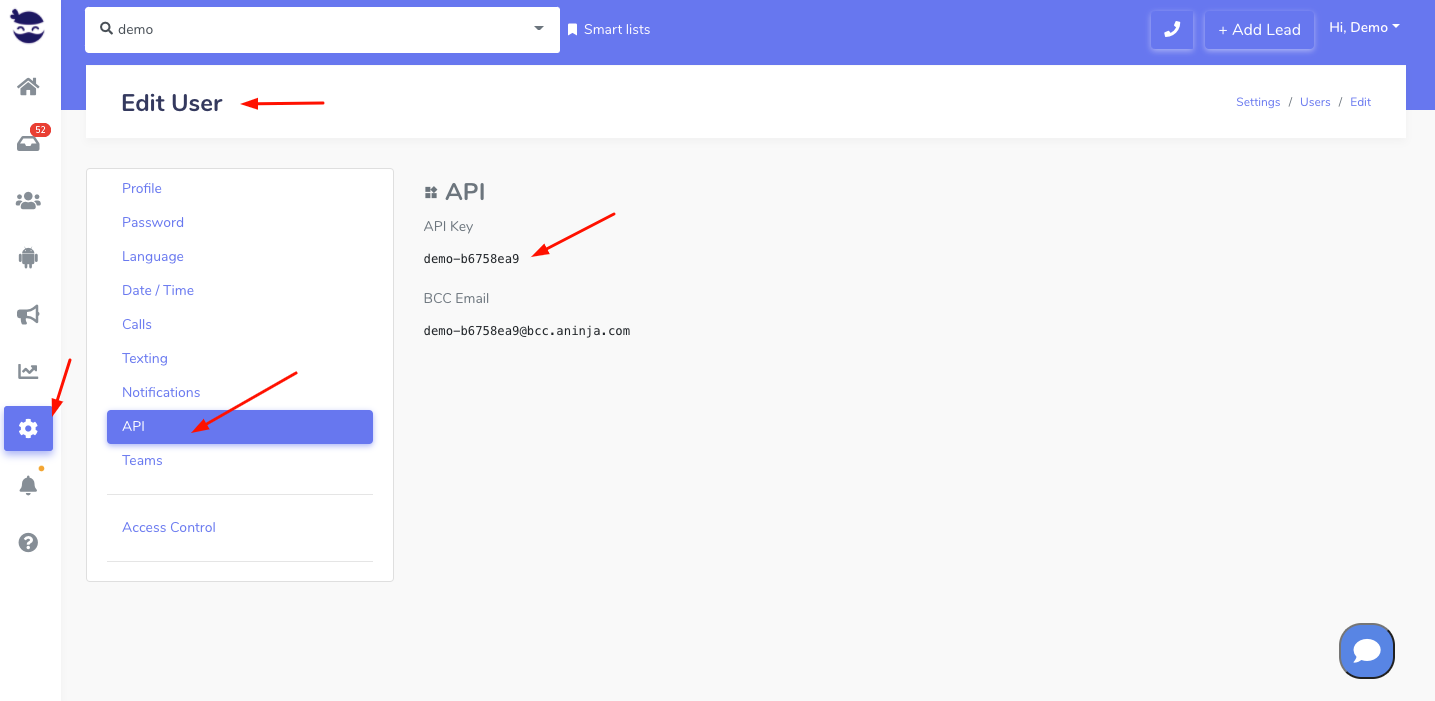
Find your aNinja Form Embed Code in your aNinja install before getting started.

Adding aNinja Form to Squarespace Website

You can do this yourself or give this code to your developer.
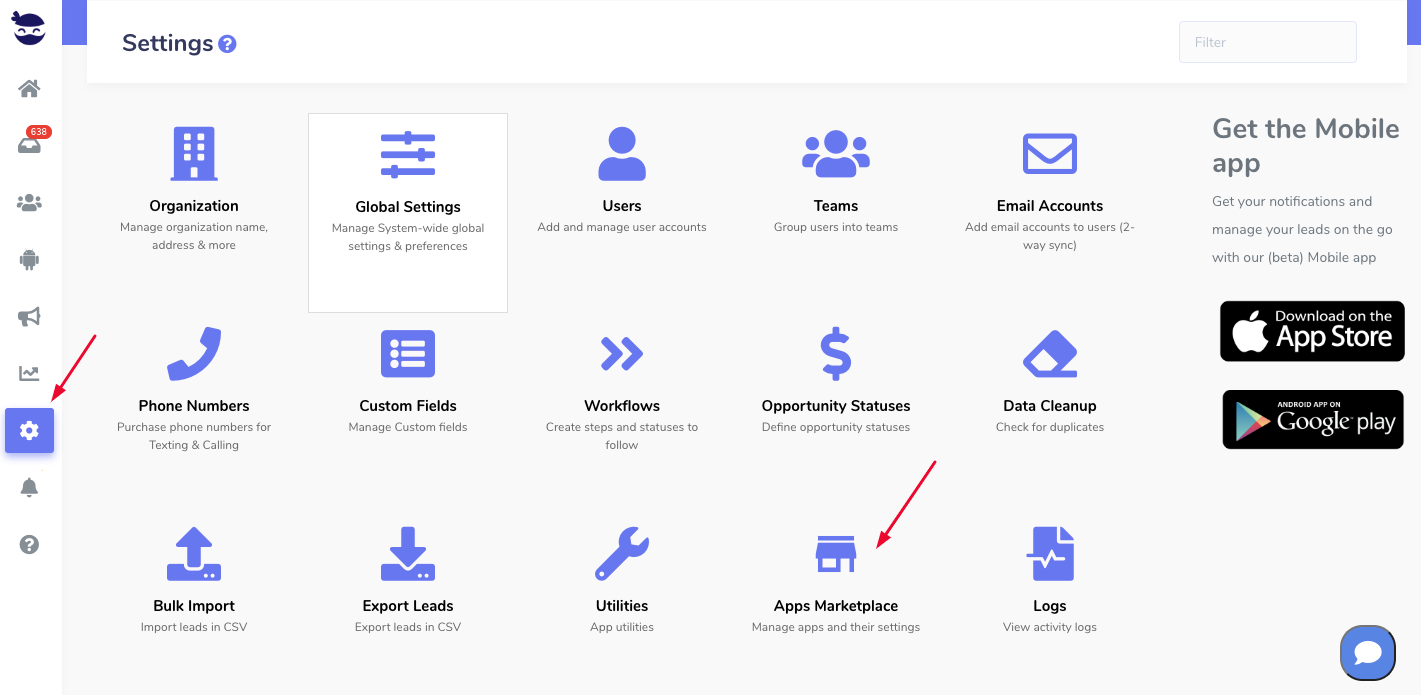
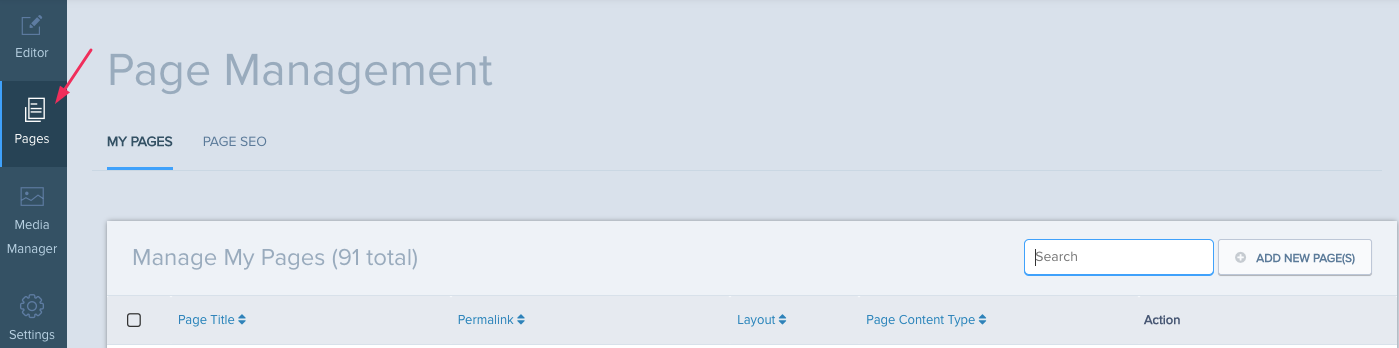
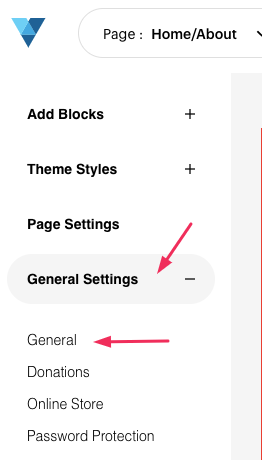
  • In the “Home Menu“, click “Pages
  • Locate the contact us page on the top toolbar.
  • Scroll down to the section where you want to add the contact form and click Edit
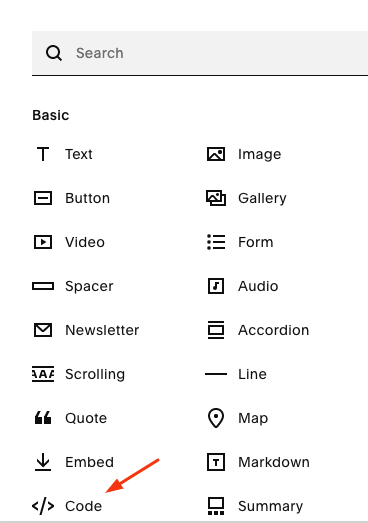
  • Then hit the + sign
  • And choose Code

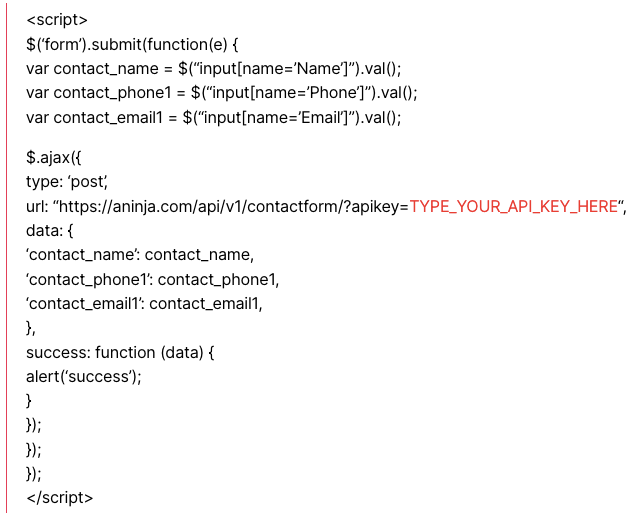
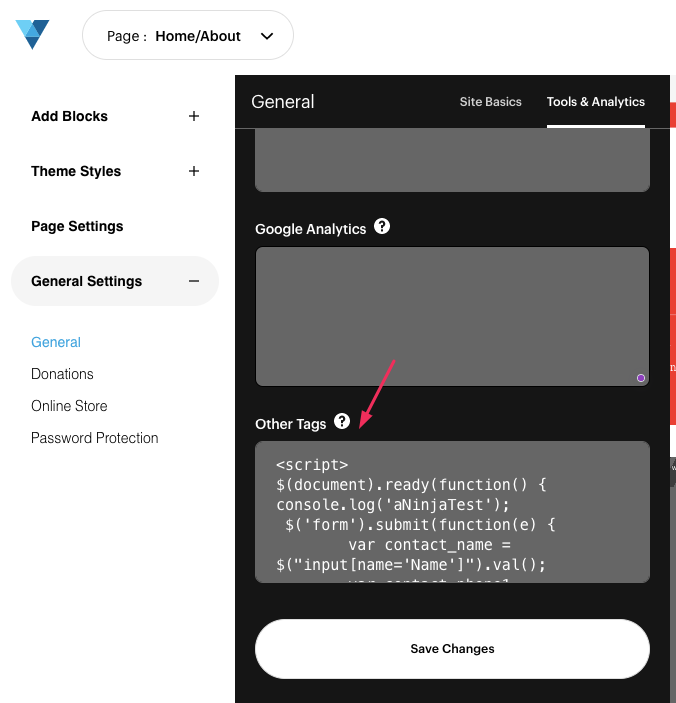
  • Replace “hello world” by your Form Embed code.
  • You might not be able to see the form in the edit mode – it says “Script disabled”.
  • Just go to your website to see and test the form.

Where does the imported data appear

After the integration, you can search your aNinja CRM for the imported leads. You can also search for any custom field, opportunities, and any other info that you have imported.

  • Lead contacts appear in the leads contact section in the lead view
  • Opportunities also appear in the opportunity section in the lead view
  • The company’s info appears on the top left of the lead view, in the Company section.
  • Custom fields appear in the custom field section of the lead view.
  • Lead Search is a field that also appears in the bottom left of the lead view. Specifically, these are info/links on the lead or the organization found in Google search.

Send us your request to support@aninja.com and we will happily assist.

Integrating Wild Apricot forms with aNinja

Integrating Wild Apricot forms with aNinja involves capturing lead data from the Wild Apricot form immediately after form submission and forwarding it to aNinja.

This can be done using Webhooks, which are automated messages sent from one application to another.

Here is a step-by-step guide to integrating Wild Apricot forms with aNinja using Webhooks:

Set up a Webhook in Wild Apricot

This involves creating a custom Webhook that sends the lead data to the custom endpoint URL in aNinja.

To add a webhook to your Wild Apricot account, follow these steps:

  • First, log in to your Wild Apricot account
  • On the left sidebar, click the Settings menu
  • And, select the Webhooks option (under Integration).
    • If you can’t see Integration under Settings, check under Apps.

  • On the Webhooks screen, click Add webhook.

  • After that, on the screen that appears, enter a title for your webhook, and paste the following URL.
  • TODO ADD URL

Authorization settings

Within the Authorization settings, click on “None”. No authorization credentials will be included in the call request.

Notification type(s)

Within the Notification type(s) section, choose the kinds of changes that will trigger notifications to be sent to the external service.

The table below lists the changes that will trigger notifications for each notification type.

Type
Triggers
Contact
  • Any change to any tab of the contact details for any contact
  • Any change to common field settings
Event Any change to event settings except:

  • Changes to registration form and types
  • Changes to event email settings or templates
Event registration Any change to event registration details for any registrant, including:

  • New registration
  • Canceled registration
  • RSVP response
Invoice Any change to any invoice, including:

  • New invoice
  • Modified invoice
  • Deleted invoice
  • Voided invoice
Logged email
  • An email is added to the email log
Membership
  • Any change to the membership settings for any member
  • Any change to membership field settings
  • Changes to membership level settings will not trigger notification
Membership level
  • Any change to settings for an existing membership level
  • New level created
  • Existing level deleted
Membership renewal
  • Existing membership renewed
Payment Any change to any payment, including:

  • New payment
  • Adjusted payment
  • Canceled payment
Refund Any change to any refund, including:

  • New refund
  • Adjusted refund
  • Canceled refund


Test the webhook
  • To test your webhook, click the Test webhook button within the Test your webhook section.
  • Once the test is complete, the test call status will be displayed. You can then click the View details link to view the test call request and response.
  • Once you are ready to enable your webhook, click the Allow webhook toggle so that it appears blue.

  • Lastly, click the Save button to save your changes and enable your webhook.

Where does the imported data appear

After the integration, you can search your aNinja CRM for the imported leads. You can also search for any custom field, opportunities, and any other info that you have imported.

  • Lead’s contact appear in the leads contact section in the lead view
  • Opportunities also appear in the opportunity section in the lead view
  • The company’s info appears on the top left of the lead view, in the Company section.
  • Custom fields appear in the custom field section of the lead view as well.
  • Lead Search is a field that also appears in the bottom left of the lead view. Specifically, these are info/links on the lead or the organization found in Google search.

Need help in integrating Wild Apricot forms with aNinja? Leave us an email at support@aninja.com. And, we will happily assist you!

Integrating “Forminator pro” forms with aNinja using Javascript code

Integrating “Forminator pro” forms with aNinja allows you to push leads data to aNinja with every form submission.

In this article we’re using a Javascript code for the integration.

Integrating Forminator pro with aNinja

To add a custom JavaScript field to your Forminator pro form, follow these steps:

  • Log in to your WordPress site
  • And navigate to the Forminator Pro plugin.
  • In the Forminator Pro dashboard, select the form that you want to integrate with aNinja.
  • Then, in the form builder, click on the “Custom HTML/JS” field to add it to your form.
  • Once the field is added, click on the “Edit HTML” button to open the HTML editor.
  • And add your JavaScript code in the editor.

Here’s an example – you want to map the form fields to aNinja fileds (see fields mapping section below)

<script>

$ = jQuery;

$(document).ready(function() {

$(‘body’).on(‘submit’, ‘#forminator-module-5704‘, function (e) {

       var contact_name = $(“input[name=’name-1′]”).val();

       var contact_email1 = $(“input[name=’email-1′]”).val();

       var contact_phone1 = $(“input[name=’phone-1′]”).val();

       var time_to_contact = $(“select[name=’select-1′]”).val();

       var method_to_contact = $(“select[name=’select-2′]”).val();

       var comments = $(“input[name=’textarea-1′], textarea”).val();

       $.ajax({

            type: ‘post’,

            url: “https://aninja.com/api/v1/contactform/?apikey=YOURAPIKEY“,

            data: {

                ‘contact_name’: contact_name,

                ‘contact_phone1’: contact_phone1,

                ‘contact_email1’: contact_email1,

                ‘custom_comments’: comments,

                ‘custom_best_method_to_contact’: method_to_contact,

                ‘custom_best_time_to_contact’: time_to_contact,

            },

            success: function (data) {

                //alert(‘success’);

                console.log(‘Lead succesfully injected to aninja’);

            }

        });

});

});

</script>

  • Lastly, click “Save” to save your changes.

Fields mapping

Map the data on the aNinja fields and Form fields.

These are the default aNinja fields:

For the Custom Fields, just prefix the field name with “Custom.” e.g. Custom.Source

Where does the data appear

After the integration, you can search your aNinja CRM for the imported leads. You can also search for any custom field, opportunities, and any other info that was pushed from the form.

  • Lead’s contacts appear in the leads contact section in the lead view
  • Opportunities also appear in the opportunity section in the lead view
  • The company’s info appears on the top left of the lead view, in the Company section.
  • Custom fields appear in the custom field section of the lead view
  • Lead Search is a field that also appears in the bottom left of the lead view. Specifically, these are info/links on the lead or the organization found in Google search.

WPForms integration with aNinja

With WPForms integration, you can push forms responses to your aNinja account using webhooks, as soon as someone submits a new form on your website.

Webhooks allows you to automatically send information from your form to aNinja.

WPForms integration with aNinja

To configure webhook integration settings within the WPForms plugin, follow these steps:

Installing the Webhooks Addon
Setting Up a Webhook
  • Create a new form or edit an existing form in the WPForms form builder.
  • Click on the “Settings” tab at the top of the form builder.
  • Under Webhooks, toggle the Enable webhooks option on.

Enabling webhooks for a form

  • Click on the pencil to give a name to your webhook
  • Then fill out the settings for this connection:
  • Under “Request URL”, enter the below aNinja webhook URL:

https://aninja.com/api/v1/contactform/?apikey=YOUR_API_KEY 

  • Under “RequestMethod” enter “POST”

The webhooks settings in the form builder

  • Under “Request Body” define the keys and values that will be sent in the body of your webhook’s request.:

    • aNinja fields in the parameter box

    • Form fields from the dropdown.

Check the fields mapping section below to map to the correct aNinja fields.

  • Once you have added all the fields you want to include, click “Save” at the bottom of the “Webhooks” panel to save your changes.
  • Go ahead and test the form on your website. The submissions will be pushed to your aNinja account with the lead data captured in the form.

Fields mapping

Map the data on the aNinja fields and Form fields.

These are the default aNinja fields:

For the Custom Fields, just prefix the field name with “Custom.

Where does the data appear

After the integration, you can search your aNinja CRM for the imported leads. You can also search for any custom field, opportunities, and any other info that you have imported.

  • Lead’s contacts appear in the leads contact section in the lead view
  • Opportunities also appear in the opportunity section in the lead view
  • The company’s info appears on the top left of the lead view, in the Company section.
  • Custom fields appear in the custom field section of the lead view
  • Lead Search is a field that also appears in the bottom left of the lead view. Specifically, these are info/links on the lead or the organization found in Google search.

Godaddy API Form integration

With the simple Javascript code, you can forward your web form leads into your aNinja account. In this article, we show you how the Godaddy API Form integration can be done.

Godaddy API Form integration

The following example is specific to GodDaddy websites.

  • First, log in to your GoDaddy account
  • Then, go to the Product page.
  • Scroll down to Websites + Marketing
  • And, select Manage next to your website to open your site.
  • Select Edit Website or Edit Site to open your website builder.
  • Then, select the form page.
  • Here, you want to search for the HTML section and select Add.
  • Click Embed custom code on the page.

User-added image

  • Click inside the new section to open up the HTML editor.

User-added image

  • Here, in the “Custom Code” box, paste the Javascript code in the following example.
    • You want to replace the fields names used in the example with your form fields names.
    • Also, check the fields mapping table section to map your form fields to aNinja’s.

Example:

<script src = “https://ajax.googleapis.com/ajax/libs/jquery/3.2.1/jquery.min.js”></script>
<script>
$(document).ready(function () {

window.parent.submitted = false;
$(window.parent.document).on(‘submit’, ‘[data-aid=”CONTACT_FORM_CONTAINER_REND“] form’, function (e) {
// Avoid mutliple submissions during 5 seconds period to avoid duplicates
if (window.parent.submitted) {
return;
}
window.parent.submitted = true;
setTimeout(() => {
window.parent.submitted = false;
}, ‘5000’);

let contact_name = ”;
if ($(‘input[data-aid=”CONTACT_FORM_NAME“]’, window.parent.document)) {
contact_name = $(‘input[data-aid=”CONTACT_FORM_NAME“]’, window.parent.document).val();
}
let contact_email1 = ”;
if ($(‘input[data-aid=”CONTACT_FORM_EMAIL“]’, window.parent.document)) {
contact_email1 = $(‘input[data-aid=”CONTACT_FORM_EMAIL“]’, window.parent.document).val();
}
let contact_phone1 = ”;
if ($(‘input[data-aid=”CONTACT_FORM_PHONE“]’, window.parent.document)) {
contact_phone1 = $(‘input[data-aid=”CONTACT_FORM_PHONE“]’, window.parent.document).val();
}
let address_street1 = ”;
if ($(‘input[data-aid=”Address (Street, City, Zip Code)”]’, window.parent.document)) {
address_street1 = $(‘input[data-aid=”Address (Street, City, Zip Code)”]’, window.parent.document).val();
}
let custom_message = ”;
if ($(‘textarea[data-aid=”CONTACT_FORM_MESSAGE“]’, window.parent.document)) {
custom_message = $(‘textarea[data-aid=”CONTACT_FORM_MESSAGE“]’, window.parent.document).val();
}

// Ajax call
$.ajax({
type: ‘POST’,
url: “https://aninja.com/api/v1/contactform/?apikey=<YOUR_APIKEY>“,
data: $.param({contact_name : contact_name}) + “&”+ $.param({contact_email1 : contact_email1}) + “&”+ $.param({contact_phone1 : contact_phone1}) + “&”+ $.param({address_street1 : address_street1})+ “&”+ $.param({custom_message : custom_message}),
success: function (data) {
alert(‘success’);
}
});
});
});
</script>

Fields mapping Table

The following are standard fields you can map to, in addition to any custom fields created in your application that you can see under Settings > Custom fields.

For the Custom fields:

Where does the imported data appear

After the integration, you can search your aNinja CRM for the imported leads. You can also search for any custom field, opportunities, and any other info that you have imported.

  • Lead’s contacts appear in the leads contact section in the lead view
  • Opportunities also appear in the opportunity section in the lead view
  • The company’s info appears on the top left of the lead view, in the Company section.
  • Custom fields appear in the custom field section of the lead view
  • Lead Search is a field that also appears in the bottom left of the lead view. Specifically, these are info/links on the lead or the organization found in Google search.

Need help with Godaddy API Form integration? Leave us an email at support@aninja.com. And we will happily assist you.

Adding aNinja Chatbot to your UENI website

You can add your aNinja Chatbot to your UENI website by using a simple Javascript code. Which is the aNinja Chatbot Embed Code.

Find your aNinja Chatbot Embed Code in your aNinja install before getting started.

Adding aNinja Chatbot to UENI Website

  • Then, click on the Settings section

  • And then Custom Code

  • The custom code is not rendered in the editor Preview.
  • Visit your website to see the Chatbot.

Where do the Chatbot Conversations appear in aNinja

After he integration, the chatbot captures lead data in the conversation and injects a new lead into your aNinja account.

You can see these conversations:

  • In your Inbox. Just select “Chatbot” from the All types dropdown.Add aNinja Chatbot to your UENI website
  • And in your Dashboard widget “Chatbot Conversations”. If you can’t see this widget, just enable it from the little gear on the top right of the dashboard.

If the user closed the chatbot conversation before your reply, your message will appear in a bubble next to the chatbot on the website:

Chatbot behavior

The chatbot pop-up gets triggered only for the first user visit to your site. It doesn’t automatically re-pop up on their subsequent visits, mainly because it gets annoying for repeat users. However, they can see that it’s in the bottom right section.

We can customize the below Chatbot behaviors:

  • Exposing the Chatbot initial greeting on every visit
  • Hiding the initial greeting message on page load
  • Delay showing the Chatbot widget for a number of seconds
  • Customizing widget container style to fit on the load page

Send us your request to support@aninja.com and we will implement the changes for you.

Google Forms aNinja Webhook integration

With Google Forms Webhook integration, you can push forms responses to your aNinja account as soon as someone submits a new Google Form.

The newest version of Email Notifications add-on supports webhooks and in addition to making HTTP requests to the webhook callback URL.

The add-on can also include the user’s response and the form data in the payload body of the HTTP request.

Webhooks for Google Forms

Enabling Webhooks in Google Forms

  1. To get started, install the Google Forms add-on from the Google marketplace.
    1. The add-on is titled ‘Email Notifications’ but it also includes support for sending instant push notifications to any webhook URL.
  2. Next, launch the add-on and choose Webhooks for Google Forms from the menu.
  3. Lastly, click the Create Webhook button to integrate a new webhook with your Google Forms.
    1. You can have multiple webhooks associated with the same Google Form and it would send the forms data to all webhook URLs when a new form submission is received.
1- Install Google Forms add-on

Email Notifications for Google Forms add-on is available for both Gmail and Google Workspace accounts.

  • To install the Google Forms add-on, open Google Marketplace
  • And click the blue Install button to add the app in your Google Account.

Install Google Forms add-on


  • On the next screen that says “Email Notifications needs your permission in order to start installing”, click the Continue button.
  • Choose the account under which you wish to install and authorize the Forms add-on.
  • The add-on will now request permissions to access your Google account.
    • Click the Allow button to grant the necessary access and launch the add-on.

Google Forms permissions

2- Launch the Email Notifications Add-on for Google Forms

After you have installed the Google Forms add-on, it can be accessed and launched from any Google Form that is associated with your Google account.

  • Go to forms.google.com 
  • And open any existing Google Form in your Drive.
  • Or you can type forms.new in your browser’s address bar to create a new form where you wish to use the email add-on.
  • Inside the Form editor, click the Add-ons icon that resembles a puzzle piece as shown in the screenshot.

Launch Google Forms add-on


  • Next, choose Email Notifications for Google Forms from the list of available add-ons.
    • If you are running the add-on for the first time inside a Google Form, you may also have to choose Enable Notifications to activate the add-on form for that Google Form.
3- Create Webhook for Google Forms
  • Inside the Email Notifications for Google Forms choose Webhook for Google Forms


  • Then click on Create webhook

Add the Webhook URL and Query Parameters
  • On the first screen, provide a unique name for your webhook (used internally) and choose an HTTP Request method.
  • You are more likely to do a POST request but the webhook module also supports GET, PUT, PATCH and DELETE methods.
  • Here, you need to get your aNinja API key 
  • Next, provide the below webhook URL to integrate aNinja with Google Forms:

https://leads.aninja.com/handlers/googleforms/index.php

  • For testing purposes, we recommend using either the webhook.site or requestbin.com service to get a unique URL for inspecting and testing your webhooks.

Webhook Form Url


  • The Query Parameter section lets you append custom parameters to the webhook URL.
  • For instance, if you are sending webhook from multiple forms, you can append the {{Form Id}} parameter to your URL to easily distinguish the source of a particular webhook call.
  • You may use any dyanmic field for query parameters:
    • Dynamic fields are always enclosed in double curly braces – like {{Your first name}} – and are automatically replaced with the actual answers that the user submits in the form.
Authorization and Authentication

You can configure your webhook to include a secret bearer token or access token to authorize the calls.

You can do basic authentication with login and password or include the API keys with the authentication headers.

Custom Headers

You may also include custom headers in your webhook endpoint(s).

The keys of the header can be either strings or numbers and may not include spaces or other invalid characters.

Request Body

The request body defines the payload (form response and custom data) that is sent to the web service when a form entry is received.

You may send payload in different formats including JSON, Form data, XML and more.

webhook request body


  • The payload may have form meta data (like the form ID, response Id, response Edit URL) and user’s answers.
    • Each question should be added as a new key, value pair in the request body with the answer title enclosed in double curly braces.
  • Map the form fields to aNinja fields:

  • After you are done defining your webhook, click the Test button and the add-on will send make an HTTP request to the callback URL using form data from the most recently received response of your Google Form.
  • Click Save to enable the webhook.

Manage Webhooks

The webhook manager lists all the webhooks that are enabled for your current Google Form.

You can click:

  • The Edit icon to change a specific webhook,
  • The Duplicate button will help you create a copy of the current webhook
  • And the Delete option removes the webhook from your form.

Google Form Webhooks

HubSpot aNinja Integration

HubSpot aNinja Integration allows you to make a real-time connection between your HubSpot calling leads and aNinja.

Overview

After the integration, if the lead that called in HubSpot was not saved in aNinja, this integration creates a new lead in aNinja; and it adds the call recording in HubSpot as well as in aNinja lead’s view, in the history section.

If the lead was already saved in aNinja, their lead view is updated with the call recording as soon as the call is made. And the phone recording show in both Apps.

Connecting HubSpot with aNinja

Before you start with the integration, make sure to log in to your HubSpot account.

In aNinja
  • Log in to your aNinja account.
  • On the left sidebar, click on Settings > Apps Marketplaces

Hubspot aNinja Integration

  • Then, click HubSpot > Install

Hubspot aNinja Integration

  • Choose the HubSpot account to integrate with aNinja.
  • Lastly, click Connect app.
  • Now your HubSpot account is connected with aNinja.
In HubSpot
  • Go to Contact > Call
  • Under Other provider, find aNinja dialer.

If there’s no record in aNinja for the lead that called in HubSpot, this integration creates a new lead in aNinja, and it adds the call recording in both apps.

Where does the imported data appear

After the integration, you can search your aNinja CRM for the imported leads.

Expanding the lead info

imatrix aNinja Form Integration

aNinja allows you to integrate your imatrix Website Forms into your aNinja account. In this article, we show you how the imatrix aNinja Form Integration can be done using a simple Javascript code.

imatrix aNinja Form Integration

You can integrate and augment the functionality of popular platforms with aNinja.

  • First, you need to find your API key
    • On the left sidebar, click on Settings > Users
    • Then, click the edit pen next to your name.
    • And, copy it to use it later in the integration
  • Now, login to your imatrix website editor
  • On the left side menu, click on Website Editor
  • Then, click on Edit Website in the middle of the page.
  • Type your email and password to login
  • On the left side menu, click on Pages 

  • Next to the form, on the right side, click on the little Settings gear
  • Scroll down to the Custom Info section
  • And insert your Javascript code under “Specify Custom Header”

imatrix aNinja Form Integration

  • Map the form fields to aNinja fields
  • Save and Publish
  • Go to your website, refresh and test submitting a form.
  • Then, check your aNinja account for the new lead automatically generated after the form submission.
You can use the below Javascript code

Where does the imported data appear

After the integration, you can search your aNinja CRM for the imported leads. You can also search for any custom field, opportunities, and any other info that you have imported.

  • Lead contacts appear in the leads contact section in the lead view
  • Opportunities also appear in the opportunity section in the lead view
  • The company’s info appears on the top left of the lead view, in the Company section.
  • Custom fields appear in the custom field section of the lead view.
  • Lead Search is a field that also appears in the bottom left of the lead view. Specifically, these are info/links on the lead or the organization found in Google search.

Need help with imatrix aNinja Form Integration? Leave us an email at support@aninja.com. And we will happily assist you.

VistaPrint aNinja Form Integration

aNinja allows you to integrate your Vistaprint Website Forms into your aNinja account. In this article, we show you how the Vistaprint Form Integration can be done using a simple Javascript code.

Vistaprint aNinja Form Integration

You can integrate and augment the functionality of popular platforms with aNinja.

  • First, you need to find your API key
    • On the left sidebar, click on Settings > Users
    • Then, click the edit pen next to your name.
    • And, copy it to use it later in the integration
  • Now, login to your Vistaprint website editor
  • In the middle of the page, click on edit website
  • On the left side menu, click on General Settings > General
  • Then, choose Tools & Analytics
  • Under Other Tags add the Javascript code (see example below)Javascript aNinja Form Integration
  • Map the form fields to aNinja fields
  • Save and Publish
  • Go to your website, refresh and test submitting a form.
  • Then, check your aNinja account for the new lead automatically generated after the form submission.
You can use the below Javascript code

Where does the imported data appear?

After the integration, you can search your aNinja CRM for the imported leads. You can also search for any custom field, opportunities, and any other info that you have imported.

  • Lead’s contacts appear in the leads contact section in the lead view
  • Opportunities also appear in the opportunity section in the lead view
  • The company’s info appears on the top left of the lead view, in the Company section.
  • Custom fields appear in the custom field section of the lead view.
  • Lead Search is a field that also appears in the bottom left of the lead view. Specifically, these are info/links on the lead or the organization found in Google search.

Need help with Vistaprint aNinja Form Integration? Leave us an email at support@aninja.com. And we will happily assist you.