Trigger “Custom field value changed” event

With the “Custom field value changed” Trigger event, you can automatically perform an action based on a specific custom field value.

This powerful trigger event allows you to specify a custom field value and trigger an action whenever that value is changed.

Setting a trigger event to handle Custom field value changed

To set up this trigger event, you will need to indicate the custom field that you want to track in the trigger event and that should trigger the action. Specifying the corresponding value of the custom field in the trigger condition is optional.

Then, you can set the action that should be taken when the trigger fires.

  • Hit + Add Trigger
  • In the Trigger Event:
    • Choose “Custom field value changed

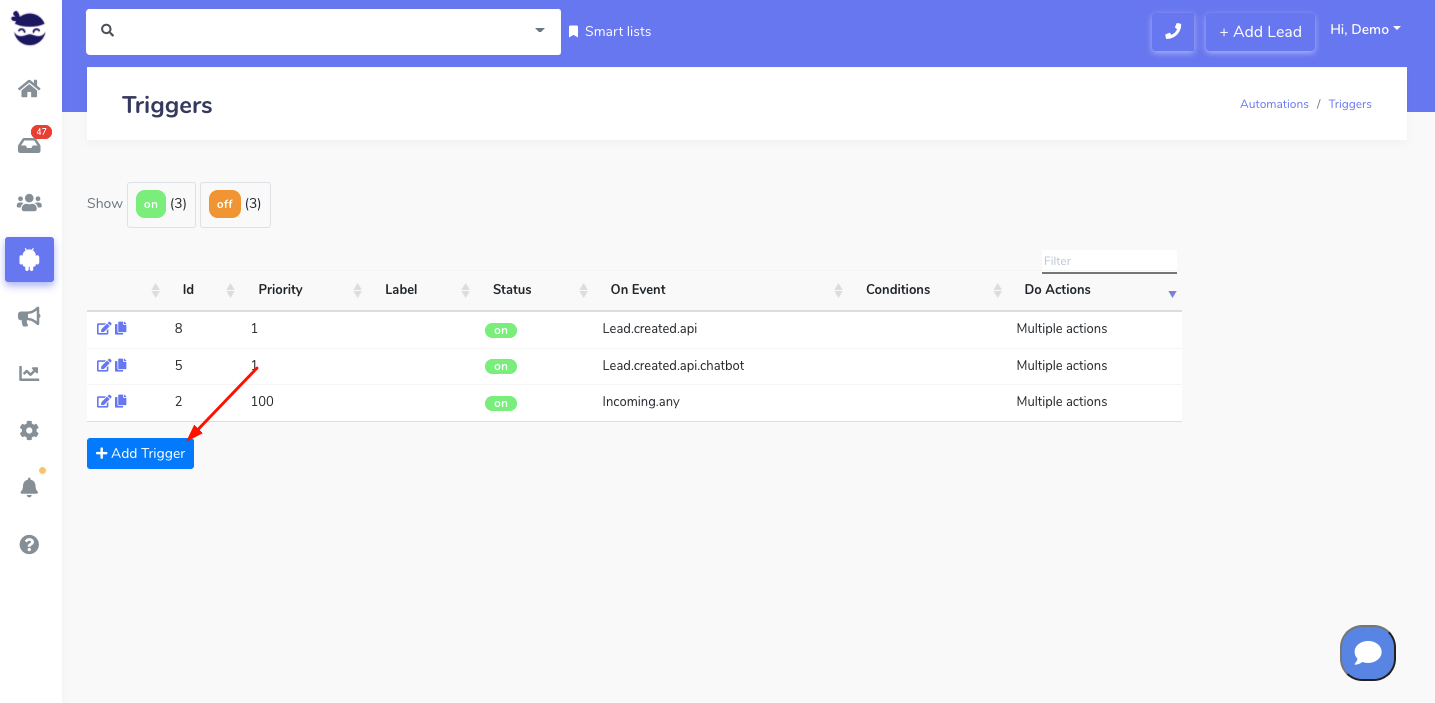
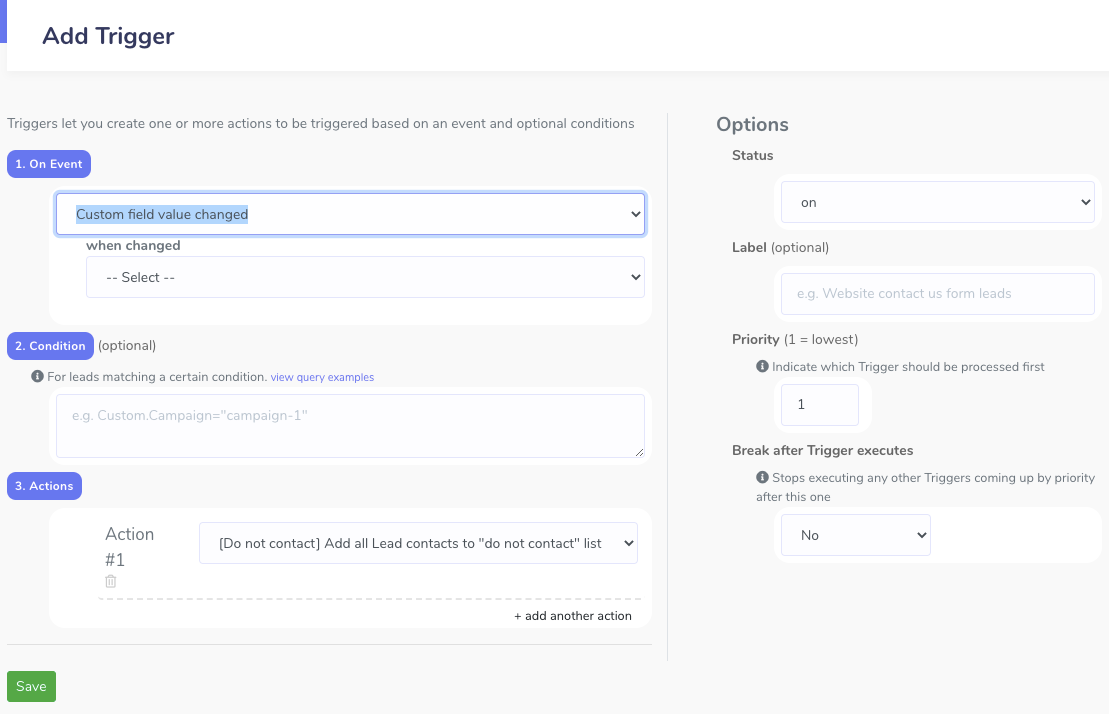
  • In the Trigger Condition (optional):
    • Specify the custom field value that will fire the trigger action. (see example below).
  • In the Trigger Action:
    • Set the trigger action you want to fire in response to the event.
    • You can add multiple actions to be executed when the event takes place.
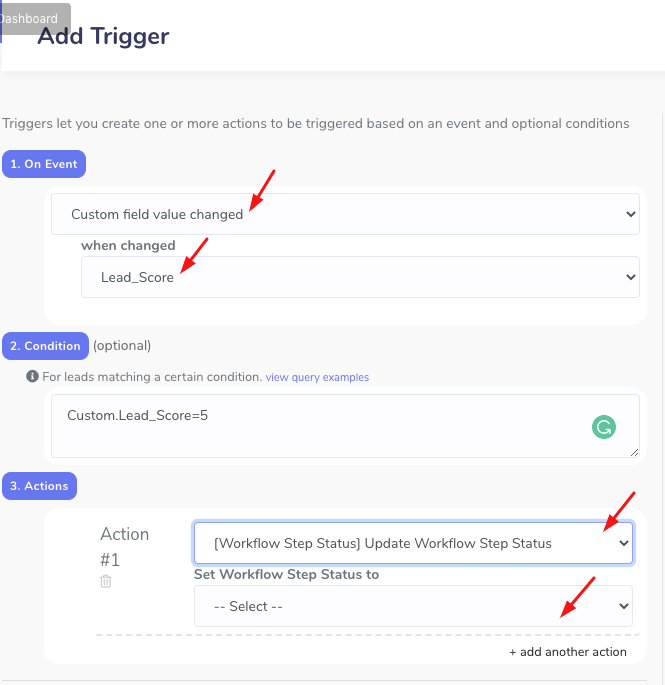
Example:

If you have a custom field for “Lead Score“; and you want to automatically change the workflow step of the lead to “Qualified” when their lead score reaches a certain threshold (after changing the custom field value of Lead score in the lead view), you can set up a trigger to do this.

  • On an event that is “Custom field value changed”
    • Select the custom field e.g. Lead_Score from the “changed to” dropdown
  • Set the trigger condition to e.g. “Custom.Lead_Score=5”
  • Choose to execute an action to “[Workflow Step Status] Update Workflow Step Status:
    • and Set Workflow Step Status to: “Qualified

You can add multiple trigger actions from the actions dropdown.

Trigger "Custom field value changed" event

Launching a Text sequence to a single lead

Launching a Text sequence to a single lead can be done from the Lead View.

And the “Active Text sequences” show you the Text sequences this lead is enrolled in.

Overview of Text sequences

To launch a Text sequence in aNinja, you want to follow these steps:

  • First, create a Text templates
  • Then, create a Text Sequence with at least one step. Choose to send “Immediately” if you want your sequence to launch with no delay.
  • Finally, you can choose to either send your sequence to a single lead or in bulk sequence.

Launching Text sequence to a single lead

  • First, go to the lead view.
  • On the toolbar, click Text Sequence under the Text dropdown

  • Or, on the left side of the page, scroll all the way down to find the Active Text Sequences.

  • To create a Text sequence, just click on the plus sign (+). As a result, this opens a new Text window in the lead interactions on the same page.

  • Go ahead and select a Text sequence.
  • To send the sequence, click on start.
  • And to cancel it, just click on the recycle bin.

Viewing Active Text sequences for a lead

  • First, go to the lead view
  • Then, on the left side of the page, scroll down to find the Active Text Sequences.
  • Here, you can see all the Text sequences sent to this lead.
  • Thereafter, to see details of the Text sequences in which this lead is enrolled and the steps reached, just click on “Show previous“.

Blocking a lead phone number

If you want to stop receiving calls from a lead, you can block their phone number in aNinja.

You can also block callers for solicitation and register your phone number in the National Do Not Call Registry.

In this article, we show you how to block a lead phone number in aNinja.

Blocking a lead phone number in aNinja

The lead phone numbers are located in the lead view, in the contacts section.

Click on the block icon next to the phone number you want to block. Then the block icon turns red.

To unblock a phone number, just click on the block icon to turn it back to black.

If the lead has multiple phone numbers, you might want to block them all.

Accessing the list of blocked phone numbers

In this view, you can:

  • Block and unblock a phone number
  • Filter the view by User
  • See all the phone numbers marked as “Blocked”
  • See the Date they were marked
  • And, the User who marked them

Blocking a phone number

To block a phone number, just type it in the box and click on Block.

Then the number is added to the list of all the blocked phone numbers and the block icon in the lead view turns to red.

Afterward, the lead calls are immediately hung up. You will be notified on the mobile app and in the Inbox.

Unblocking a phone number

To unblock a phone number, locate it in the list and click on the unblock button.

This automatically unblocks the phone number and turns the block icon in the lead view back to black.

Filtering the results

You can filter the results to appear by user if you are a user with Admin access.

Otherwise, the users can only see the phone numbers blocked by them.

Error codes returned by the carrier on SMS or MMS

You might receive error codes returned by the telephone carrier after you’ve sent a SMS or MMS.

The telephone carriers filter all the messages to protect the mobile subscribers from spam and other forms of unwanted messaging.

And, these systems look at both message content and volume.

Filtering in the United States and Canada can affect the delivery of your SMS and MMS messages.

Where do error codes appear in aNinja

When in the lead view, in the history section, you can see “error” in red on the right corner under the sent SMS or MMS.

Hover your mouse over “error” to see the error code.

Error codes on SMS or MMS

Then, search for this code in the below section to understand the reason for this error.

Error codes references on SMS or MMS

Below are most common error messages returned by the carriers.

  • 11751 => Media exceeds messaging provider size limit.
    • Maximum size limit depends on the messaging channel.
    • aNinja supports an MMS of 600KB.
  • 12300 => Invalid Content-Type.
    • Our carrier is unable to process the Content-Type of the provided URL.
    • You must return a Content-Type for all requests. Requests without a Content-Type will appear in the Debugger as a 502 Bad Gateway error.
  • 30002 => Account suspended
    • The message you sent was filtered by the Carrier for containing forbidden content which resulted in suspending your account/number.
  • 30003 => Unavailable or unreachable destination.
    • The destination handset you are trying to reach is switched off or otherwise unavailable.
  • 30005 => Unknown or inactive destination number.
    • The destination number you are trying to reach is unknown and may no longer exist.
    • The device you are trying to reach is not on or does not have sufficient signal.
    • The device cannot receive SMS (e.g. the phone number belongs to a landline).
    • There is an issue with the mobile carrier.
  • 30006 => Landline or unreachable destination.
    • The destination number is unable to receive this message. Potential reasons could include trying to reach a landline. Or, in the case of short codes, an unreachable carrier.
  • 30007 => Your message was blocked by the carrier due to spam, phishing, and fraud content.
  • 30008 => Delivery of your message failed for unknown reasons.
    • Our carrier receives a very generic error from the destination carriers that they have no further details about. They associates the message with the error code 30008 letting you know that they truly don’t know what caused this error from the provider.
  • 30019 => Content size exceeds carrier limit.
    • Message failed because the size of the content associated with the message exceeded the carrier limit.
  • 30410 => Provider timeout.
    • The provider used may be experiencing disruptions resulting in errors or request timeouts. Messages are failed and not retried to avoid duplicate message delivery.
  • 32017 => Carrier blocked call due to poor reputation score on the telephone number.
    • The calling number has a low answer rate from end users; or, generates low-duration calls; or it is responsible for large volumes of unwanted calls.

Customizing the Leads View

Customizing the Leads View allows you to display any info you have on your leads that you have saved in your aNinja account. (Whether all the leads or the ones that you’ve pulled out using a Smartlist).

In this article, we show you how you can customize the leads view to show info you have for your leads (Name, User assigned to, lead’s contacts, the created date, and the custom fields).

Customizing the Leads View

To choose which data you want to display for the leads, just click on the little icon on the top right. And select the fields of your choice.

Customizing the Leads View
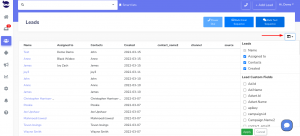
The columns that you add will be there every time you’re in the leads view. Whether you accessed it from the left sidebar, or by searching for a lead in the top navigation.


Assigning a bulk import list

Assigning a lead to a user allows you to efficiently follow up with your lead and close them quickly. Especially if you have distributed the tasks between your team members to better close leads. How about assigning a bulk import list to a specific user!

Assigning a bulk import list to a user

  • When preparing the leads file, add a column in your CSV sheet called User_id.
    • You can find the user_id in Settings > Users > next to the user name.
  • And set the column values to the User ID of the user you want to assign the leads to.

Mapping the user ID to aNinja field

When importing your CSV file, you want to map the user ID in your CSV file to user_id in aNinja fields.

Where does the user ID appear?

After the import, the user ID you’ve added to your contacts list will show in the lead view of the imported leads > in the Assigned to section.Assigning a bulk import list

Note: As long you have “Users can only see Leads assigned to them” enabled under Settings > Global Settings, then users (unless admin) can only see leads assigned to them.

Need help in assigning a bulk import list? Leave us an email at support@aninja.com and include the CSV file. Let us know the user you’d like to assign.

Reordering Lead Contacts

The Lead’s contacts are the info you have on a lead, saved in his lead view. A lead might have multiple contacts saved in his lead view. This could be the example of a company and its employees.

The first info saved in the Lead’s contacts is considered the primary contact. And the system automatically selects the primary contact for the outbound emails and texts.

With aNinja, you can change the order of the lead contacts in the way that suits you.

The contact items (email, phone number, URL) inside the contact also can be reordered.

Reordering the lead contacts & items

  • When on the lead view, you can see the lead contacts on the left side.

Reordering Lead ContactsIn this picture, this lead has 2 contacts. Demo (primary contact) and Demo1.

  • Drag Demo1 to the top, and the system will consider it as the primary contact.
  • Also, if there are multiple phone numbers in the contact, you can reorder them to make the primary one for example the mobile number.

Does reordering the lead contacts affect the sequences and triggers

Reordering the lead contact does not affect the previously saved sequences and triggers. As their data was pulled on the day they were created and are waiting in queue till the launching date of the sequences or triggers. So any changes in the lead info after creating a sequence are not reflected in the sequences.

Does reordering the lead contacts affect the “do not contact”

If the primary contact happens to be marked as “do not contact“, the system uses the second contact saved in the lead.

So, if you don’t want your automation to reach a specific lead, make sure to mark ALL his contacts as “do not contact”.


Schedule your text message

In this article, we show you how you can schedule your text message to delay the delivery to send it at a later time and date.

To reach out to your lead, you can send them a text message via aNinja.

Start Messages and create a text message, but don’t send it. Choose the time you want to send the message.

Scheduling a text to be sent later

  • On the lead view, click on the Text from the toolbar.Schedule your text message
  • Create the text but don’t send it.
  • Next to the send button, click the arrow to choose the date & time.
  • Then, hit Schedule > Send.
  • As a result, on the set date & time, the system sends the text to your lead.

Rescheduling a text

  • On the lead view, locate the text in the history section and click Reschedule.
  • Then, choose the new date & time and hit Schedule.

Cancelling a scheduled text

  • On the lead view, locate the text in the history section and click on Cancel.
  • As a result, the system will cancel your text.
  • Cancelling the scheduled texts is enabled on the web app but we don’t have it on the mobile app yet.

Checking the status of the scheduled text

You can see the scheduled texts only on the date they’ve been created. They don’t get rendered again when sent.

So you can check them in the lead view. Go back through the lead interactions to the date when the scheduled text was created.

The status of the text is on the right bottom of the text.

  • Scheduled for day & time: The text is still not sent until the day & time are due.
  • Success: On the set date, the system sent your text successfully.
  • Cancelled (was scheduled): This is a text that you cancelled.

Schedule your email

In this article, we show you how you can schedule your email to delay the delivery to send it at a later time and date.

To reach out to your lead, you can send them an email via aNinja.

Create an email, but don’t send it. Choose the time you want to send the email.

Scheduling an email to be sent later

  • On the lead view, click on the Email from the toolbar.
  • Compose the email you want to send.
  • Your email is auto-saved every few seconds so you don’t lose your work.
  • Next to the Send button, click the arrow to choose the date & time.
  • Then, hit Schedule > Send.
  • Therefore, on the set date & time, the system sends your email to your lead.

Rescheduling an email

  • On the lead view, locate the email in the history section and click Reschedule.
  • Then, choose the new date & time and hit Schedule.

Cancelling a scheduled email

  • On the lead view, locate the email in the history section and click on Cancel.
  • As a result, your email will be cancelled.
  • You can cancel the scheduled emails only from the web app but we don’t have it on the mobile app yet.

Checking the status of the scheduled email

You can see the scheduled emails only on the date they’ve been created. They don’t get rendered again when sent.

So, to check them, go to the lead view. In the history of interactions, go to the date when the scheduled email was created.

The status of the email is on the right bottom of the email.

  • Scheduled for day & time: The email is still not sent until the day & time are due.
  • Success: On the set date, the system sent the email successfully.
  • Cancelled (was scheduled): This is an email that you cancelled.

Basic aNinja terms

Here’s a simple explanation of the basic terms and keywords that we use in aNinja. After all, we want you to get the correct meaning of the words we use.

Know what aNinja terms stand for

All around aNinja, and in the knowledge base articles you encounter keywords. And it’s very important for you to know what they stand for. We divided these keywords into 4 sections:

Features
  • Automations: These are Templates, Sequences, and Triggers.  You automate them to be launched automatically at a certain event without your intervention.
  • aNinja Forms: These are the contact forms that you create on aNinja. When you embed them on your website, they collect leads. And automatically the system injects them into your account.
  • Dashboard: It is a set of widgets that give you a quick overview and deep view into your aNinja system.
  • Widget: It’s a graphical display. Precisely, it brings you the report on the workflow of your latest activities and interactions that you make in aNinja.
  • Chatbot: It’s a computer program that can be embedded on your website. It simulates human conversation through text chat. Therefore, aNinja Chatbot answers your website visitors’ simple questions. Moreover, you can customize the questions in the Chatbot Playbook.
  • Chatbot Playbook: It determines how the chatbot answers the user’s questions. More precisely, it’s an automated message workflow that runs on simple logic in order to help the users get the answers they need.
The Lead related
  • Custom Fields: These are info that you can add to the lead. Therefore, it augments the lead data (creation time, payment plan, phone number, platform, tenant code, and much more…).
  • Lead activities: These are basically the activities that you perform on a certain lead:
    • Tasks, Assigning lead, Opportunities, Custom Fields, Email and Texts sequences, Merging, and Deleting.
  • Lead interactions: These are the interactions that you perform on a certain lead:
    • Emails, Texts, Calls, and Notes.
  • Lead View: It is where you can see all activities and interactions that you made with a lead.
  • Leads View: It’s where you can see all the leads you have in your account. Or the result of a Smartlist or a search typed in the top navigation bar.
  • Workflow: It consists of a series of sequential steps that allows you to monitor the lead/customer’s progress in the pipeline.
System search
  • Smartlist: or Smart View. Simply, it is a list of leads that the system pulls from your CRM following criteria specified in a query.
  • Query: It’s the essential component for building a Smartlist. Precisely, it’s a specific request for lead retrieval among your CRM.
aNinja Keys & codes

Have any specific questions about the aNinja terms? Please leave us an email at support@aninja.com. We’re more than happy to offer you clarifications.