Exporting Contacts from Mailchimp

You can export your contacts from Mailchimp and import them into your aNinja account to augment your lead database.

You can export an entire audience, a segment, or a group.

Configure contact table

  • Click Audience > All contacts
  • Click the Toggle Columns drop-down menu.
  • Uncheck the boxes next to the fields you want to hide or check the boxes next to the fields you want to view.
    Cursor checks box in toggle columns drop-down menu.
  • To reorder columns, click and drag the three dots next to any name field and drag it to your preferred location.
    Cursor clicks three dots next to name field.
  • Click Save.

View or export an audience

To view or export your entire audience, follow these steps.

  • Click Audience > All contacts.
  • If you have more than one audience, click the Current audience drop-down and choose the one you want to work with.
  • Click Export Audience.
    • You will receive the exported audience by email. You can download the file to your computer.
  • Or from Mailchimp, after the export loads, click Export as CSV to download the file to your computer.

View or export a segment

To view or export a saved segment, follow these steps.

  • Click Audience > All contacts.
  • If you have more than one audience, click the Current audience drop-down and choose the one you want to work with.
  • Click View Segment, and choose the segment you want to export.
  • Click Export Segment.
    click export segment

    • You will receive the exported segment by email. You can download the file to your computer.
  • Or in Mailchimp, after the export loads, click Export as CSV to download the file to your computer.

View or export tagged contacts

To view or export tagged contacts, follow these steps.

  • Click Audience > All contacts.
  • If you have more than one audience, click the Current audience drop-down and choose the one you want to work with.
  • Click the Filter by Tags drop-down menu and choose the tag you want to work with.
  • It generates a segment of all the contacts in your audience with that tag applied to them.
  • From the segment view, click the Filtered By Tags drop-down menu to choose more tags. When you’re done, click Export Segment.
    • You will receive the exported segment by email. You can download the file to your computer.
  • Or in Mailchimp, after the export loads, click Export as CSV to download the file to your computer.

View or export a group

  • Click Audience > Audience dashboard.
  • If you have more than one audience, click the Current audience drop-down and choose the one you want to work with.
  • Click the Manage Audience drop-down and choose Manage contacts.
  • Click Groups.
  • Then, hit View Groups to expand the group you want to view.
  • Click the # contacts link to view the individual contacts in each group.
  • Click Export Segment.
    • You will receive the exported segment by email. You can download the file to your computer.
  • Or in Mailchimp, after the export loads, click Export as CSV to download the file to your computer.

Open your export file

Your export may include a ZIP file that contains separate CSV files for each type of contact (subscribed, unsubscribed, non-subscribed, and cleaned). Unarchive the ZIP file to access the CSV files and open each file individually in your preferred spreadsheet application ( Microsoft ExcelGoogle Sheets, or OpenOffice Calc.)


Exporting Leads into a CSV file

aNinja allows you to export your leads from your account into a CSV file.

Exporting Leads into a CSV file

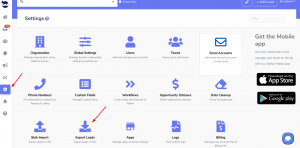
You can access the “Export leads” function through 2 places: The Lead View, and Settings.

Exporting Leads through the Lead View
  • On the left sidebar, click on the Leads View icon.
  • Here, you can choose to export all your leads, or some of them using a smartlist.
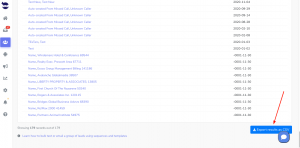
  • Then, go all the way down to the end of the page.
  • Lastly, click on Export results as CSV.Export Leads to a CSV file
  • The results will be saved in your downloaded files on your computer.
Exporting Leads through Settings

  • “Exporting leads may take a while depending on the number of leads in your system. Continue with export now?” Click OK
  • The results will be saved in your downloaded files on your computer.

Leads data that get exported in the CSV file

The following basic data is exported into the CSV file:

  • Address
  • Assignee
  • Company Name
  • Contact info
  • And Lead Search

However, we can custom export the following data as tables of CSV files.

  • Lead tasks
  • Lead notes
  • Workflows
  • Leads opportunities
  • SMS templates
  • Email templates
  • SMS sequences
  • Email sequences
  • Users info
  • Teams info
  • “Do not contact” items
  • Sent texts (optional)
  • Received texts (optional)

Just leave us an email at support@aninja.com and a developer from our side will work on preparing the full export accordingly.

Data Import/Export from Phone or Gmail

In this article, we show you how the Data Import/Export from Phone or Gmail can be done.

aNinja allows you to inject your phone and Gmail contacts into your aNinja account to create more leads and expand your database.

Exporting phone contacts 

  • Open the Contacts app.
  • And tap the three-line menu icon in the top left corner.
  • Then choose Settings.
  • Hit Export under Manage Contacts.
  • And select every account to ensure you export every contact on your phone.
  • Lastly, tap Export to VCF file.

Importing phone contacts into aNinja

  • Send us the VCF file. We will handle importing your contacts from our side.

Exporting Gmail contacts

Here are the simple steps you can follow to export your Gmail contact and import them into aNinja:

  1. Log into the Gmail account you want to export from.
  2. Point your Browser URL to: https://contacts.google.com
  3. In the left sidebar click on “More” (to expand it).
  4. Click Export.
  5. Select a group of contacts or all.
  6. Select the “Outlook CSV” format.
  7. Click Export.

Importing Gmail contacts into aNinja

  • Send us the CSV file. We will handle importing and deduping from our side! 

Note: these are the guidelines, they can change from Android/iOS phone device version to the other.

Where does the imported data appear

After the integration, you can search your aNinja CRM for the imported leads. You can also search for any custom field, opportunities, and any other info that you have imported.

  • Lead’s contacts appear in the leads contacts section in the lead view
  • Opportunities also appear in the opportunity section in the lead view
  • The company’s info appears on the top left of the lead view, in the Company section.
  • Custom fields appear in the custom field section of the lead view
  • Lead Search is a field that also appears in the bottom left of the lead view. Specifically, these are info/links on the lead or the organization found in Google search.

Need help with the data Import/Export from Phone or Gmail? Leave us an email at support@aninja.com. We will happily assist you!