Launching a Text sequence to a single lead

Launching a Text sequence to a single lead can be done from the Lead View.

And the “Active Text sequences” show you the Text sequences this lead is enrolled in.

Overview of Text sequences

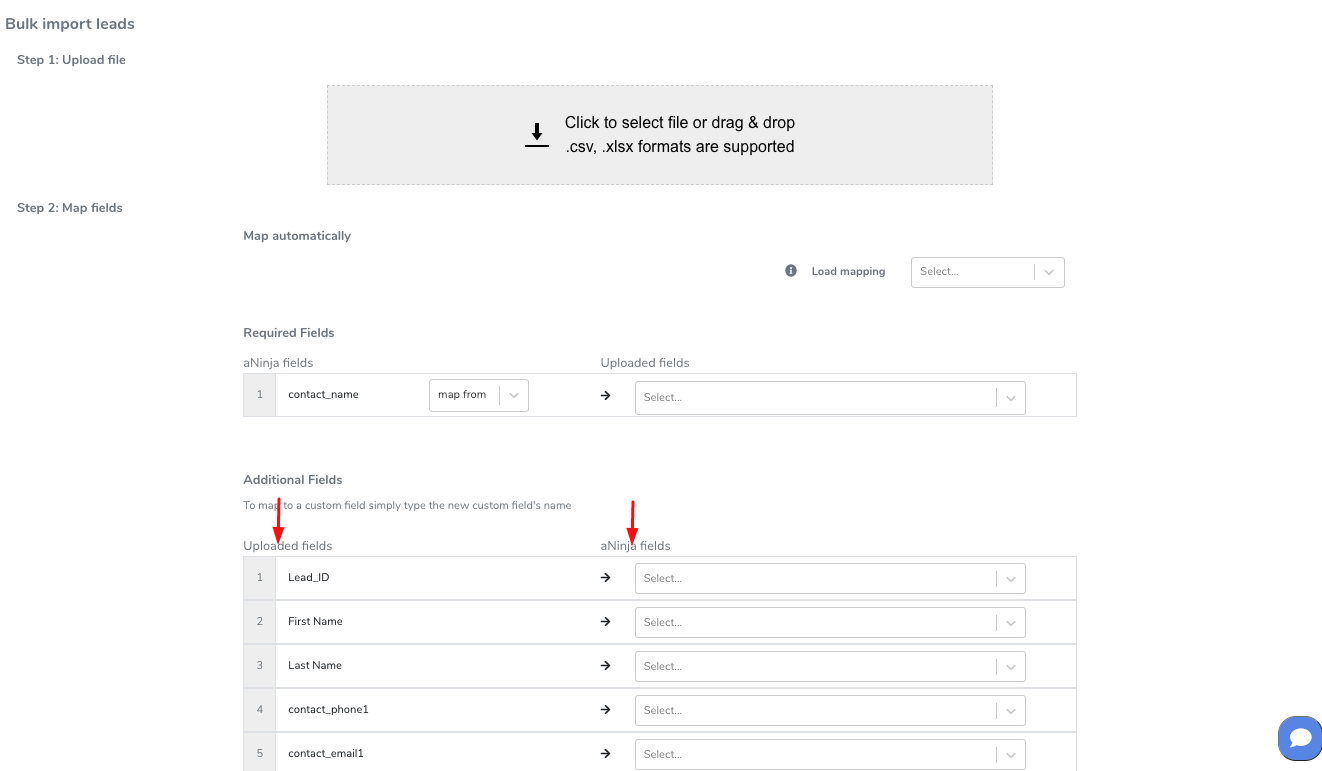
To launch a Text sequence in aNinja, you want to follow these steps:

  • First, create a Text templates
  • Then, create a Text Sequence with at least one step. Choose to send “Immediately” if you want your sequence to launch with no delay.
  • Finally, you can choose to either send your sequence to a single lead or in bulk sequence.

Launching Text sequence to a single lead

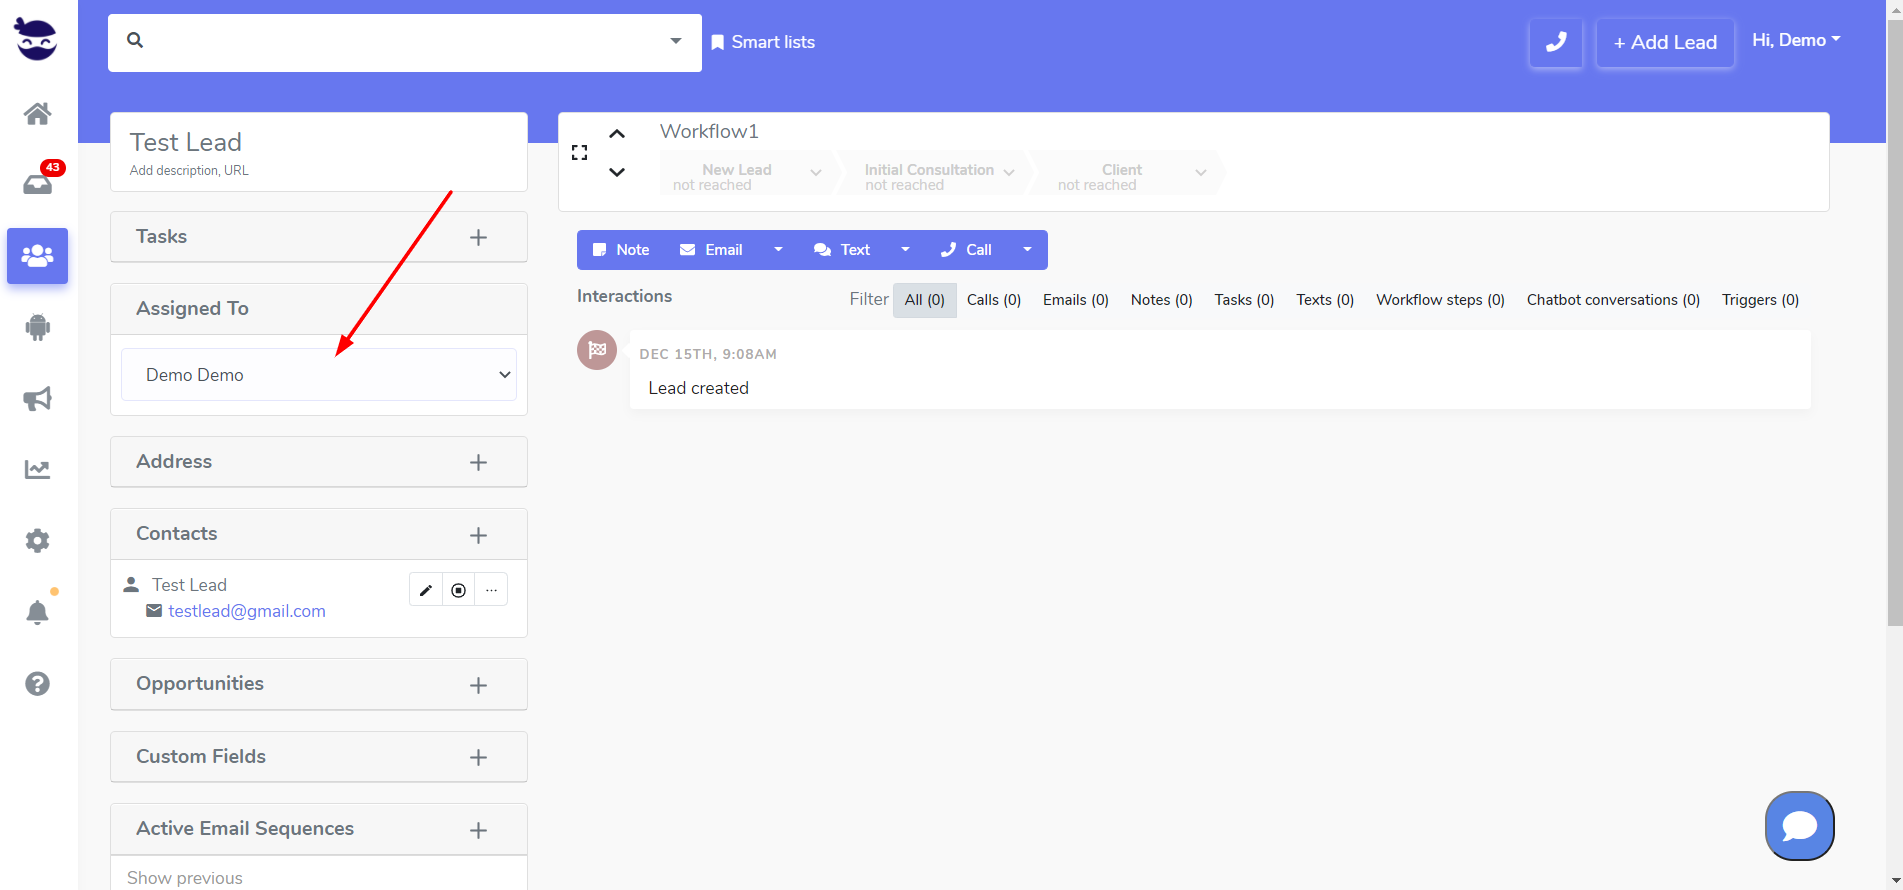
  • First, go to the lead view.
  • On the toolbar, click Text Sequence under the Text dropdown

  • Or, on the left side of the page, scroll all the way down to find the Active Text Sequences.

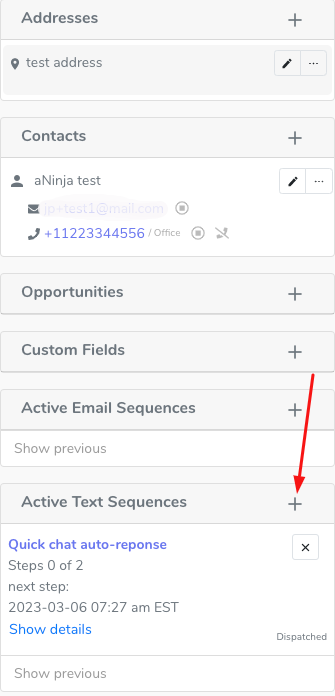
  • To create a Text sequence, just click on the plus sign (+). As a result, this opens a new Text window in the lead interactions on the same page.

  • Go ahead and select a Text sequence.
  • To send the sequence, click on start.
  • And to cancel it, just click on the recycle bin.

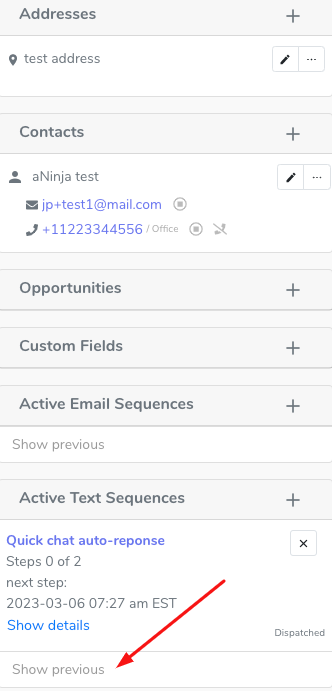
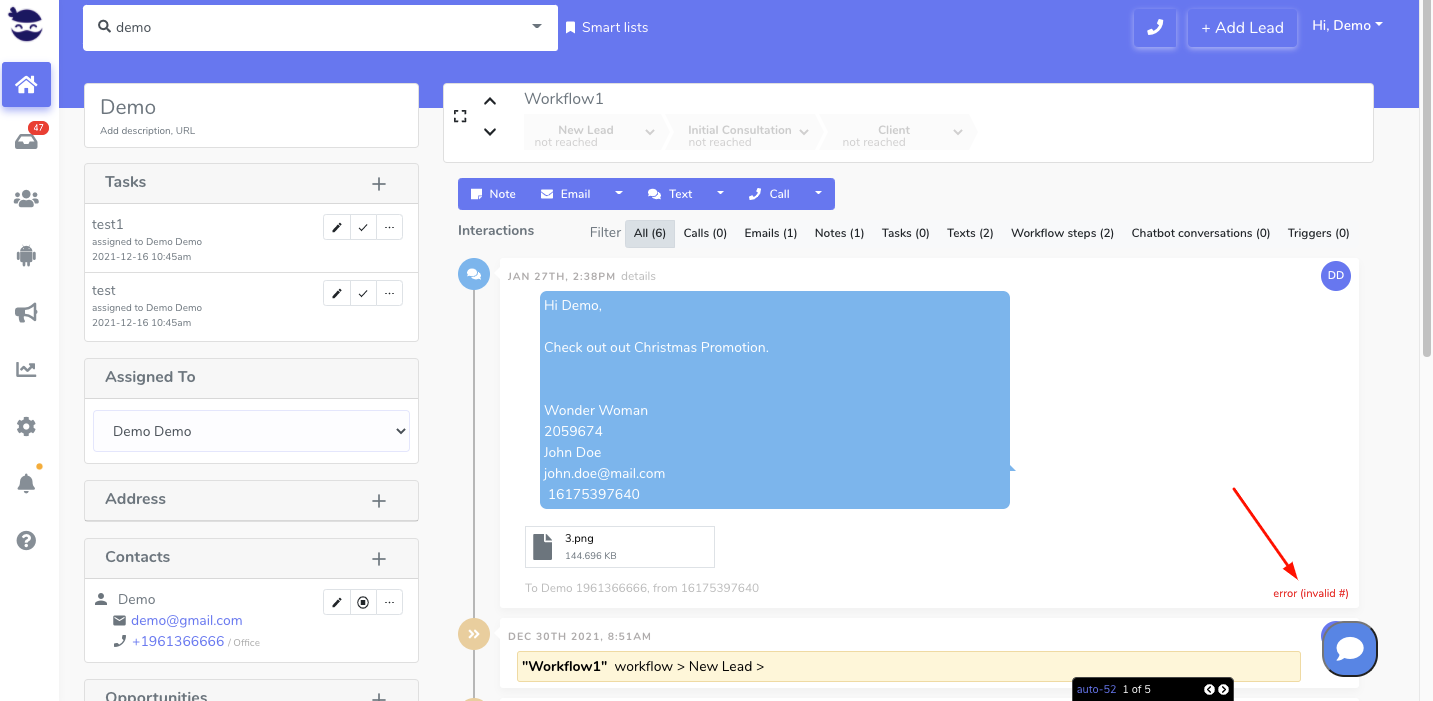
Viewing Active Text sequences for a lead

  • First, go to the lead view
  • Then, on the left side of the page, scroll down to find the Active Text Sequences.
  • Here, you can see all the Text sequences sent to this lead.
  • Thereafter, to see details of the Text sequences in which this lead is enrolled and the steps reached, just click on “Show previous“.

Trigger “Duplicate Leads Merge” action

Trigger “Duplicate Leads Merge” action is useful when leads created via API create duplicates in your account;  you can then automatically merge them through Triggers.

Definitely, you want to keep a clean and consolidated data. This allows you to generate more accurate and meaningful reports and analytics, which can help in making informed business decisions.

Setting the Trigger “duplicate leads merge action”

Trigger actions get executed based on a certain event that you specify in the triggers feature:

  • Select the event that will cause the trigger to fire.
    • e.g. Lead created via API

  • Under Actions, click “+ add another action”
  • Select from the actions drop-down:

[Lead merge] Merge new lead into existing duplicate

Trigger duplicate leads merge action

  • And indicate the merge method (email/phone).

  • This automatically merges new leads by ‘phone’ or ’email’ if ‘Lead created via API’ option was selected as the desired event.

Good to know:

If a lead with the same email was sent via API but doesn’t appear in aNinja, you should check if the “Do not add new leads via API if lead with similar email already exists” rule is disabled. This rule prevents duplicate leads from being created, and therefore, the merging logic will not take effect.

  • You can also indicate if this action should stop executing all subsequent actions/triggers in case the new lead has been merged. This is helpful if you don’t want a specific sequence to fire off for already existing leads.

  • With that being said, it would be better if you set the trigger using this action with a high priority number so that it gets fired first.

Email parsing using Zapier

In this article, we show you how to automatically copy data from your emails and inject it into your aNinja account. This is called Email parsing.

And we’re going to expose this through Zapier.

*Requires Zapier Premium account.

Email Parsing

Email parsing is extracting data from an email using an email parser like Zapier Email Parser. Then connecting the email parser to a Zap to inject that data into your aNinja account.

As long as the emails are all laid out generally the same way, the email parser should be able to detect the data and copy it for you.

Parsing Emails

To parse an email, follow the below instructions:

1- Make a new Email Parser mailbox
  • Go to parser.zapier.com
  • Sign in with your Zapier account or make a new account.
  • Then, click either of the Create Mailbox buttons to add a new mailbox.
"Create Mailbox" button appears in the top right and lower left of Zapier's Email Parser set-up page.
  • Email Parser will then show you an email address like 2grb3sdr@robot.zapier.com.
The page reads "We're waiting... Send an email to 2grb3sdr@robot.zapier.com! Refresh page to look for new email."
  • Copy that address and keep it handy, because that’s where you’ll need to send emails to be parsed later on.
2- Send an email to the parser
  • Open your email app, and find an email like the ones you want to extract data from.
  • Forward this email to the email address you copied earlier (e.g. 2grb3sdr@robot.zapier.com)
  • And click Send.
3- Teach the parser how to read your email

Once Zapier Email Parser receives your email, it shows a text version of your email in the Initial Template box.

Zapier Email Parser page with sections for "Address" "Initial Template" "Body Source" and "Parser Engine"

All you need to do is indicate to the parser the data that you want to copy.

  • Select the text or field that you want the Email Parser to copy.
  • For each field you select, type a name for that field in the box, and click Save.

  • The Email Parser will replace the text with the name in curly brackets, like {{headline1}}.

    Text is highlighted and a dialog box appears, where the user types "Headline 1" and clicks "Save"
  • Repeat that for each field you want the email parser to copy and give each item a unique name.

  • Once that’s done, click the blue Save Address and Template button at the bottom, and your email parser is ready to work.

Want to make Email Parser more reliable?
  • Forward another similar email to the same address.
  • Then click View Emails beside your parser’s name in Zapier Email Parser’s Mailboxes list, to see all of the emails the mailbox has received.
Mailbox History page showing three emails received by the parser address
  • Click Show on one of the items to see the text of the email, with the text Email Parser selected in yellow.
Email text with some sections highlighted in yellow by Email Parser
  • If anything looks incorrect, click the Edit extra template link near the bottom.
  • Select the same text you originally wanted to copy from your emails.
  • Give it the same names, then save the new template.
  • You can repeat that multiple times to make your parser more reliable.
4- Automatically forward emails to the parser

The Email Parser you made is now ready to copy text from other similar emails. We need to send every new email that contains the data you want, to the email parser.

  • Set a filter in your email app to automatically forward messages that match the one you sent to Email Parser.
  • Typically, your notification emails will all have something in common; they come from the same sender and often have the same subject.

We’re going to show you how to set a filter in Gmail. If you use another email service, check your documentation to see if your app or service can automatically forward email messages.

To watch for those emails in Gmail, you’ll first need to add your email parser address to Gmail to automatically forward emails. Here’s how:

    • Open your Gmail Forwarding settings, Settings > Forwarding tab.

    • Click Add a forwarding address.

    • Enter your Email Parser e.g. 2grb3sdr@robot.zapier.com email in the text box and click next.

    • Check your email. Zapier should send you a confirmation email from Gmail. If you don’t see it, check the Email Parser app’s mailbox, it should have the email. Either way, copy the confirmation code, then paste it into the box back into your Gmail Forwarding settings.

    • Now you can have Gmail automatically forward emails to your email parser. First search for the email address and/or subject of the messages you’ll have the email parser process.

    • Click the tiny down arrow on the right of the search bar to see the full Advanced Search options.

    • Then click the Create filter button or link in the lower right corner. Have that filter forward the email to the email parser address you just added and you should be all set.

    • Every time you receive the email messages you want to parse, Gmail will send it along to the Email Parser.

5- Put your parsed email data to work

Now, you need to connect your Email Parser to Zapier’s app automations, which lets you send data from your emails to your aNinja account.

Follow instructions here to create a Zap and connect your Email Parser with aNinja:

https://help.aninja.com/knowledge-base/zapier-aninja-integration/

  • The Email Parser is the trigger event.
  • aNinja is the Trigger Action.
Set Up Action page with several Parse Outputs in the "Message" field.

Mapping fields for a successful data import

It’s important to understand the data types for successful fields mapping during the import of data.

Whether you’re importing your contacts in a CSV file, or through API (Forms, Ad campaigns, etc…); saving your data in the right place allows you to easily manipulate it and create Smartlists, search for leads, and launch automation.

Data Types

Mapping fields for a successful data import:

aNinja has both Standard fields which are the built-in default fields and Custom fields, which you customize to your needs.

All the imported data is located in the Lead view.

Standard Fields

aNinja standard fields are found under the categories: Lead’s Contacts, Company, and Address.

The Contact name is the only required field and it’s essential to complete the import.

Custom Fields

Prefix your field’s name with “Custom.” so it is saved as a custom field on the lead page.

When importing leads in bulk in a CSV file to aNinja, if you can’t see the fields you need, you can create them manually upon import.

Or, before the bulk import, go to Settings > Custom FieldsWhen doing a bulk import, aNinja anticipates which Custom fields you might want to create and marks them as ‘New’. Mapping to a field marked ‘New’ automatically creates a new Custom Field within aNinja.

Types of Custom Fields

When you create a custom field in Settings > Custom fields, you can designate its type:

Text – For text input
Link – For fields with any link/URL
Date – Date in YYYY-MM-DD format
Dropdown – Fields with multiple options dropdown

Then, you can use it on the lead page and assign it a value to be able to group/search for specific leads when needed.

Where does the imported data appear

After the import, you can search your aNinja CRM for the imported leads. You can also search for any custom field and any other info that you have imported.

In the lead view, the left side is where the lead’s data appears:


Mapping fields for Leads Bulk Import

aNinja offers different ways to create leads in your account. Importing leads in a CSV file is one of them.

Before the import, you want to sanitize the contacts file to ensure proper mapping.

The correct mapping of leads’ data to aNinja fields saves your data in the right place which makes searching for it easy.

You can also save bulk import mappings and reload it when you have a similar file to import (same order and number of headers).

Mapping leads data to aNinja fields

  • For the bulk import, go to Settings > Bulk Import
  • Select the contact’s file.
    • If in your CSV file there are records with no contact names, you receive an alert so you go back to the file and add the names. Then try to upload it again.
  • Now, map the data to aNinja fields:

  • The contact name is the only required field.
    • You can either map it to one field or join 2 fields in case the first name and last name are saved in 2 separate columns in your CSV file.
  • It’s important to map the data in your contacts file with the correct aNinja fields to be able to find them in the right place in the lead view.

You can even create custom fields if they’re not already there.

Standard fields
  • Contact_name: is a required field and it’s essential to complete the import.
  • Primary contact’s email: contact_email1. You can also add a second email (contact_email2).
  • Primary contact’s phone: contact_phone1.You can also add a second phone number (contact_phone2).
    • Here we recommend choosing the mobile number to be the primary contact phone as the system grabs the primary phone number to be used when texting.

Custom fields

You can create custom fields immediately when doing the mapping if they were not listed among the fields. Just prefix the field with “Custom.” e.g. Custom.Source

Saving field mappings

It’s optional. You can save the fields mapping and reload it when you have a similar file to import (same order and number of headers).

It’s useful if you regularly do bulk imports into aNinja and have many fields to map.

Don’t forget to click Upload to import the data.

Where does the imported data appear

After the import, you can search your aNinja CRM for the imported leads: Lead Contacts, Custom fields, and Addresses. Type your search on the top navigation bar.

  • Lead’s contacts appear under Contacts in the lead view.
  • Opportunities also appear in the opportunity section in the lead view.
  • The company’s info appears on the top left of the lead view, in the Company section.
  • Custom fields appear under Custom fields in the lead view.

Have any specific questions on the best ways to import your data? Please, email our Support team at support@aninja.com.

Assigning a bulk import list

Assigning a lead to a user allows you to efficiently follow up with your lead and close them quickly. Especially if you have distributed the tasks between your team members to better close leads. How about assigning a bulk import list to a specific user!

Assigning a bulk import list to a user

  • When preparing the leads file, add a column in your CSV sheet called User_id.
    • You can find the user_id in Settings > Users > next to the user name.
  • And set the column values to the User ID of the user you want to assign the leads to.

Mapping the user ID to aNinja field

When importing your CSV file, you want to map the user ID in your CSV file to user_id in aNinja fields.

Where does the user ID appear?

After the import, the user ID you’ve added to your contacts list will show in the lead view of the imported leads > in the Assigned to section.Assigning a bulk import list

Note: As long you have “Users can only see Leads assigned to them” enabled under Settings > Global Settings, then users (unless admin) can only see leads assigned to them.

Need help in assigning a bulk import list? Leave us an email at support@aninja.com and include the CSV file. Let us know the user you’d like to assign.

Integrating Hubspot forms with aNinja

In this article, we show you how integrating the Hubspot forms with aNinja can be done in 2 steps.

The integration allows you to forward leads into your aNinja account simply using a programming code or an API. Which allows you to augment the number of your leads.

1- In Hubspot Marketing Hub, Edit your page, then, go to page Settings > Advanced Options.

2- In Footer HTML add the following Javascript (here, you will need to adapt the code to your form and use your aNinja API key).

<script src=”https://ajax.googleapis.com/ajax/libs/jquery/3.2.1/jquery.min.js”></script>
<script>

$(document).on(‘submit’,’form’,function(){
var contact_name = $(“input[name=’firstname’]”).val() +” “+$(“input[name=’lastname’]”).val();
var contact_email1 = $( “input[name=’email’]”).val();
var contact_phone1 = $( “input[name=’phone’]”).val();

    $.ajax({
        type: 'POST',
        url: "https://aninja.com/api/v1/contactform/?apikey=YOUR_ANINJA_API_KEY_HERE",
        data: {
            'contact_name': contact_name,
            'contact_email1': contact_email1,
            'contact_phone1': contact_phone1,
            'your-comments': 'From my Hubspot form'
        },
        success: function (data) {
            console.log('[Info] aNinja form submitted successfully');
        }
    });
});

</script>

  • Also, check if your Hubspot plan offers Workflows. If so, you can post the Form submission to aNinja through a Workflow webhook in Hubspot.

Where does the imported data appear

After the integration, you can search your aNinja CRM for the imported leads. You can also search for any custom field, opportunities, and any other info that is collected from the forms.

  • Lead’s contact appears in the leads contact section in the lead view
  • Opportunities also appear in the opportunity section in the lead view
  • The company’s info appears on the top left of the lead view, in the Company section.
  • Custom fields appear in the custom field section of the lead view
  • Lead Search is a field that also appears in the bottom left of the lead view. Specifically, these are info/links on the lead or the organization found in Google search.

Need help integrating Hubspot forms with aNinja? Leave us an email at support@aninja.com. We’re more than happy to assist you.

Calendly action did not trigger lead creation in aNinja

Calendly action did not trigger lead creation in aNinja?


Basically, any activity in your Calendly Calendar (like booking a demo with a lead), must trigger the creation of a lead into your aNinja account.

Calendly action did not trigger the creation of a lead

When you installed Calendly to use it as your calendar in your aNinja, the system has set a trigger that allows creating a lead in aNinja, after any action with leads in Calendly.

If Calendly‘s action did not trigger lead creation in aNinja, that means that there is an issue with the communication between the 2 applications.

Let’s get to know how API work in this case. API is a set of functions that allows 2 applications to interact with each other. Even more, to exchange data. In our case, the applications are Calendly and aNinja.

  • For the integration to work, Calendly shares its personal access token with you. You then save it in your aNinja account.
  • If you can’t see the webhooks data under the User / Organization Webhooks, you want to check your Calendly plan. The integration requires a “Professional” account.
  • Sometimes, Calendly automatically disables the webhooks if it was receiving error codes from our server. To re-enable it, you should delete and recreate the webhook.
  • You want to click on Refresh Webhooks every time you make changes to the webhooks.

Need help with this? Just reach us at support@aninja.com. We will happily assist you!

Notifications on incorrect lead contact data

The Lead contact is the lead info saved in the Lead View (email addresses, phone numbers, URLs). When the lead is created, the contacts are saved as entered/provided.

The system uses the lead contacts to send your emails and texts. This means, in case the lead contact was incorrect, your outbound will surely not reach the lead.

Notifications on unsent emails outbound

You receive an email notification that the email address of this lead is incorrect and your outbound did not reach them.

Notifications on unsent texts outbound

You can see an error message in red in the lead history.

Notifications on incorrect lead contact data

Note: You also receive an error message after you send a text if the primary phone number is a landline number.

You can handle the outgoing SMS with an error code through triggers. e.g. mark as “do not contact” the lead with a landline number.

Lead Interactions

Lead interactions refer to the various touchpoints between a business and a potential customer, or lead, throughout the sales and marketing process.

You can track and manage those interactions in aNinja. Which allows you to monitor and analyze them with leads and track their progress through the sales pipeline.

In aNinja, they can take many forms, including notes, emails, texts, and phone calls.

Types of lead interactions

  • Note 
    • Leave any important note for you or other team members to pick up on, including minutes notes.
  • Email
    • Send personalized emails to leads to introduce your product or service, provide value, and encourage them to take action.
  • Text
    • Using SMS or other messaging apps to communicate with leads in a more immediate and personal way.
  • Call 
    • Speaking with leads over the phone to build rapport, answer questions, and provide more information about your product or service.

Where can I see the lead interactions

They exist in the lead view, in “All Interactions” dropdown.

Lead Interactions

You can access the lead view from 2 places:

  • On the top navigation bar, type the name of the lead or any info related to this lead (email, phone, URL, or custom field). Then, aNinja finds them for you. Just click on the name and the system redirects you to the lead view where you can start the lead interactions.
  • From the left sidebar, click on Leads icon. It shows you the list of all the leads you have in aNinja. Locate the lead, click on their name, and you will be guided to their lead view.

All your interactions are saved in the Lead View in the History section to give you a deep view of the tasks performed for this lead.

Search for more help articles in the aNinja Knowledge base