Marking a lead as “Do Not Contact”

When you don’t intend to message a certain lead, you can mark them as “Do Not Contact”.

Moreover, through triggers, you can stop emails or texts sequences for this lead separately.

Marking a lead’s contact as “do not contact”

To mark a lead as “do not contact”,

  • Go to the lead View, on the left side, click on the plus sign (+) next to Contacts.

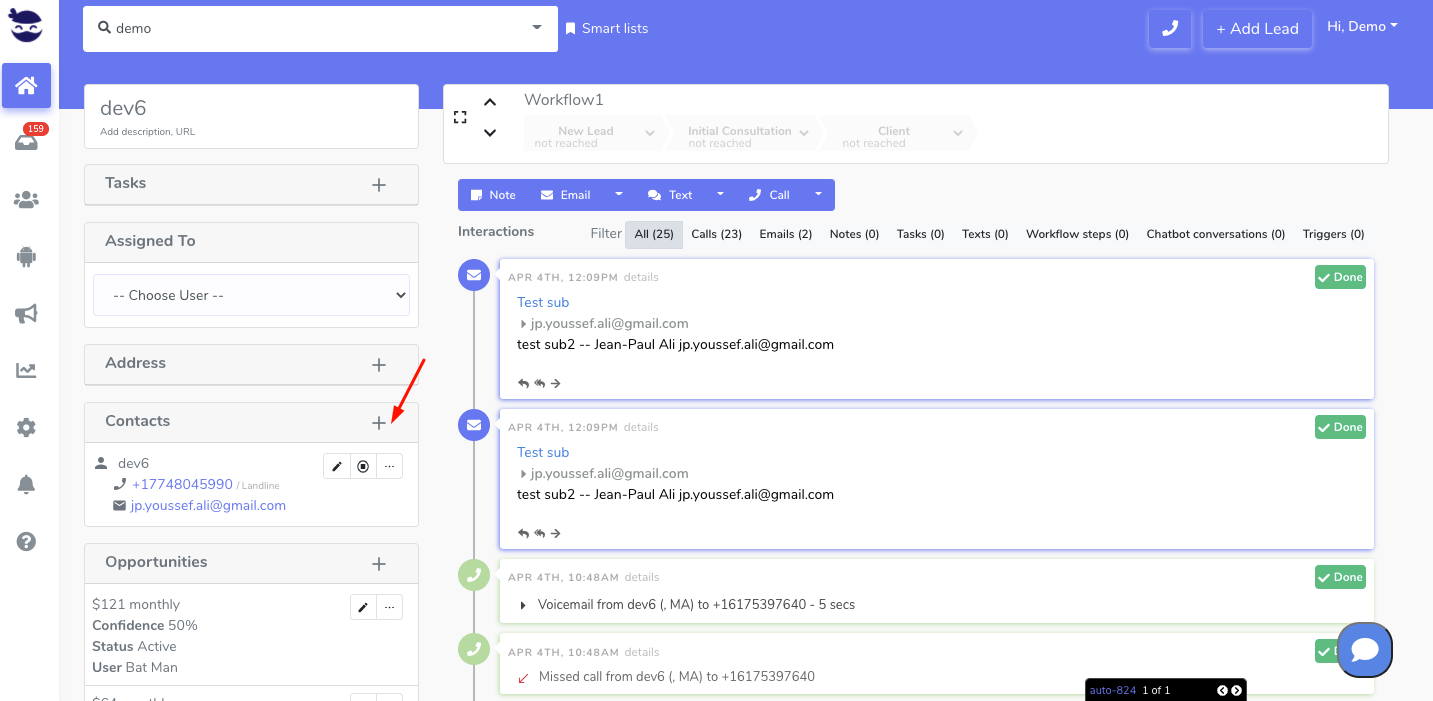
  • Push the Stop next to a contact item to activate the “do not contact”.
    • e.g. If you want to stop sending texts to a certain lead, just click on the stop button next to the phone number(s).
    • If you want to stop sending emails and texts to a certain lead, click on the stop button next to all contact items (emails and phone numbers).

mark lead as "do not contact"

  • Once the “do not contact” button turns red, all automatic messages (emails or texts based on your selection) will be automatically blocked for this lead.
  • You can still however manually contact the lead through email from the lead view.
  • If you’re replying to a lead’s text after being marked as do not contact, it will show you “no contact” in the phone number section.
  • Regarding the leads that were added to the “do not contact” list; they do get included in the bulk sequences but their texts get blocked by aNinja so it doesn’t get actually sent.
    You can check them by clicking on the blocked leads count in ‘Bulk Sequences’ widget.
  • Adding a lead’s contact to the “do not contact” list”, can be automatically executed through Triggers, based on an event that verifies the trigger’s condition.
  • You can manage the contacts saved in the “Do Not Contact List” in Settings > Do Not Contact Lists (view, remove from the do not contact list, and export as CSV).

Bulk texting a smartlist of leads for the first time

Bulk text helps you send customized SMS for your marketing / service campaigns. It helps provide actionable alerting, on-call management, and much more. With aNinja, you can create a smartlist with the leads that you’ve not yet contacted: Bulk texting a smartlist of leads for the first time.

Bulk texting a smartlist of leads for the first time

  • If you’d like to create a Smartlist of leads that have never received a text from your aNinja account before, you can use the following query:

sms.outgoing.total=0

Bulk texting a smartlist of leads for the first time

The results of the Smartlist will show in the Leads view. Go ahead and click on Bulk Text Sequence to start launching your text sequences to this list.

Saving your Smartlist

You can save that query into a Smartlist for future use.

  • Click on Save as Smart list
  • Name your Smartlist (e.g. Leads not contacted)
  • And Click on Save

Find your saved Smartlist

Next to the top navigation bar, Click on Smart lists and locate your smartlist

It brings you the results in the Leads view. You can choose to send Bulk Email Sequences or Bulk Text Sequences, or even power dial this list of leads.

Automate.io aNinja Integration

In this article, we show you how the Automate.io aNinja Integration can be easily done.

Getting Started

  • Log in to automate.io
  • Click on Create a Bot at the top of your dashboard. 
  • Give a name for your Bot. Let’s say ‘Facebook leads to aNinja‘, as we are using these two apps in this Bot.

Connecting the Trigger app

  • Select Facebook Lead Ads from the selection.

  • Under the Input Fields select the Page and Form.

Connecting the Action app

  • Select Webhooks under the action app.

Configuring the Action app

  • Select POST data under Webhooks.

  • Here, we need to find your aNinja API Key
  • Under Submission URL field put:
    • https://aninja.com/api/v1/contactform/?apikey=YOUR_API_KEY
      • Example:  https://aninja.com/api/v1/contactform/?apikey=sample123-6yauyue5e

Enter the Posting URL

  • Copy & Paste in the Posting URL from above.

Saving and Turning ON the Bot

  • Lastly, after you are done with creating your Bot, save it by clicking on the Save button on the top-right.
  • You see that your Bot is in an OFF state. You can turn it ON using the toggle button.

Where does the imported data appear

After the integration, you can search your aNinja CRM for the imported leads. You can also search for any custom field, opportunities, and any other info that you have imported.

  • Lead contacts appear in the leads contact section in the lead view
  • Opportunities also appear in the opportunity section in the lead view
  • The company’s info appears on the top left of the lead view, in the Company section.
  • Custom fields appear in the custom field section of the lead view
  • Lead Search is a field that also appears in the bottom left of the lead view. Specifically, these are info/links on the lead or the organization found in Google search.

Need help with Automate.io aNinja Integration? Leave us an email at support@aninja.com. We will happily assist you.