Calendly action did not trigger lead creation in aNinja

Calendly action did not trigger lead creation in aNinja?


Basically, any activity in your Calendly Calendar (like booking a demo with a lead), must trigger the creation of a lead into your aNinja account.

Calendly action did not trigger the creation of a lead

When you installed Calendly to use it as your calendar in your aNinja, the system has set a trigger that allows creating a lead in aNinja, after any action with leads in Calendly.

If Calendly‘s action did not trigger lead creation in aNinja, that means that there is an issue with the communication between the 2 applications.

Let’s get to know how API work in this case. API is a set of functions that allows 2 applications to interact with each other. Even more, to exchange data. In our case, the applications are Calendly and aNinja.

  • For the integration to work, Calendly shares its personal access token with you. You then save it in your aNinja account.
  • If you can’t see the webhooks data under the User / Organization Webhooks, you want to check your Calendly plan. The integration requires a “Professional” account.
  • Sometimes, Calendly automatically disables the webhooks if it was receiving error codes from our server. To re-enable it, you should delete and recreate the webhook.
  • You want to click on Refresh Webhooks every time you make changes to the webhooks.

Need help with this? Just reach us at support@aninja.com. We will happily assist you!

Adding your calendar to email & text sequences

Adding your Calendar to email & text sequences can be a convenient way to share your schedule with the recipients.

It allows them to easily see when you are available and schedule meetings or appointments without having to ask you for your availability.

Calendly is a calendar that you can install in your aNinja account.

Adding your Calendar to email & text sequences

Here are some ways to add your calendar link to an email or text message.

Benefits of sharing your calendar

Sharing your calendar in email and text sequences to be sent to leads in bulk can provide several benefits, including:

  1. Improved lead engagement: Make it easy for leads to schedule a meeting with you at a time that works for them. This can increase lead engagement and improve your chances of converting them into customers.
  2. Time savings: By allowing leads to schedule meetings with you directly, you can save time that would otherwise be spent scheduling appointments manually.
  3. Increased efficiency: Sharing your calendar link can help you manage your time more efficiently; it allows you to schedule appointments back-to-back or during times when you’re typically less busy. This can help you maximize your productivity and reduce downtime.
  4. Personalization: Including your calendar link in your email or text sequences, can make your outreach more personalized and relevant to each lead. This can help build rapport and increase the likelihood of a positive response.
  5. Flexibility: By giving leads the ability to choose a time that works for them, you can demonstrate flexibility and a willingness to work around their schedule. This can help build trust and credibility with your leads.

Overall, sharing your calendar link can help streamline your sales and marketing processes. It improves lead engagement, and increases efficiency.

However, it’s important to ensure that your calendar is up-to-date.

Calendly API Integration

Calendly is an online Calendar that helps you schedule meetings without the back-and-forth emails. Moreover, Calendly appointments can now be automatically added to your aNinja account. You just need to activate the Calendly API integration.

The integration requires a “Professional” account with Calendly.

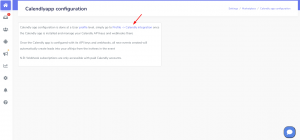
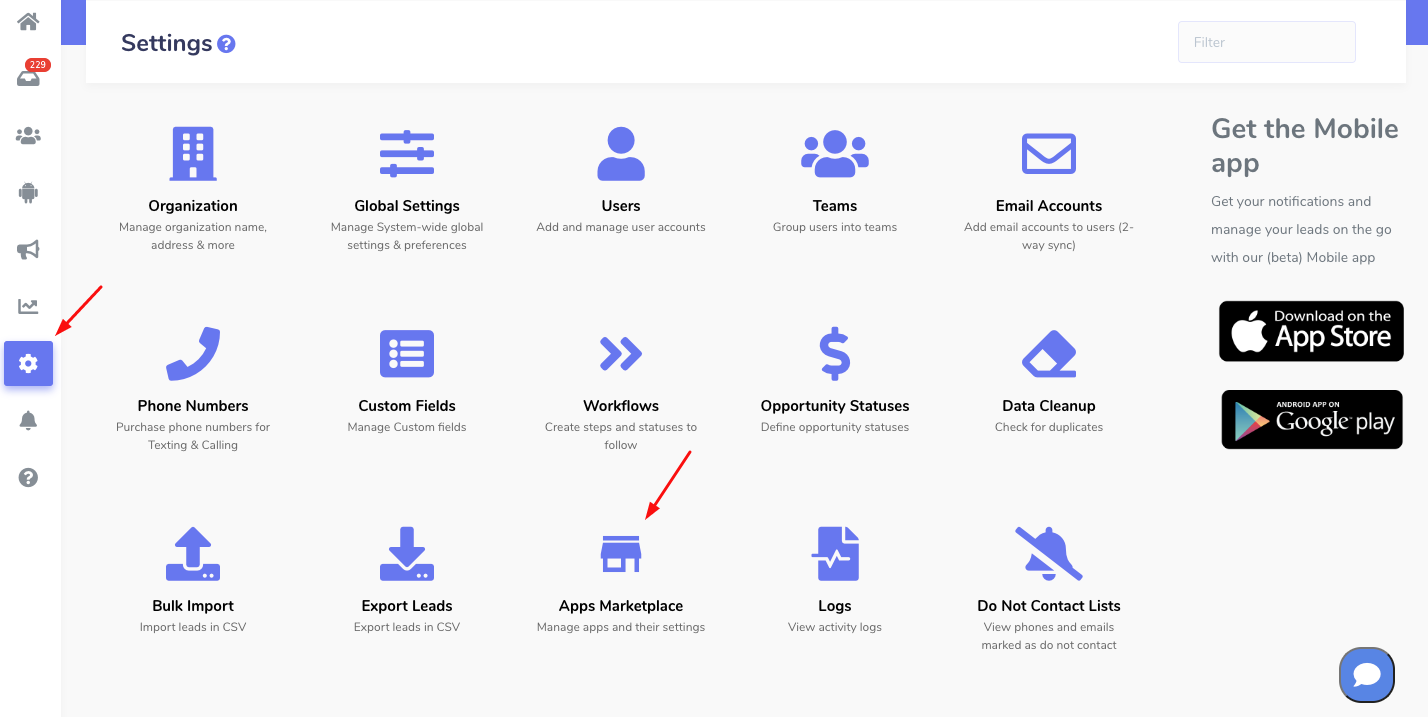
Activating the integration with Calendly

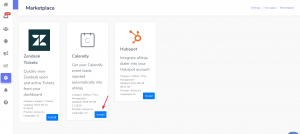
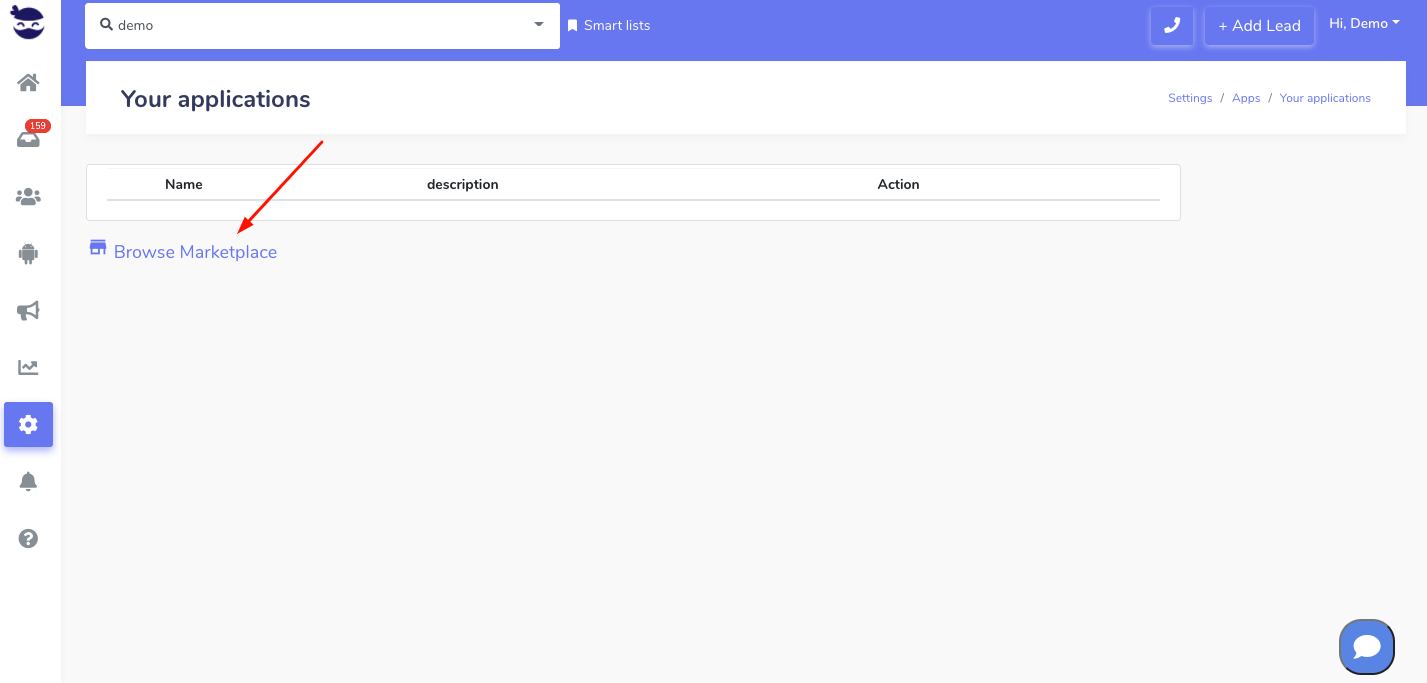
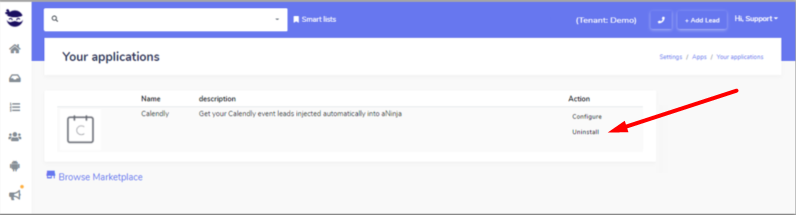
  • First, click on Browse Marketplace

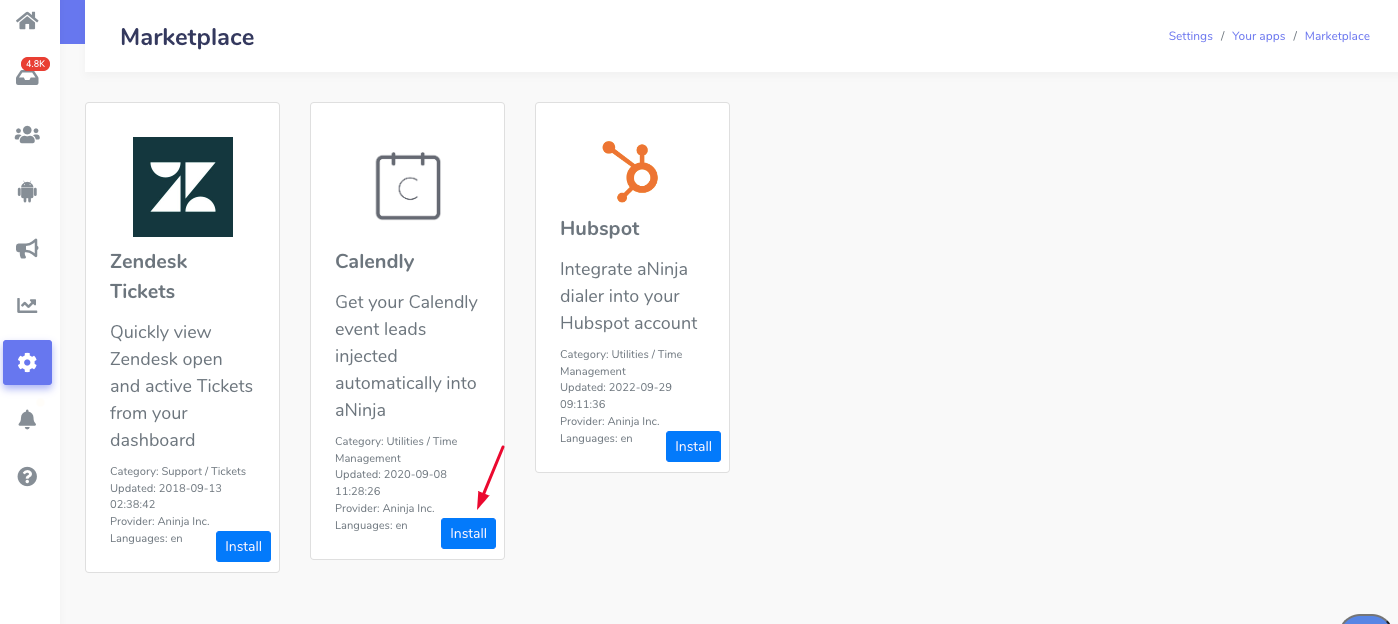
  • And, click on Install under Calendly

  • Then, hit Configure

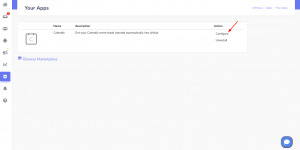
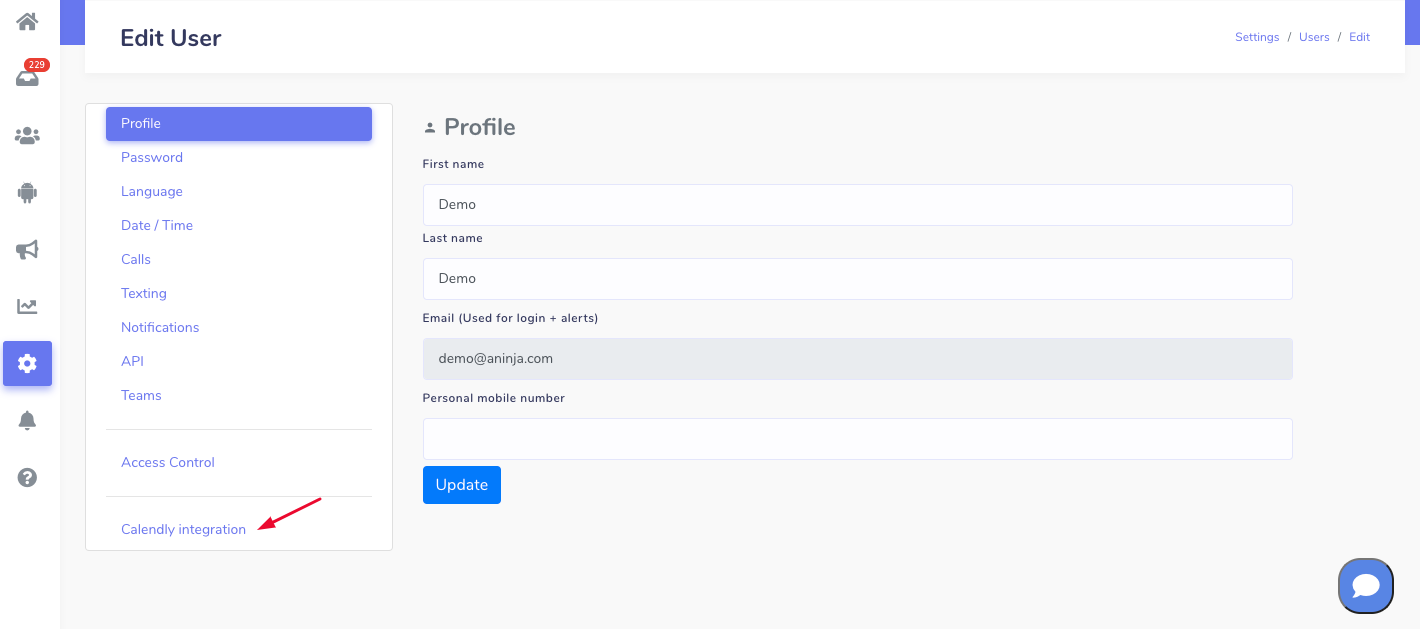
  • Click on Profile > Calendly Integration

  • You will be redirected to your user profile. Hit Calendly Integration

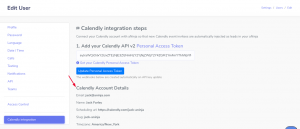
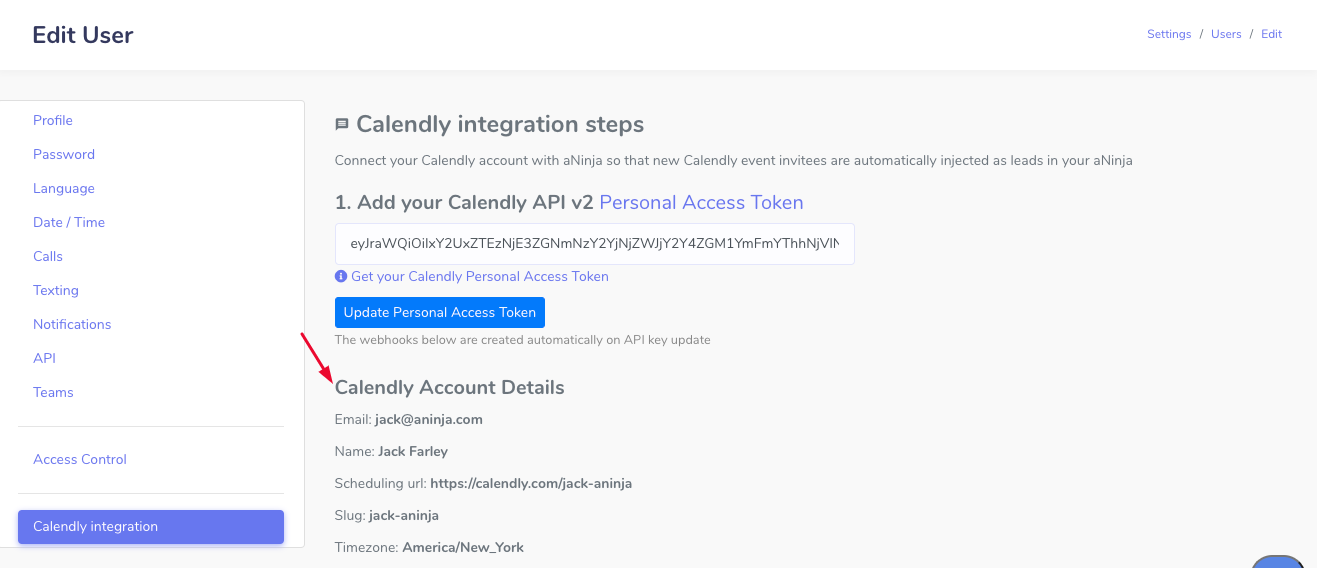
  • Under “Add your Calendly API v2“, add your Calendly Personal Access Token.
    • Click on “Get your Calendly Personal Access Token” to be redirected to your Calendly account.

  • Lastly, click on Update Personal Access Token.
  • You can see the Calendly account details:

  • To complete the integration, you want to activate ONE of the two webhooks:
    • Calendly User Webhooks
      • This triggers the webhooks for subscribed events that belong to the specific user.
    • OR Calendly Organization Webhooks:
      • This triggers the webhooks for ALL the subscribed events within the Organization.
  • If you can’t see the webhooks data under the User / Organization Webhooks, check your Calendly plan. The integration requires a “Professional” account.
  • Refresh Webhooks every time you make changes to the webhooks.

Now, any Calendly event automatically injects a lead into your aNinja account.

We’ve added a custom field ‘calendly_webhook_user_id‘ to the new leads created via Calendly. It represents the id of the user where the Calendly webhook is configured.

You can include the calendly_webhook_user_id in the trigger’s conditions, to e.g. assign the lead to the correspondent user.

Fields mapping

Ensure correct transfer of Calendly form fields to lead contacts and custom fields by using the provided naming conventions and mapping them to aNinja fields:

  • Name: map to contact_name (this is the only required field for the mapping).
  • Phone Number: map to contact_phone1
  • Email: map to contact_email1

My Calendly Integration Stopped Working

In this case, please check the following:

  • Firstly, if Calendly has regenerated or changed the Personal access token, then you should update it in aNinja for the integration to work.
  • Secondly, check if the Calendly App in aNinja is still active.
  • Thirdly, check if your Calendly account is still active and that it allows for API integrations (Professional plan).
  • Lastly, sometimes, Calendly automatically disables the webhooks if it receives error codes from our server. To re-enable it, you want to delete and recreate the webhook in your User profile > Calendly Integration.

After the integration, any Calendly appointment will automatically inject a lead into your aNinja account.

Where does the lead data appear

After the integration, you can search your aNinja CRM for new leads. You can also search for any custom field, opportunities, and any other captured info.

  • Lead’s contacts appear in the leads contact section in the lead view.
  • The company’s info appears on the top left of the lead view, in the Company section.
  • Custom fields appear in the custom field section of the lead view.
  • Lead Search is a field that also appears in the bottom left of the lead view. Specifically, these are info/links on the lead or the organization found in Google search.

Need help with the Calendly API integration? Leave us an email at support@aninja.com. And we will happily assist you!

Remove Calendly app

If you’ve added Calendly app in your aNinja, you can easily remove it from your aNinja account at any time.

Removing Calendly app

Here are the steps to follow to remove the Calendly app from  your aNinja account.

Remove Calendly app

Need help to remove the Calendly app? Leave us an email at support@aninja.com. We will happily assist you!