Email parsing using Zapier

In this article, we show you how to automatically copy data from your emails and inject it into your aNinja account. This is called Email parsing.

And we’re going to expose this through Zapier.

*Requires Zapier Premium account.

Email Parsing

Email parsing is extracting data from an email using an email parser like Zapier Email Parser. Then connecting the email parser to a Zap to inject that data into your aNinja account.

As long as the emails are all laid out generally the same way, the email parser should be able to detect the data and copy it for you.

Parsing Emails

To parse an email, follow the below instructions:

1- Make a new Email Parser mailbox
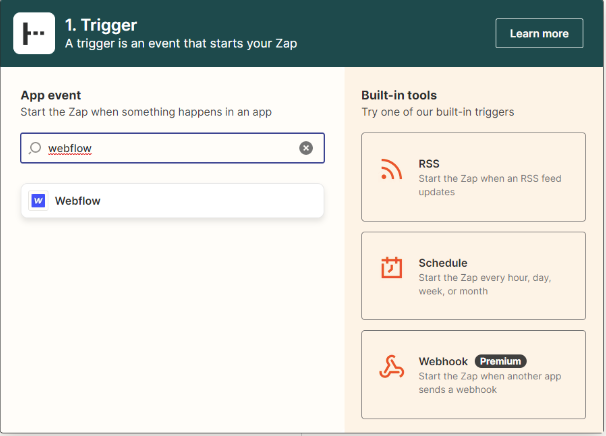
  • Go to parser.zapier.com
  • Sign in with your Zapier account or make a new account.
  • Then, click either of the Create Mailbox buttons to add a new mailbox.
"Create Mailbox" button appears in the top right and lower left of Zapier's Email Parser set-up page.
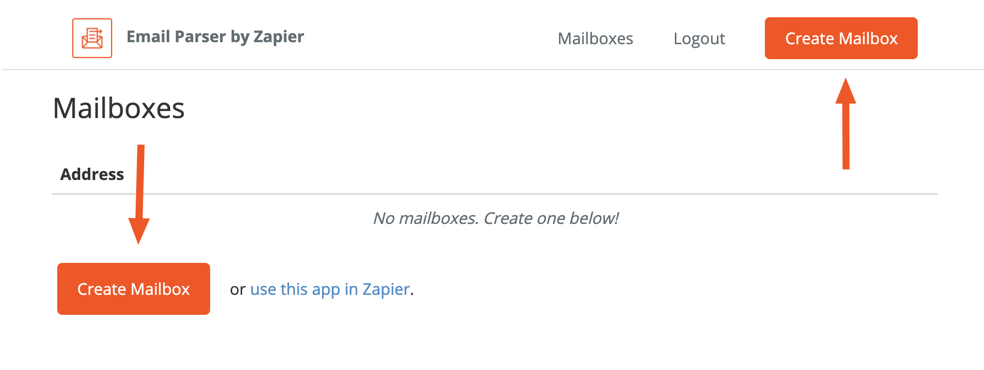
  • Email Parser will then show you an email address like 2grb3sdr@robot.zapier.com.
The page reads "We're waiting... Send an email to 2grb3sdr@robot.zapier.com! Refresh page to look for new email."
  • Copy that address and keep it handy, because that’s where you’ll need to send emails to be parsed later on.
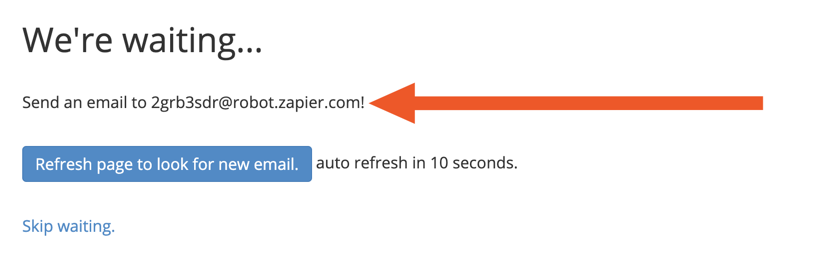
2- Send an email to the parser
  • Open your email app, and find an email like the ones you want to extract data from.
  • Forward this email to the email address you copied earlier (e.g. 2grb3sdr@robot.zapier.com)
  • And click Send.
3- Teach the parser how to read your email

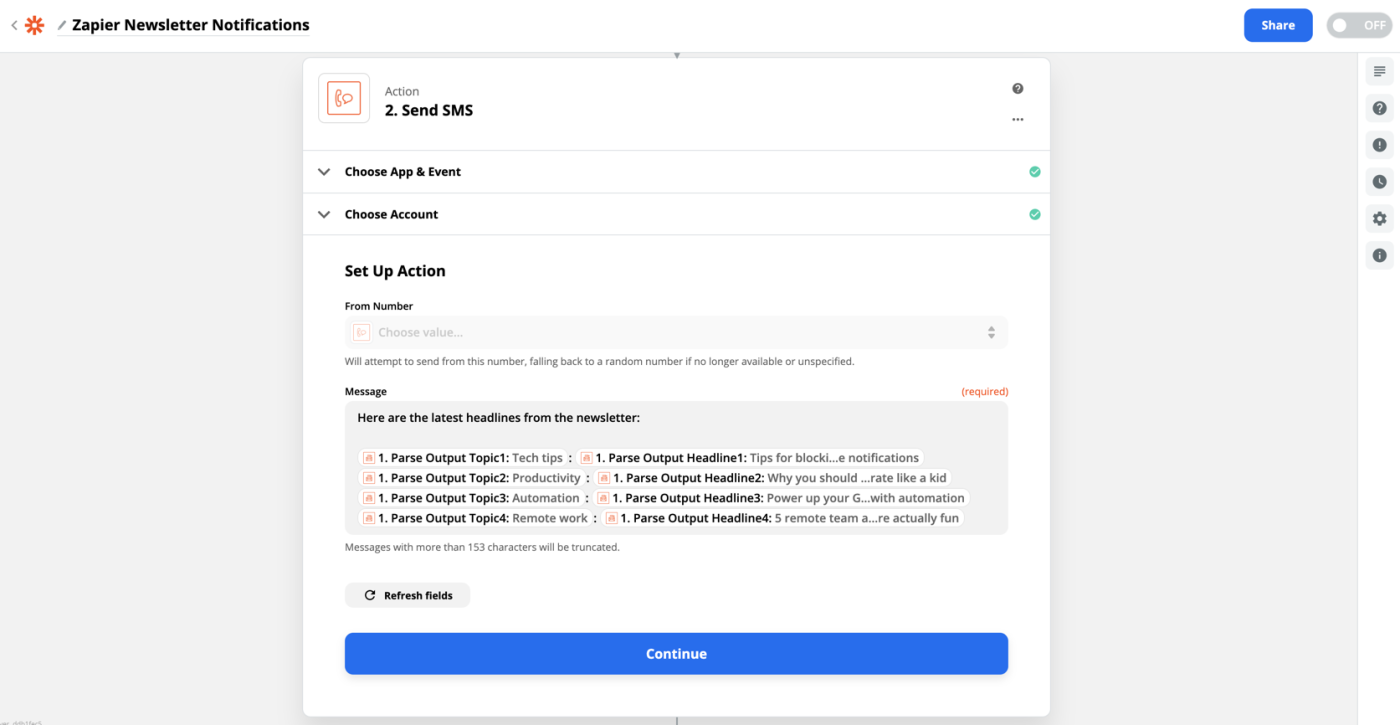
Once Zapier Email Parser receives your email, it shows a text version of your email in the Initial Template box.

Zapier Email Parser page with sections for "Address" "Initial Template" "Body Source" and "Parser Engine"

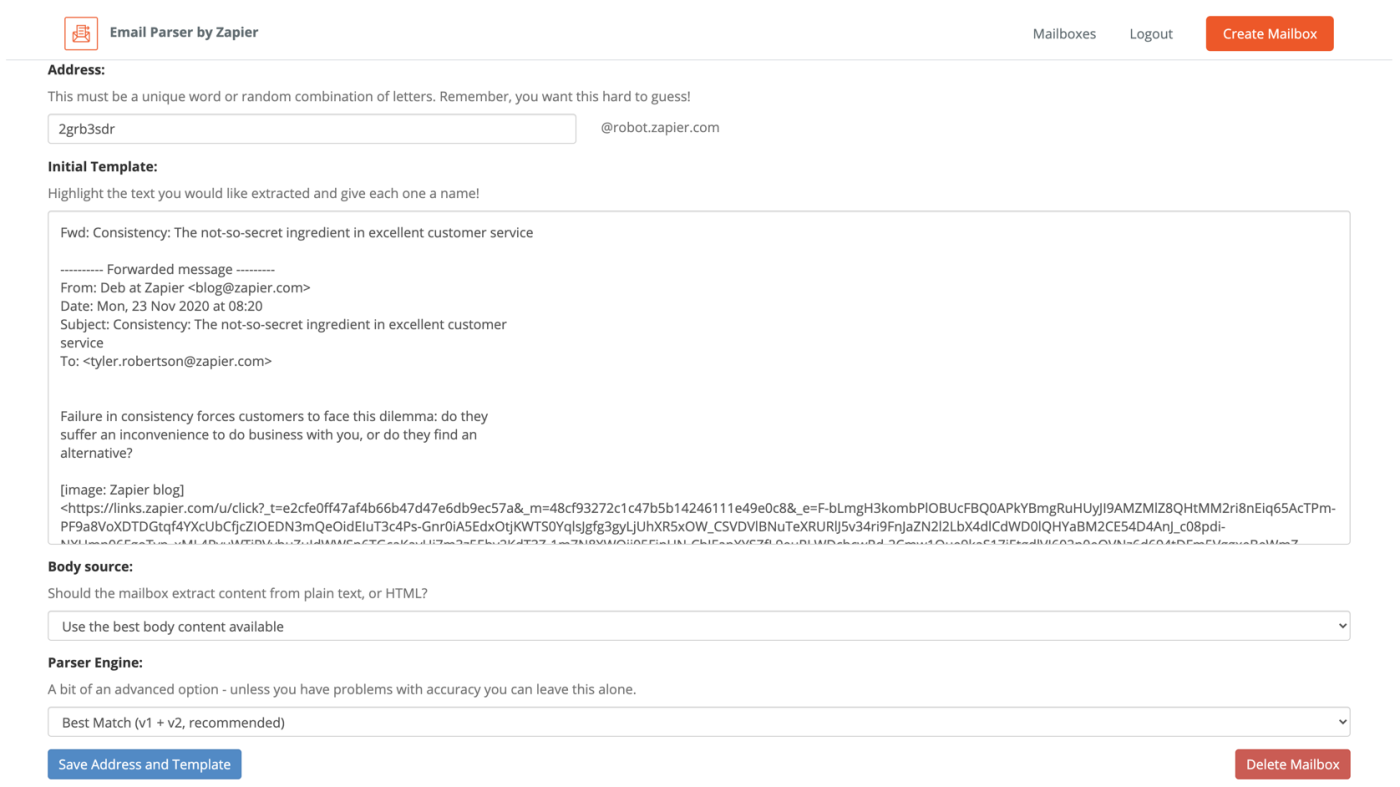
All you need to do is indicate to the parser the data that you want to copy.

  • Select the text or field that you want the Email Parser to copy.
  • For each field you select, type a name for that field in the box, and click Save.

  • The Email Parser will replace the text with the name in curly brackets, like {{headline1}}.

    Text is highlighted and a dialog box appears, where the user types "Headline 1" and clicks "Save"
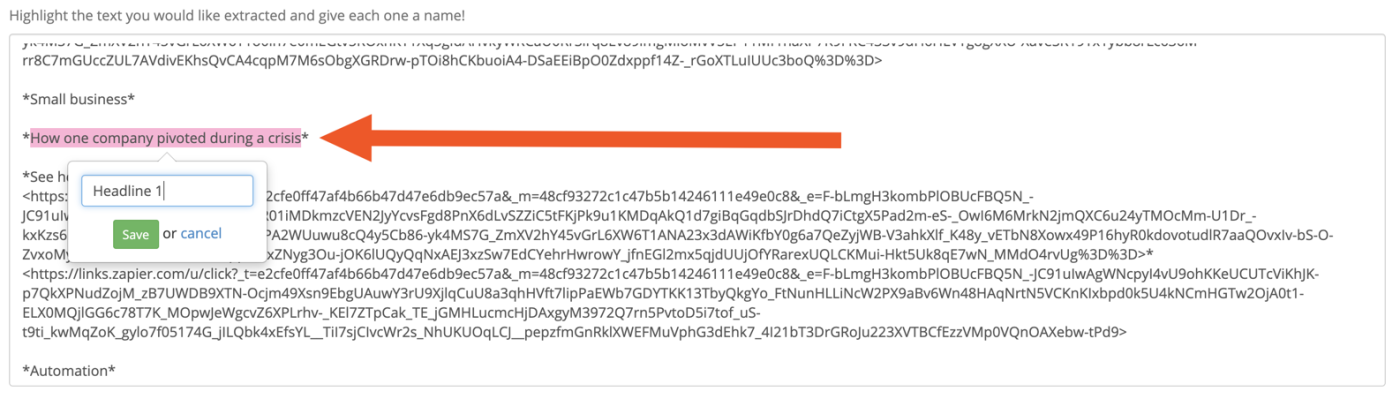
  • Repeat that for each field you want the email parser to copy and give each item a unique name.

  • Once that’s done, click the blue Save Address and Template button at the bottom, and your email parser is ready to work.

Want to make Email Parser more reliable?
  • Forward another similar email to the same address.
  • Then click View Emails beside your parser’s name in Zapier Email Parser’s Mailboxes list, to see all of the emails the mailbox has received.
Mailbox History page showing three emails received by the parser address
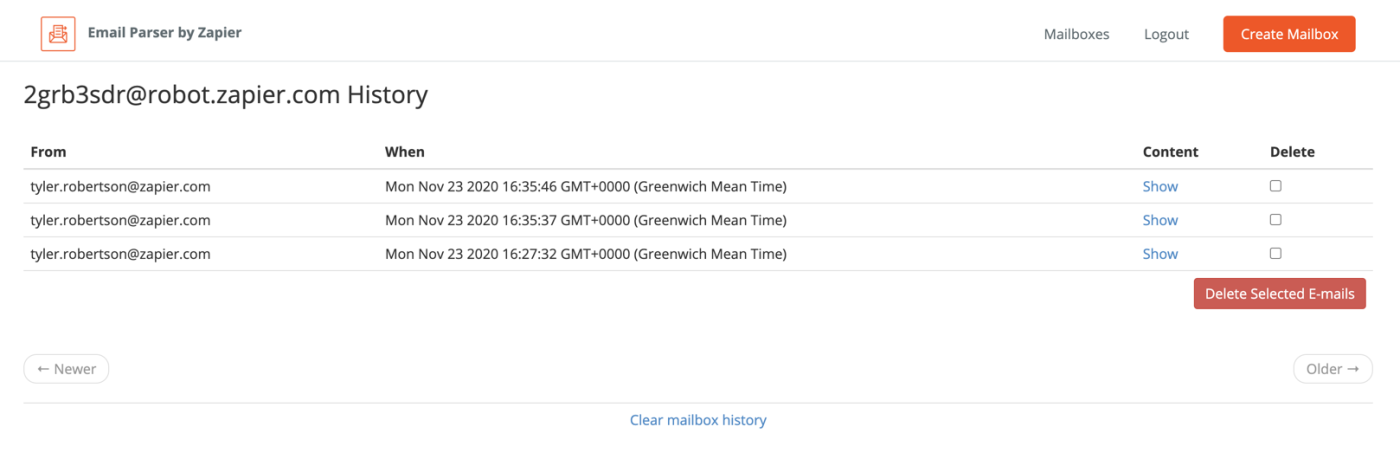
  • Click Show on one of the items to see the text of the email, with the text Email Parser selected in yellow.
Email text with some sections highlighted in yellow by Email Parser
  • If anything looks incorrect, click the Edit extra template link near the bottom.
  • Select the same text you originally wanted to copy from your emails.
  • Give it the same names, then save the new template.
  • You can repeat that multiple times to make your parser more reliable.
4- Automatically forward emails to the parser

The Email Parser you made is now ready to copy text from other similar emails. We need to send every new email that contains the data you want, to the email parser.

  • Set a filter in your email app to automatically forward messages that match the one you sent to Email Parser.
  • Typically, your notification emails will all have something in common; they come from the same sender and often have the same subject.

We’re going to show you how to set a filter in Gmail. If you use another email service, check your documentation to see if your app or service can automatically forward email messages.

To watch for those emails in Gmail, you’ll first need to add your email parser address to Gmail to automatically forward emails. Here’s how:

    • Open your Gmail Forwarding settings, Settings > Forwarding tab.

    • Click Add a forwarding address.

    • Enter your Email Parser e.g. 2grb3sdr@robot.zapier.com email in the text box and click next.

    • Check your email. Zapier should send you a confirmation email from Gmail. If you don’t see it, check the Email Parser app’s mailbox, it should have the email. Either way, copy the confirmation code, then paste it into the box back into your Gmail Forwarding settings.

    • Now you can have Gmail automatically forward emails to your email parser. First search for the email address and/or subject of the messages you’ll have the email parser process.

    • Click the tiny down arrow on the right of the search bar to see the full Advanced Search options.

    • Then click the Create filter button or link in the lower right corner. Have that filter forward the email to the email parser address you just added and you should be all set.

    • Every time you receive the email messages you want to parse, Gmail will send it along to the Email Parser.

5- Put your parsed email data to work

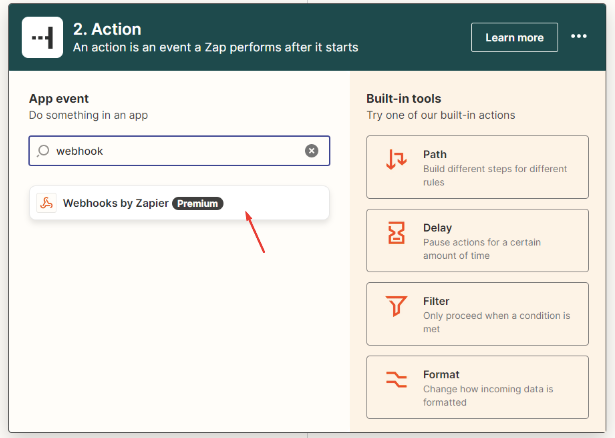
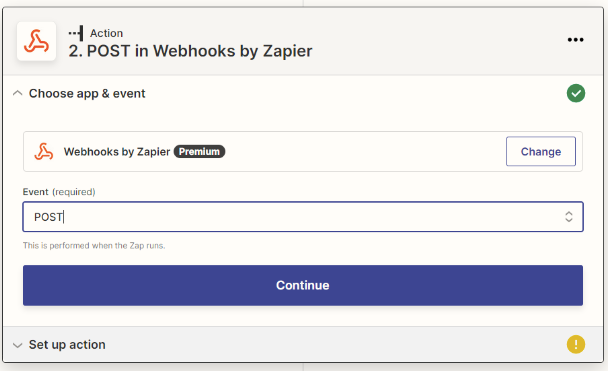
Now, you need to connect your Email Parser to Zapier’s app automations, which lets you send data from your emails to your aNinja account.

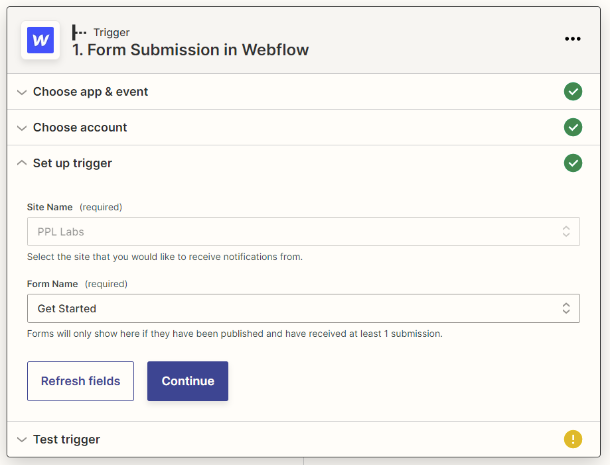
Follow instructions here to create a Zap and connect your Email Parser with aNinja:

https://help.aninja.com/knowledge-base/zapier-aninja-integration/

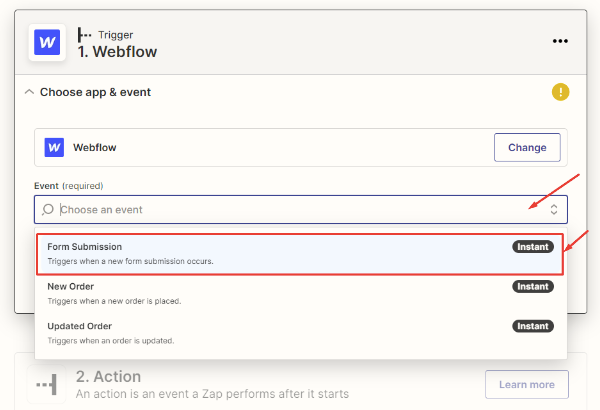
  • The Email Parser is the trigger event.
  • aNinja is the Trigger Action.
Set Up Action page with several Parse Outputs in the "Message" field.

Configuring iOS email with Rackspace

Configuring iOS email with Rackspace allows you to send and receive emails using iOS.

Let’s look at how you can use the Rackspace settings to configure your iOS email.

Configuring your iOS email with Rackspace

  1. Visit Settings and tap Passwords and Accounts. In this example, we are using the Mail app for iOS 13.

2. Next, tap Add Account.

3. Select Other at the bottom.

4. Tap Add Mail Account.

5. In the next screen, enter the following information:

Name: Your Name or Business Name
Email Address: Your Mailbox Email Address
Password: Your Mailbox Password
Description: Anything you’d like!

Once done, click Next.

6. Next, enter the following information, the previously entered information should already be prefilled from the last section.

Email Protocol: IMAP

Incoming Mail Server

Host Name: secure.emailsrvr.com
Username: Your Mailbox Email Address
Password: Your Mailbox Password

Outgoing Mail Server

Host Name: secure.emailsrvr.com
Username: Your Mailbox Email Address
Password: Your Mailbox Password

Once done, tap Next.

7. On the next screen, you will need to ensure that the Mail feature is enabled and then hit Save to save your configurations.

Congratulations! You have successfully configured your Rackspace mailbox with the iOS Mail application. The syncing process between the Mail client and your mailbox may take some time based on the amount of email data to be fetched.

Configuring Mozilla Thunderbird email with Rackspace

Configuring Mozilla Thunderbird email with Rackspace allows you to send and receive emails using Mozilla Thunderbird.

Let’s look at how you can use the Rackspace settings to configure your Mozilla Thunderbird email.

What is Rackspace email

Rackspace Email is an affordable, business-class email hosting solution with any time, anywhere access and a 100% uptime guarantee; all backed by industry-leading SLA and administrator access to the team of email hosting experts, 24x7x365.

Moreover, users can access their email using Outlook, their mobile phones, or through the webmail application.

Configuring your Mozilla Thunderbird email with Rackspace

  1. First, Sstart by launching Thunderbird. If this is the first time you’ve opened the Thunderbird, you’ll see a Welcome page prompting you to set up an existing email account.

Your Name: Your Name or Business Name
Email Address: Your Mailbox Email Address
Password: Your Mailbox Password

Once done, click Manual Config.

If you’ve used the Thunderbird before, then go to Menu > New > Existing Mail Account.

2. Then, in the current window, enter the following information to match the image below:

Incoming

Email Protocol: IMAP
Server hostname: secure.emailsrvr.com
Port: 993
SSL: SSL/TLS
Authentication: Autodetect

Outgoing

Email Protocol: SMTP
Server hostname: secure.emailsrvr.com
Port: 465
SSL: SSL/TLS
Authentication: Autodetect

Once done, click Re-test.

3. Once testing is successful, you can click Done to finish the setup.

That’s it! You have now set up Mozilla Thunderbird to work with your Rackspace mailbox. But the syncing process between Thunderbird and your mailbox may take some time based on the amount of email data to be fetched.

Configuring Microsoft email with Rackspace

Configuring Microsoft email with Rackspace allows you to send and receive emails using Microsoft.

Let’s look at how you can use the Rackspace settings (IMAP & SMTP) to configure your Microsoft email.

What is Rackspace email

Rackspace Email is an affordable, business-class email hosting solution with any time, anywhere access and a 100% uptime guarantee; all backed by industry-leading SLA and administrator access to the team of email hosting experts, 24x7x365.

Moreover, users can access their email using Outlook, their mobile phones, or through the webmail application.

Configuring your Microsoft email with Rackspace

  1. Open Mail from the Windows Start Menu.

2. If this is the first time you’ve opened the Mail app, you’ll see a Welcome page. Tap Add Account to get started.

If you’ve used the Mail app before, then go to Settings > Manage Accounts > Add Account.

3. Choose Other Account.

4. Enter your Mailbox Email Address.

5. Next, define the Name you wish to use while sending messages.

6. Enter your Mailbox Password.

That’s it! You have successfully configured your Rackspace mailbox with the Windows Mail client. The syncing process between Windows Mail and your mailbox may take some time based on the amount of email data to be fetched.

Configuring Outlook email with Rackspace

Configuring Outlook email with Rackspace allows you to send and receive emails using Outlook.

Let’s look at how you can use the Rackspace settings to configure your Outlook email.

Configuring Outlook with Rackspace email

  1. Launch Microsoft Outlook. In this demonstration, we are using Microsoft Outlook 2016.

2. If this is the first time you’ve opened Outlook, you’ll see a Welcome page. Click Next to get started.

If you’ve used Outlook before, then go to File > Add Account.

3. Select Yes when prompted about setting up Outlook to connect to an email account and click Next.

4. Select Manual Setup or Additional Server Types and hit Next.

5. Select Manual Setup or Additional Server Types and click Next.

6. In the Add Account window, enter the following information:

User Information

Your Name: Your Name or Business Name
Email Address: Your Mailbox Email Address
Account Type: IMAP
Incoming Mail Server: secure.emailsrvr.com
Outgoing Mail Server: secure.emailsrvr.com

Logon Information

User Name: Your Mailbox Email Address
Password: Your Mailbox Password

Rackspace email integration

Rackspace email integration allows you to set up Rackspace email on your email clients such as Outlook, Thunderbird, Windows, and iOS.

Moreover, enabling IMAP in Rackspace mail allows you to use IMAP (Internet Message Access Protocol) to sync your Rackspace Mail on aNinja app.

Overview of IMAP Protocol

IMAP is a protocol that allows you to download email messages from your Rackspace Mail server. It also allows you to access them with desktop email clients like Outlook/ Mac Mail and/or mobile email clients. So, you can configure Rackspace Mail on any standard IMAP email client using the IMAP and SMTP Server Settings.

Moreover, IMAP allows a two-way synchronization between the email clients and your Rackspace email account. It means that you can access the same account from multiple email clients.

Rackspace Mail IMAP Settings 

IMAP lets you configure your email client to receive incoming mail from your Rackspace email account. It allows two-way syncing, which is great if you’ll be checking email from multiple devices.

Here are the IMAP settings at Rackspace:

  • Your Name: Your Name or Business Name
  • Login Name: Your Mailbox Email Address
  • Password: Your Mailbox Password
  • Account Type: IMAP
  • Incoming Mail Server: secure.emailsrvr.com
  • Incoming Mail Server (IMAP) TCP Port: 993 (SSL)
Rackspace Mail SMTP Settings

Whereas IMAP helps you receive incoming mail, SMTP is a protocol that handles sending emails via Rackspace. You can use it to configure your email client so that you’re able to send emails right through that client.

Here are the SMTP settings at Rackspace:

  • Your Name: Your Name or Business Name
  • Login Name: Your Mailbox Email Address
  • Password: Your Mailbox Password
  • Account Type: IMAP
  • Outgoing Mail Server: secure.emailsrvr.com
  • Outgoing Mail Server (SMTP) TCP Port: 465 (SSL)

Configuring your email client with Rackspace email

After enabling IMAP in Rackspace mail, now, let’s look at how you can use the Rackspace settings from above to configure different email clients.

As mentioned earlier, we’ll cover these four popular email clients. Just click on your email provider and you will be redirected to the helping article.


Standalone / Curl Applications Integration

With Standalone / Curl Applications Integration you can forward leads into your aNinja account simply using a programming code or an API. In this article, we show you how the Standalone / Curl Applications Integration can be done.

Standalone / Curl Applications

The following example is in PHP, but can be repurposed to your language of choice (Python, Ruby, Java, etc..)

Sample PHP API push

/**
* Basic snippet for posting with command line curl
*/
$apikey = '123456';

function doCurl($apikey = null, $data = []) {
$data = http_build_query($data);

$api_base = 'https://aninja.com/api/v1';

$api_endpoint= '/contactform/?apikey='.$apikey.'';

$cmd = 'curl -sL --data ''.$data.'' "'.$api_base.'/'.$api_endpoint.'"';

Fields mapping Table

The following are standard fields you can map to, in addition to any custom fields created in your application that you can see under Settings > Custom fields.

Where does the imported data appear

After the integration, you can search your aNinja CRM for the imported leads. You can also search for any custom field, opportunities, and any other info that you have imported.

  • Lead’s contacts appear in the leads contact section in the lead view
  • Opportunities also appear in the opportunity section in the lead view
  • The company’s info appears on the top left of the lead view, in the Company section.
  • Custom fields appear in the custom field section of the lead view
  • Lead Search is a field that also appears in the bottom left of the lead view. Specifically, these are info/links on the lead or the organization found in Google search.

Need help with teh Integration? Leave us an email at support@aninja.com. And we will happily assist you.

Javascript API Integration

With Javascript API Integration you can forward leads into your aNinja account simply using a programming code or an API. In this article, we show you how Javascript API Integration can be done.

Javascript applications

The following example is of an API request in Javascript. You can customize off of the following examples to suit your actual code/use case.

Example use cases: Squarespace, Shopify

ajax({
type: 'POST',
url: "https://aninja.com/api/v1/contactform/?apikey=YOUR_API_KEY_HERE",
data:$.param({contact_name : contact_name}) + "&"+ $.param({contact_email1 : contact_email1}) + "&"+ $.param({contact_phone1 : contact_phone1})+ "&"+ $.param({company_name : company_name}),
success: function (data) {
alert('success');
}
});

Fields mapping Table

The following are standard fields you can map to, in addition to any custom fields created in your application that you can see under Settings > Custom fields.

Where does the imported data appear

After the integration, you can search your aNinja CRM for the imported leads. You can also search for any custom field, opportunities, and any other info that you have imported.

  • Lead’s contacts appear in the leads contact section in the lead view
  • Opportunities also appear in the opportunity section in the lead view
  • The company’s info appears on the top left of the lead view, in the Company section.
  • Custom fields appear in the custom field section of the lead view
  • Lead Search is a field that also appears in the bottom left of the lead view. Specifically, these are info/links on the lead or the organization found in Google search.

Need help with Javascript API Integration? Leave us an email at support@aninja.com. And we will happily assist you.

Webflow Integration using Zapier

Webflow integration can be done either through Zapier or through webhook. In this article, we’re going to show you the Webflow integration using Zapier.

Find your aNinja embed code before you get started. It is the form integration endpoint from aNinja. This is different for each form.

Sending Webflow form submissions to aNinja through Zapier

  • Log in to your Zapier account
  • Click on Make a Zap
  • ‍Choose Webflow as your Trigger App event
  • Connect the Webflow account. Make sure you are logged in to Webflow on the same browser.
  • Select Form Submission as Webflow trigger
  • Choose your Webflow Account
  • Set up Webflow Form Submission by selecting the site you want to receive notifications from and the Form Name
  • Test Trigger
  • For Action, choose Webhook.
  • For Event, select POST
  • Set up action
  • URL: Copy here the aNinja Form Embed code.Webflow Integration using Zapier
  • Payload Type: form

Mapping Fields

Map the Data on the aNinja fields and Form fields

These are the default aNinja fields:

Testing the Integration

  • Click Fetch & Continue to test the Webflow connection. Make sure you have at least one recent form submission created or submit a new form submission on your website before testing the connection. If there’s an issue with the connection troubleshoot your Webflow connection with Zapier (see below).
  • Check aNinja if the test lead got through.
  • Rename the Zap.
  • Publish Zap

Where does the imported data appear

After the integration, you can search your aNinja CRM for the imported leads. You can also search for any custom field and any other info that is collected from the forms. All the data appear in the Lead View.

  • Lead’s contact (Name, address, email, phone, and email) appears in the leads contact section in the lead view
  • The company’s info appears on the top left of the lead view, in the Company section.
  • Custom fields appear in the custom field section of the lead view
  • Lead Search is a field that also appears in the bottom left of the lead view. Specifically, these are info/links on the lead or the organization found in Google search.

Need help with the Webflow Integration using Zapier? Leave us an email at support@aninja.com. We’re more than happy to assist you.

Webflow Webhook Integration

Webflow integration can be done either through Zapier or through webhook. In this article we’re going to show you the Webflow through webhook

What’s a Webhook

A webhook is a lightweight API that powers one-way data sharing, triggered by events. And it delivers data to other applications as it happens, meaning you get data immediately. All you have to do is give the webhook provider (e.g.Webflow) a URL to deliver requests to (e.g. aNinja’s URL).

So, with Webflow Webhook Integration you can forward leads into your aNinja account simply by setting up a Webhook for your form submission. Find your aNinja API key before getting started.

Setting up a webhook in Webflow

  • First, log in to your Webflow account.
  • Then, go to your Webflow Project Settings.Webflow Webhook Integration
  • Choose Integrations.Webflow Webhook Integration
  • Click + Add webhook (at the bottom)
  • Here, you need to find your aNinja API key
  • Lastly, set the webhook on “Form submissions” and use the endpoint URL:

https://leads.aninja.com/handlers/webflow/redirect.php?apikey=YOUR_ANINJA_API_KEY <– replace with your aNinja API key.

Fields mapping

Map the Data on the aNinja fields and Form fields

These are the default aNinja fields:

Where does the imported data appear

After the integration, you can search your aNinja CRM for the imported leads. The name and email appear in the lead’s contact section in the lead view. Need help with Webflow Webhook Integration? Leave us an email at support@aninja.com. And we will happily assist you.