IMAP vs POP3

IMAP vs POP3: These are 2 different methods to access mail from a third-party email client or software.

When setting up a mail client such as Microsoft Outlook, Mac Mail, iPhone, or Android, you will need either enter POP or IMAP server settings.

POP3 (Post Office Protocol)

POP (Post Office Protocol) stores the emails on a single device and not on the server. POP doesn’t support public folder access. The folders are only accessed from the client’s device. This does not enforce aNinja’s vision for mobile data access.

If you want to keep messages on the server, make sure to enable the setting “Keep email on server”. Or all messages are deleted from the server once downloaded to the app or software.

IMAP (Internet Messaging Access Protocol)

IMAP is an internet protocol that lets you sync your email inbox across multiple devices. It also allows a two-way synchronization between the email clients and aNinja. So that if you communicate by email with your lead/customer (whether from aNinja, your email client, or anywhere), you will have all the relevant emails for that lead centralized in the aNinja lead view, as well as available in your email clients.

Why does aNinja only support IMAP

  • We only support IMAP because the main difference is that IMAP allows us to read the messages on the server and keep them there.
  • POP (an older protocol, that gets the messages off the server)
  • aNinja synchronizes the email messages view. So if you communicate by email with your lead/customer (whether from aNinja, your email client, or anywhere) you will have all the relevant emails for that lead centralized in the aNinja lead view (as well as available in your email clients).

Need help understanding the difference between IMAP vs POP3? Leave us a message at support@aninja.com. We will happily assist you!
aNinja API

aNinja API allows you to integrate your different marketplaces into your aNinja account using your private aNinja API key.

What is an API

An API (Application Programming Interface) is a set of functions that allows applications to access data and interact with external software components, operating systems, or microservices.
To simplify, an API delivers a user’s response to a system and eventually, sends the system’s response back to a user. For example:

  1. When you click “add to cart”;
  2. Then, an API tells the site you added a product to your cart;
  3. Afterward, the website puts the product in your cart
  4. As a result, your cart is updated.

Real-world examples of APIs

Looking for real-world examples of APIs? Every time you visit a page online, you’re interacting with API. Here are some real-world examples so you know how you can interact with aNinja API.

Conclusion

Think you might be ready to try APIs for yourself? Then you can explore APIs, send requests, see what data is returned, and much, much more.
http://developer.aninja.com/

Lastly, have any questions or clarifications on the aNinja API? Leave us a message at support@aninja.com. We will happily assist you.

Adding aNinja Chatbot to your WordPress website

No matter whether you’re a growing company or a market leader, aNinja Chatbot helps you communicate better with customers and push your business forward. Adding aNinja Chatbot to your WordPress Website can be done by using a simple Javascript code.

Adding aNinja Chatbot to your WordPress website

For the WordPress websites:

If you can’t see the Headers and Footers plugin in Settings, you just want to install the “insert-headers-and-footers” plugin directory that allows the plugin to appear in Settings.

Where do the Chatbot Conversations appear in aNinja

Now that you’ve added your Chatbot to your website, as a result, after every chatbot conversation, a new lead is created into your aNinja account with the info captured in the conversation.

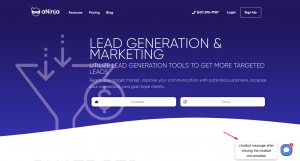
If the lead closed the chatbot conversation before your reply, your message will appear in a bubble next to the chatbot on the website:

You can see these conversations:

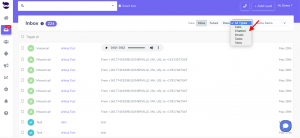
  • In your inbox. Just select “Chatbot” from the All types dropdown.
  • And in your Dashboard widget “Chatbot Conversations”. If you can’t see this widget, just enable it from the little gear on the top right of the dashboard.

Chatbot behavior

The chatbot pop-up gets triggered only for the first user visit to your site. It doesn’t automatically re-pop up on their subsequent visits, mainly because it gets annoying for repeat users. However, they can see that it’s in the bottom right section.

We can customize the following Chatbot behaviors:

  • Exposing the Chatbot initial greeting on every visit
  • Hiding the initial greeting message on page load
  • Delay showing the Chatbot widget for a number of seconds
  • Customizing widget container style to fit on the load page

Send us your request to support@aninja.com and we will implement the changes for you.

Shopify aNinja Integration – example of Fulfillment generating Lead in aNinja

With Shopify aNinja Integration you can instantly connect Shopify with aNinja and have your leads forwarded to your aNinja account.

In this article, we show you how the Shopify integration with aNinja can be easily done.

Integrating Shopify with aNinja

The following steps will walk you through the Shopify integration.

  • Log-in to your Shopify account
  • Go to Settings on the left
  • Click on Notifications
  • Scroll down, and in the Webhooks section, choose “Create webhook”
  • Choose “Fulfillment creation” event, Format JSON, and set the URL to be:
    https://aninja.com/api/v1/webhook_shopify?apikey=YOUR_ANINJA_API_KEY
    and use the Webhook API version 2020-10

  • Once it’s created – click the “Send test notification” in Shopify.

You should then see the test lead created in aNinja.

Where does the imported data appear

After the integration, you can search your aNinja CRM for the imported leads. You can also search for any custom field, opportunities, and any other information that you have imported.

  • Lead’s contacts appear in the leads contact section in the lead view.
  • Opportunities also appear in the opportunity section in the lead view.
  • The company’s info appears on the top left of the lead view, in the Company section.
  • Custom fields appear in the custom field section of the lead view.
  • Lead Search is a field that also appears in the bottom left of the lead view. Specifically, these are info/links on the lead or the organization found in Google search.

Have a specific question on the Shopify aNinja Integration? Just leave us an email at support@aninja.com. Our support team will happily assist you!

Leadsbridge aNinja Integration

In this article, we show you how Leadsbridge aNinja Integration can be easily done.

What’s Leadsbridge

LeadsBridge is an automation platform. It’s designed for companies to improve their lead generation.

It also helps them automate their audience management and streamline their full-funnel tracking.

aNinja allows you to get your leads from Leadsbrige to your aNinja account.

Integrating Leadsbridge with aNinja

  • In your Leadsbridge dashboard, on the top left, click on New Bridge.
  • Under Choose the apps you want to connect:
    • Select Leads Ads (e.g. Facebook) under Select Source
    • Then, choose Webhooks under Select Destination
    • And Continue
    • Then on the bottom left, click on “Take me to complex bridge”.
  • Under Source type e.g Facebook
  • And choose Create New Destination under the dropdown
  • Lastly, click Next
  • Under Source
    • Select the Facebook Ad Account
    • Here, choose the Facebook Page
    • Then, select the Facebook Form
    • Lastly, click Next
  • Here, we need to find your aNinja API key
  • Under URL field put:
    • http://leads.aninja.com/redirector_leadbridge_aninja.php?apikey=YOUR_API_KEY
      • Example:  https://leads.aninja.com/redirector_leadbridge_aninja.php?apikey=sample123-6yauyue5e
  • Under Destination
    • Select POST under Method
    • And Update your Leadsbridge API
    • Then, click Next
      • Toggle Active? to Yes, if you need an email notification on each new lead
      • And, click Next
  • Under Fields Mapping
    • Click Next
  • Under Test
    • Click on Test Now
    • Then, Select YES under Lead Access permissions
    • Lastly, click Save & Publish

Where does the imported data appear

After the integration, you can search your aNinja CRM for the imported leads. You can also search for any custom field and any other info that you have imported.

  • Lead’s contacts appear in the leads contact section in the lead view
  • The company’s info appears on the top left of the lead view, in the Company section.
  • Custom fields appear in the custom field section of the lead view
  • Lead Search is a field that also appears in the bottom left of the lead view. Specifically, these are info/links on the lead or the organization found in Google search.

Need help with Leadsbridge aNinja Integration? Leave us an email at support@aninja.com. We will happily assist you!
Creating aNinja Forms

For integrating forms data into aNinja, you can:

  • Use aNinja forms: These are created inside aNinja. You simply drop the Javascript code on your site and they render and automatically push the lead data into aNinja.
  • Use your existing forms (in this case we can adapt some Javascript code to push the lead into aNinja on form submission).
  • If your site is a WordPress or similar, we also have plugins for those cases (Gravity forms, Contact Form 7, Hubspot Form, and WPForms).

With aNinja, you have the ability to create custom forms and personalize the content to your liking. Once these forms are integrated into your website, every submission will result in a lead being automatically added to your aNinja account.

Creating aNinja Forms

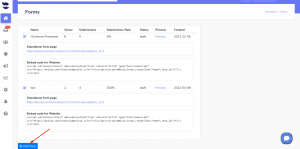
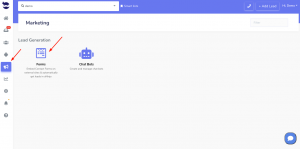
  • On the left sidebar, go to Marketing > Forms
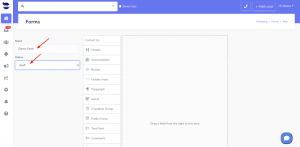
  • Click on Add Form
  • Label your form and select its status (draft, live, or archived)
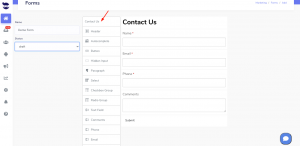
  • You can either select the Contact Us template or just drag fields from the list to create your own form.aNinja Forms
  • Incorporate a “hidden input” into your website’s form that remains concealed from users as they fill it out. And a custom field with the form name will be injected along with the lead data. This helps you identify leads generated from this specific form through the use of Smartlists.
    • A hidden input has a name and a value.
      • name: e.g. Custom_Form
      • value: e.g. aNinja contact form (or any title relating to the form).
    • If you’re intending to use multiple forms on your website, to each form you can assign a different name and value for the hidden input. Then you map it to aNinja’s Custom field. So every form submission creates a lead that has this input’s name and value among his custom fields.
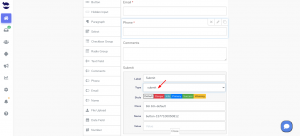
  • Insert a “Button” of type “Submit” at the bottom of your contact form for the form submission.

  • Lastly, click Save.
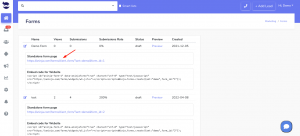
  • You can preview with Standalone link (optional)

Embed the form on your website

  • Go to Marketing > Forms
  • Copy the embed form code, to be able to embed the code snippet on your website.
  • We’ve added a data attribute inside this code that allows you to manage the Bootstrap design in the form. Set it to True or False to either skip or include the Bootstrap design in the form.
    • If it is set to True, then it skips aNinja’s design and uses the Bootstrap used in your website.
    • If set to False, then it uses aNinja’s Bootstrap design for the form.

Fields to include in the form

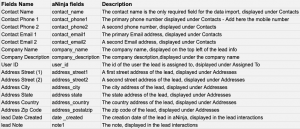
It’s very important to add “Input names” in the form fields and map them to aNinja fields (check the fields mapping section below).

The input names basically are:

  • Name: that’s a required field and it will be mapped to the aNinja field: contact_name
  • Phone: to be mapped to the aNinja field contact_phone1
  • Email: to be mapped to the aNinja field contact_email1
  • If in your form you’ve added other fields (e.g. Source), these are considered Custom Fields. When mapping them to the aNinja fields, just add this prefix Custom_ (Custom + Underscore). (e.g. Custom_Source).

Fields mapping

The following are standard fields you can map to, in addition to any custom fields created in your application that you can see under Settings > Custom fields.

Where does the imported data appear

After the form submission, a lead is automatically injected into your aNinja account.

You can search your aNinja CRM for the imported leads. You can also search for any custom field, opportunities, and any other info that you have included in your form.

  • Lead’s contacts appear in the lead contact section in the lead view.
  • Opportunities also appear in the opportunity section in the lead view.
  • The company’s info appears on the top left of the lead view, in the Company section.
  • Custom fields appear in the custom field section of the lead view.
  • Lead Search is a field that also appears in the bottom left of the lead view. Specifically, these are info/links on the lead or the organization found in Google search.

Find Your aNinja API Key

aNinja API allows you to integrate your different marketplaces into your aNinja account. Find your private aNinja API key in your aNinja profile to use it for your integrations.

Find your aNinja API key

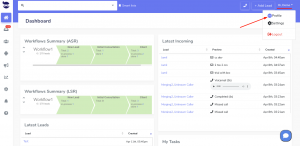
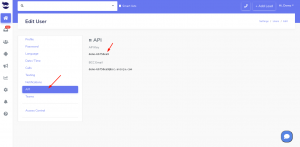
  • On the top left of your aNinja, click on your name dropdown and choose Profile.

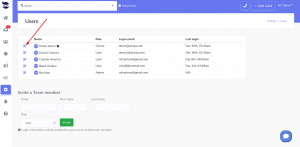
  • Or from the left sidebar, click on Settings > Users
    • Click on the edit icon next to your name
  • Click on APIFind your aNinja API key
  • Here’s your private aNinja API key

Integrate Clickfunnels with aNinja

Integrate Clickfunnels with aNinja, and forward leads into your aNinja account simply using a programming code or an API.

Integrate Clickfunnels with aNinja

  • Login to your Clickfunnels account.
  • Under “Favourite Funnels“, choose the existing funnel you want to integrate into aNinja.
  • Then, go to Settings on the top right
  • Here, on the settings page, click on “Manage Your Funnel Webhooks”
  • Now, click the “+ New Webhook” button to add a new webhook.
  • Here, we need to get your aNinja API key  
  • In Clickfunnels, URL field put:
    • https://aninja.com/api/v1/clickfunnels/YOUR_API_KEY/?direct=true
      • Example:  https://aninja.com/api/v1/clickfunnels/sample123-6yauyue5e/?direct=true
  • Then, in the Event field choose “All Events
  • And, in the Version field choose 1
  • In the Adapter field choose “json
  • Lastly, click the button “Create Funnel Webhook”

Where does the imported data appear

After the integration, you can search your aNinja CRM for the imported leads. You can also search for any custom field, opportunities, and any other info that you have imported.

  • Lead’s contacts appear in the leads contacts section in the lead view
  • Opportunities also appear in the opportunity section in the lead view
  • The company’s info appears on the top left of the lead view, in the Company section.
  • Custom fields appear in the custom field section of the lead view
  • Lead Search is a field that also appears in the bottom left of the lead view. Specifically, these are info/links on the lead or the organization found in Google search.

Need help integrating Clickfunnels with aNinja? Just leave us an email at support@aninja.com. We will happily assist you!