Manage the “Do Not Contact” lists

You can manage the “Do Not Contact” lists to view the contacts, remove them from the lists, and even export those contacts into a CSV file.

Marking leads as Do Not Contact

You may mark leads as Do Not Contact to honor their request to opt-out from receiving your automation; or simply because you don’t intend to message them anymore.

This is a useful practice that avoid your texts / emails from being marked as spam.

Managing the “Do Not Contact” lists

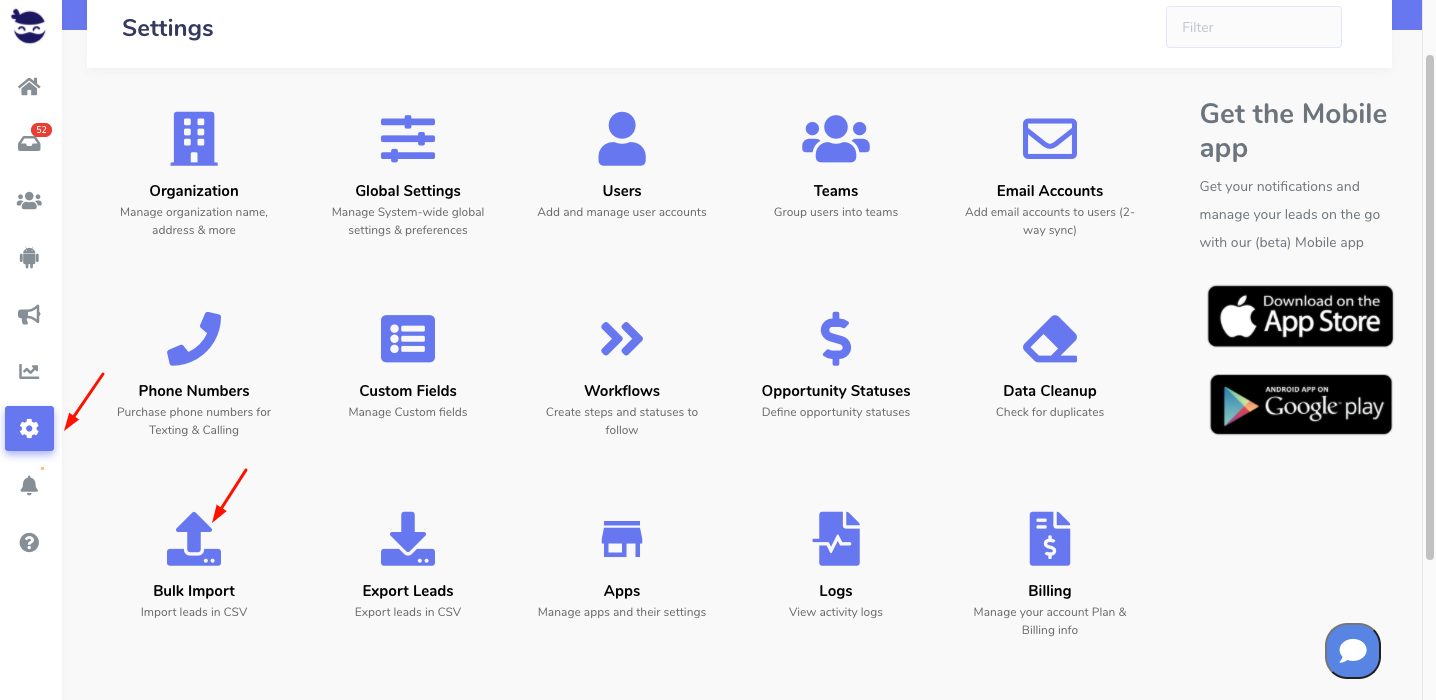
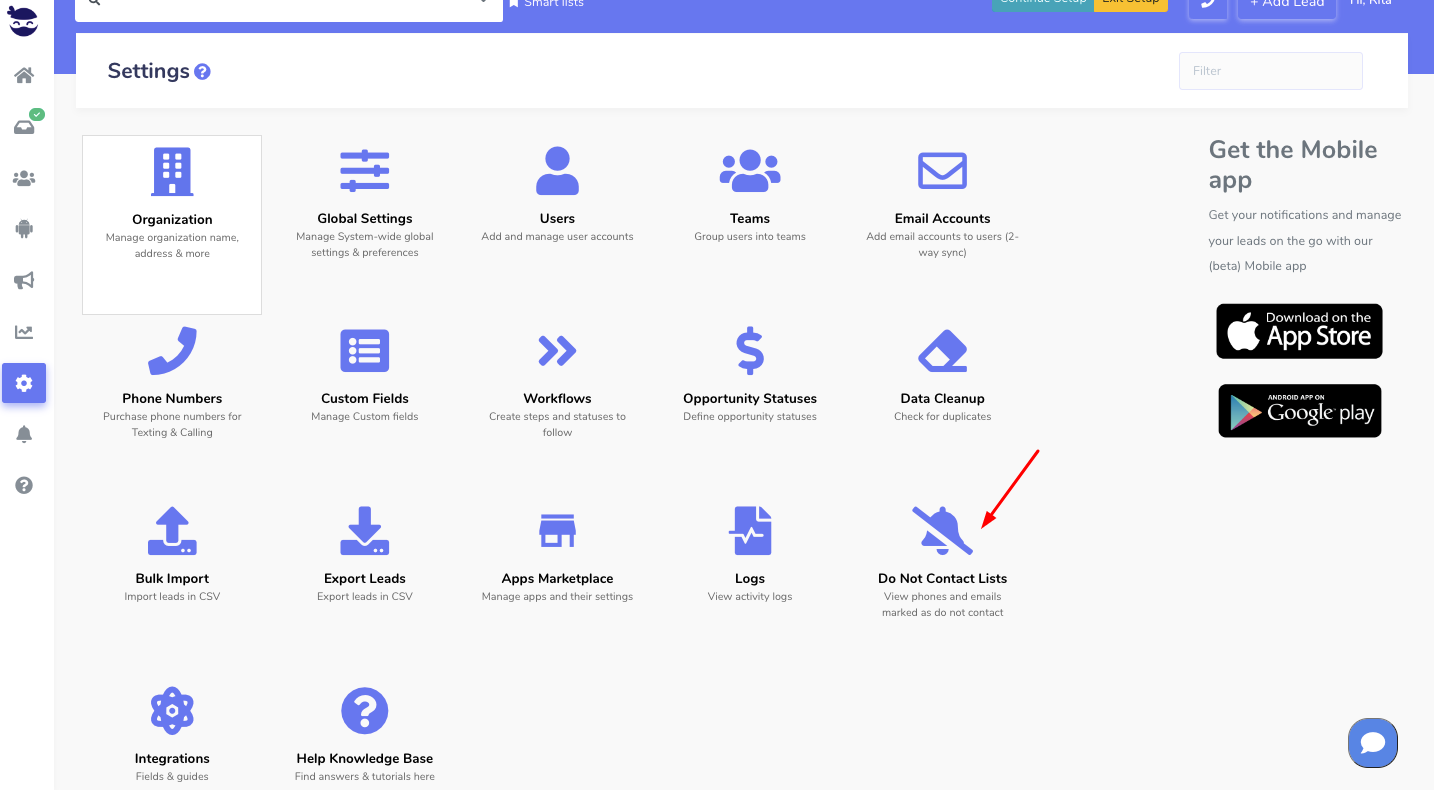
  • On the left sidebar, click on Settings > Do Not Contact Lists

In this view, you can:

  • See all the contact items (text / email) marked as “Do Not Contact”
  • Filter the view by text or email
  • See the Date they were marked
  • And, the User who marked them
  • Export the results as CSV
Filter the results

You can filter the results to appear by:

  • Emails marked as Do Not Contact

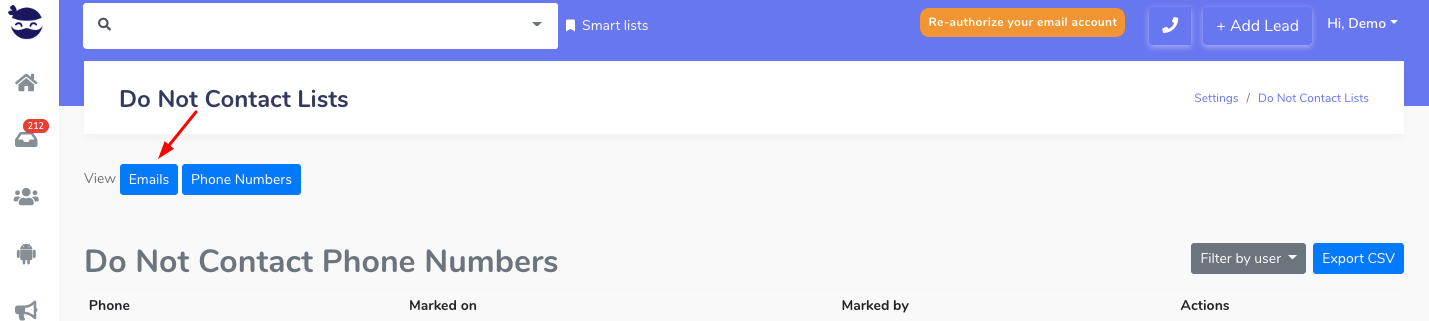
  • Phone Numbers marked as Do Not Contact

Manage the "Do Not Contact" Lists

  • And by the User who marked the contact item

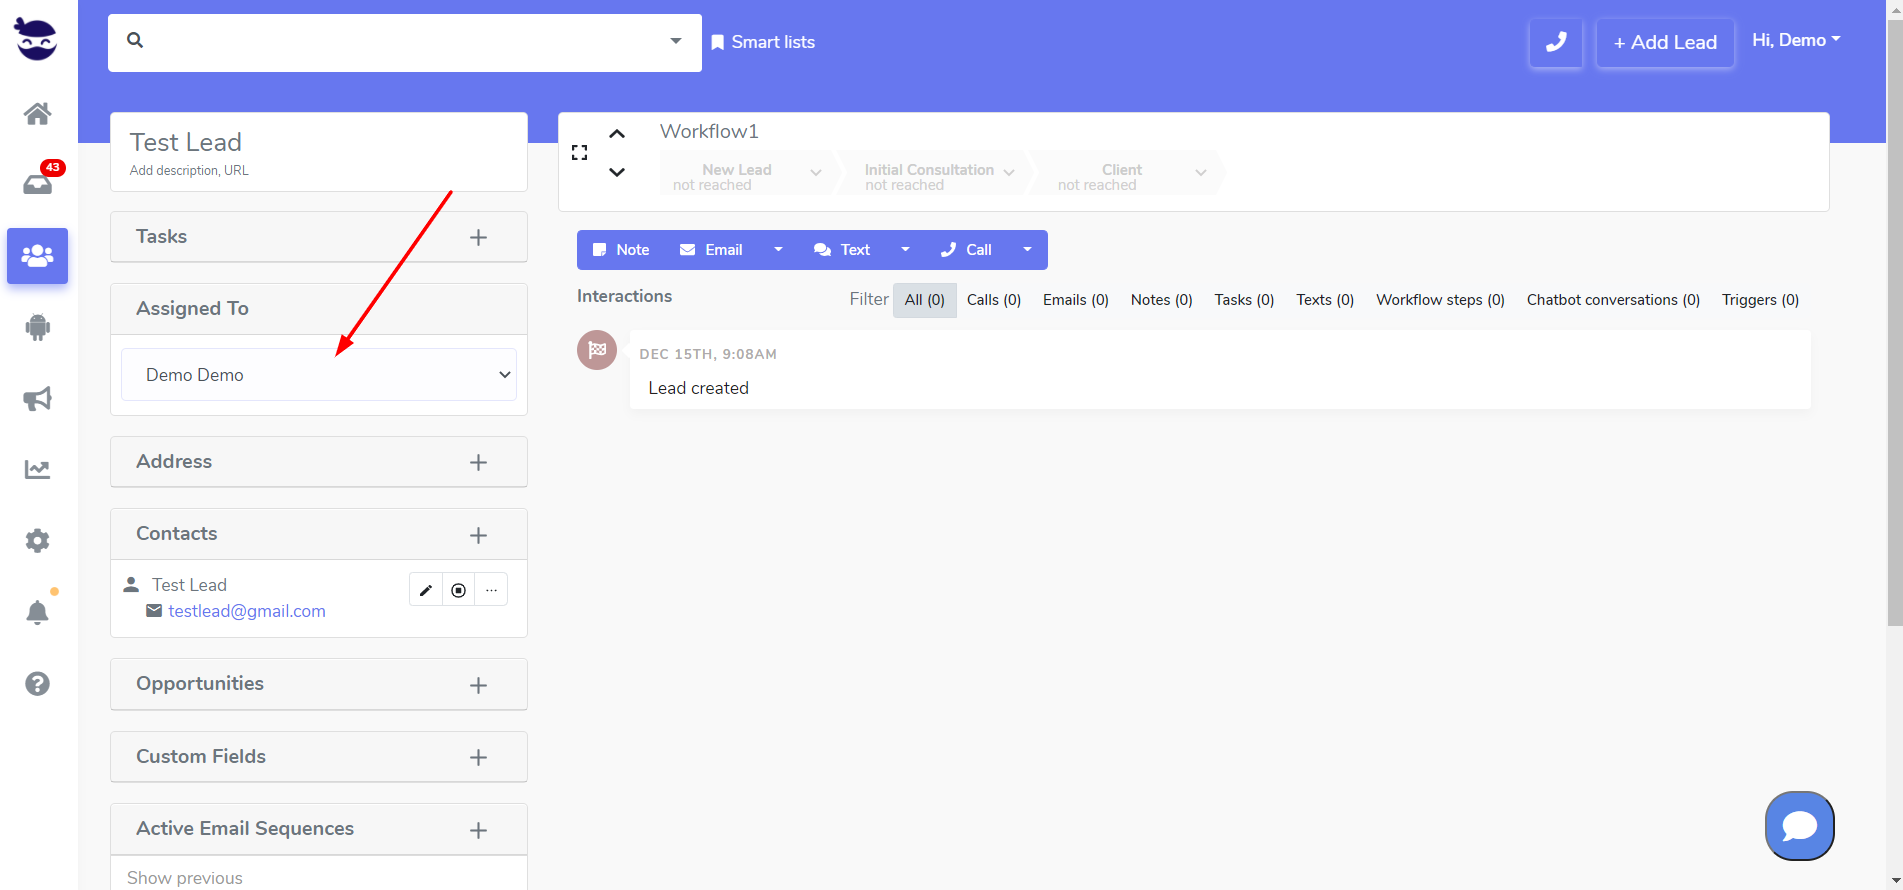
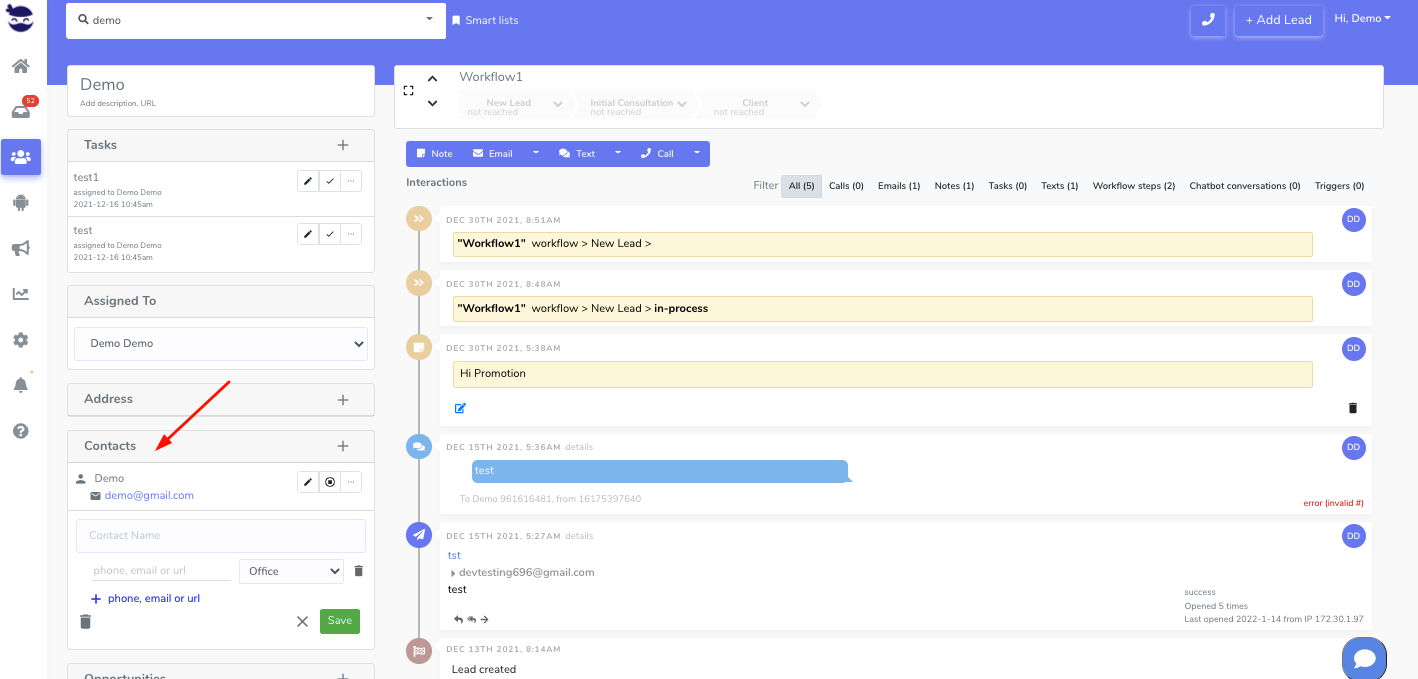
Remove a contact from the Do Not Contact List

To remove a contact item from the do Not Contact List, under Actions, click on remove. And OK to confirm.

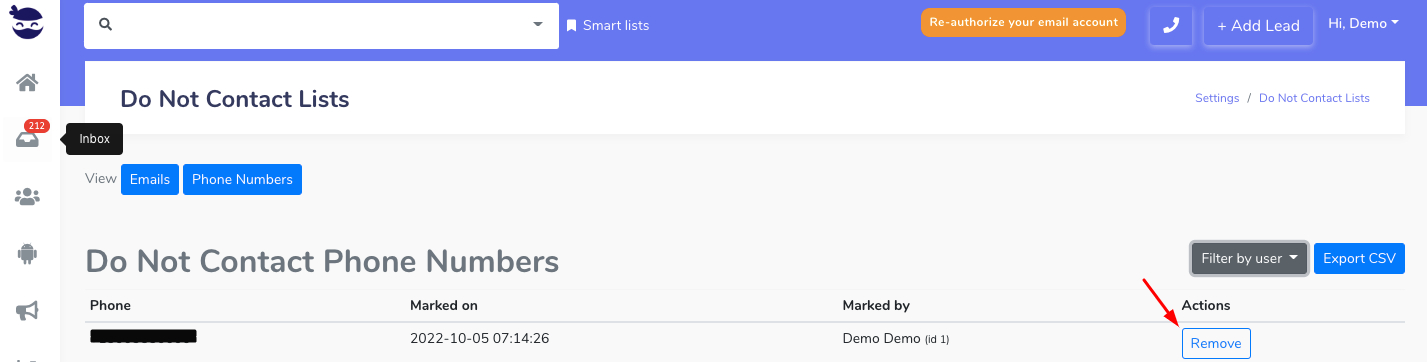
Automatically, the contact item (phone number or email) will be removed from the list. And the Stop button turns back to black in the lead view next to this contact item.

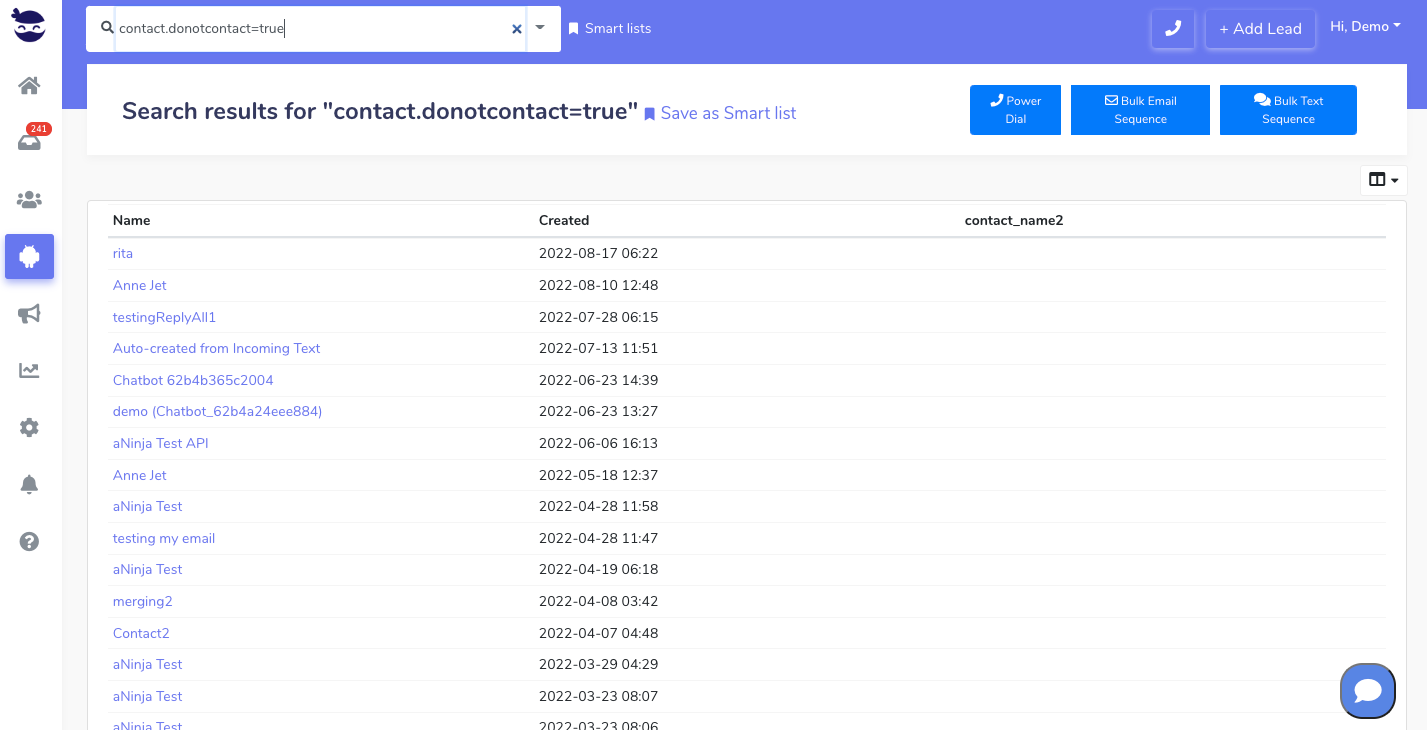
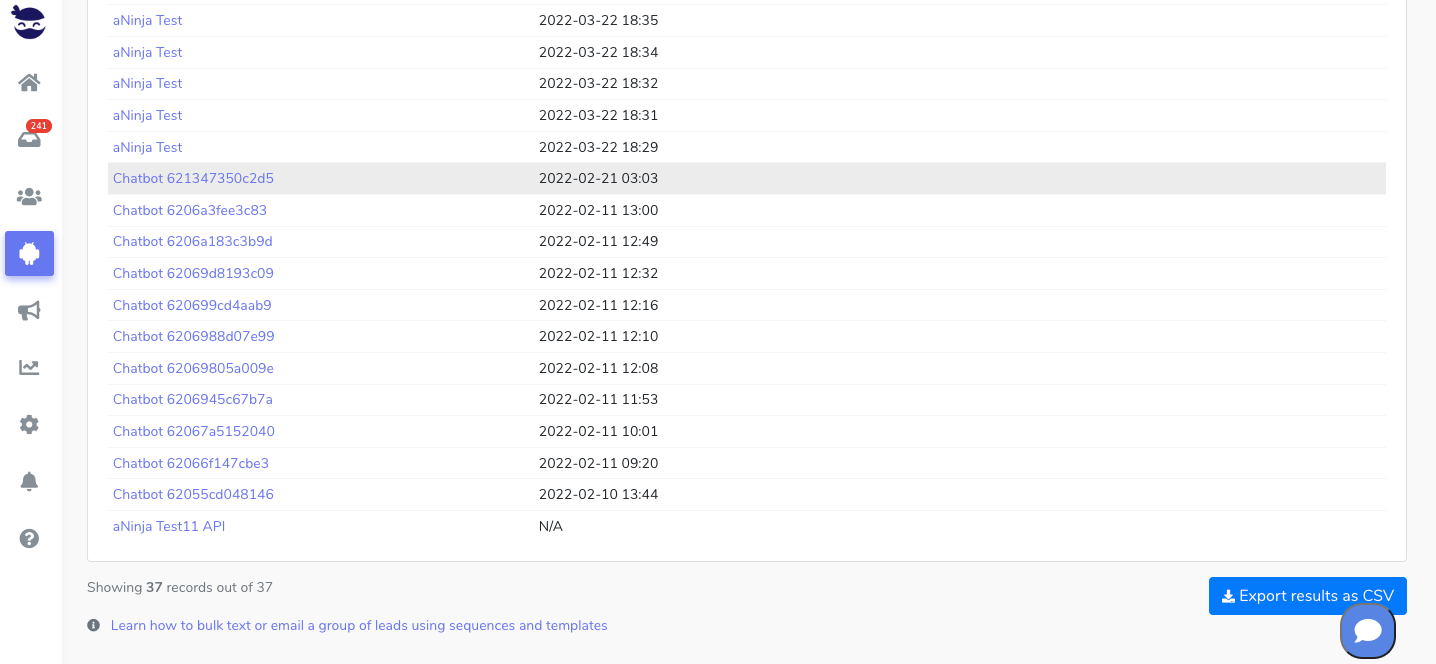
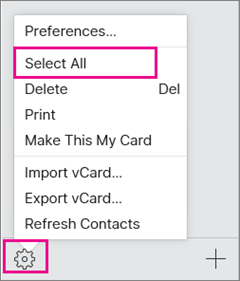
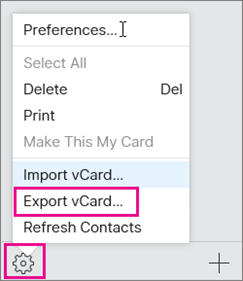
Export results as CSV

To export the results into a CSV file, click on Export CSV

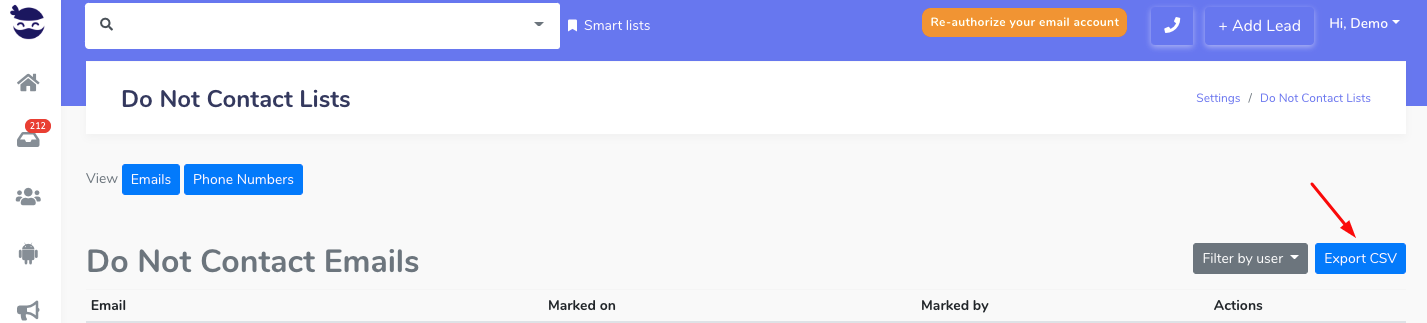
The list is saved in your documents.

The fields exported are:

  • The ID of the record
  • The Email or Text according to the selected filter
  • The Date Marked on
  • The ID of the User who marked it
  • And the user’s full name

Save “Do Not Contact” list as Smartlist

When leads are marked as do not contact, they are added to the do not contact list. And automatically the system stops all the sequences they are included in. You can save the “Do Not Contact” list as a Smartlist and export the results as CSV file.

Marking leads as “Do Not Contact”

When leads reply to you asking to stop receiving from you, you want to honor their request.

You can handle the stop incoming texts through triggers to automatically add those leads to the do not contact list; or you can manually mark the leads as do not contact. Then, they will automatically be added to the do not contact list afterward, and all the sequences they’re included in will stop.

Smartlist query for “Do Not Contact” list

  • To extract the list of the leads marked as do not contact, type this query in the top navigation bar:

contact.donotcontact=true

  • This query fetches all leads that have at least one contact marked as “do not contact”.

  • Afterward, the system brings you the results in the Leads View.
  • Lastly, click on Save as Smartlist to save the “Do Not Contact” list as Smartlist.Saving "Do Not Contact" list as Smartlist

Note!

Don’t forget to save the results before leaving the page to avoid losing the search. Otherwise, the leads view displays all the leads you have in your account.

Exporting results as CSV

  • After saving the “Do Not Contact” list as Smartlist, click on Smart Lists next to the top navigation bar. And select the Smartlist to view the results in the Leads View.
  • Then, scroll all the way down and click on Export as CSV

Creating a Smartlist from Bulk Import list

After importing contacts in a CSV or Excel file, you can directly  start by creating a Smartlist from the Bulk Import list.

Creating a Smartlist from Bulk Import list

  • In Settings > Bulk Import, locate the list that you’ve just imported in Previous Bulk Imports.
  • Under Records, click on the blue number (which is the number of leads in this list). This redirects you to the leads view where you can see all those leads.
  • On the top navigation bar, you can see the query that was used to execute this process. Something like e.g.: lead.bulkimport_id=12. 12 represents the serial number of the bulk import.
  • Copy this query.
  • Click on Smartlist > Add Smart List
  • Give a name to the Smartlist
  • Paste the query in “Search query”.
  • Save it for later re-use.

Launching sequences for this particular list

Exporting Contacts from Mailchimp

You can export your contacts from Mailchimp and import them into your aNinja account to augment your lead database.

You can export an entire audience, a segment, or a group.

Configure contact table

  • Click Audience > All contacts
  • Click the Toggle Columns drop-down menu.
  • Uncheck the boxes next to the fields you want to hide or check the boxes next to the fields you want to view.
    Cursor checks box in toggle columns drop-down menu.
  • To reorder columns, click and drag the three dots next to any name field and drag it to your preferred location.
    Cursor clicks three dots next to name field.
  • Click Save.

View or export an audience

To view or export your entire audience, follow these steps.

  • Click Audience > All contacts.
  • If you have more than one audience, click the Current audience drop-down and choose the one you want to work with.
  • Click Export Audience.
    • You will receive the exported audience by email. You can download the file to your computer.
  • Or from Mailchimp, after the export loads, click Export as CSV to download the file to your computer.

View or export a segment

To view or export a saved segment, follow these steps.

  • Click Audience > All contacts.
  • If you have more than one audience, click the Current audience drop-down and choose the one you want to work with.
  • Click View Segment, and choose the segment you want to export.
  • Click Export Segment.
    click export segment

    • You will receive the exported segment by email. You can download the file to your computer.
  • Or in Mailchimp, after the export loads, click Export as CSV to download the file to your computer.

View or export tagged contacts

To view or export tagged contacts, follow these steps.

  • Click Audience > All contacts.
  • If you have more than one audience, click the Current audience drop-down and choose the one you want to work with.
  • Click the Filter by Tags drop-down menu and choose the tag you want to work with.
  • It generates a segment of all the contacts in your audience with that tag applied to them.
  • From the segment view, click the Filtered By Tags drop-down menu to choose more tags. When you’re done, click Export Segment.
    • You will receive the exported segment by email. You can download the file to your computer.
  • Or in Mailchimp, after the export loads, click Export as CSV to download the file to your computer.

View or export a group

  • Click Audience > Audience dashboard.
  • If you have more than one audience, click the Current audience drop-down and choose the one you want to work with.
  • Click the Manage Audience drop-down and choose Manage contacts.
  • Click Groups.
  • Then, hit View Groups to expand the group you want to view.
  • Click the # contacts link to view the individual contacts in each group.
  • Click Export Segment.
    • You will receive the exported segment by email. You can download the file to your computer.
  • Or in Mailchimp, after the export loads, click Export as CSV to download the file to your computer.

Open your export file

Your export may include a ZIP file that contains separate CSV files for each type of contact (subscribed, unsubscribed, non-subscribed, and cleaned). Unarchive the ZIP file to access the CSV files and open each file individually in your preferred spreadsheet application ( Microsoft ExcelGoogle Sheets, or OpenOffice Calc.)


Mapping fields for Leads Bulk Import

aNinja offers different ways to create leads in your account. Importing leads in a CSV file is one of them.

Before the import, you want to sanitize the contacts file to ensure proper mapping.

The correct mapping of leads’ data to aNinja fields saves your data in the right place which makes searching for it easy.

You can also save bulk import mappings and reload it when you have a similar file to import (same order and number of headers).

Mapping leads data to aNinja fields

  • For the bulk import, go to Settings > Bulk Import
  • Select the contact’s file.
    • If in your CSV file there are records with no contact names, you receive an alert so you go back to the file and add the names. Then try to upload it again.
  • Now, map the data to aNinja fields:

  • The contact name is the only required field.
    • You can either map it to one field or join 2 fields in case the first name and last name are saved in 2 separate columns in your CSV file.
  • It’s important to map the data in your contacts file with the correct aNinja fields to be able to find them in the right place in the lead view.

You can even create custom fields if they’re not already there.

Standard fields
  • Contact_name: is a required field and it’s essential to complete the import.
  • Primary contact’s email: contact_email1. You can also add a second email (contact_email2).
  • Primary contact’s phone: contact_phone1.You can also add a second phone number (contact_phone2).
    • Here we recommend choosing the mobile number to be the primary contact phone as the system grabs the primary phone number to be used when texting.

Custom fields

You can create custom fields immediately when doing the mapping if they were not listed among the fields. Just prefix the field with “Custom.” e.g. Custom.Source

Saving field mappings

It’s optional. You can save the fields mapping and reload it when you have a similar file to import (same order and number of headers).

It’s useful if you regularly do bulk imports into aNinja and have many fields to map.

Don’t forget to click Upload to import the data.

Where does the imported data appear

After the import, you can search your aNinja CRM for the imported leads: Lead Contacts, Custom fields, and Addresses. Type your search on the top navigation bar.

  • Lead’s contacts appear under Contacts in the lead view.
  • Opportunities also appear in the opportunity section in the lead view.
  • The company’s info appears on the top left of the lead view, in the Company section.
  • Custom fields appear under Custom fields in the lead view.

Have any specific questions on the best ways to import your data? Please, email our Support team at support@aninja.com.

Segmenting leads in the bulk import using Custom fields

Segmenting the leads you are importing means separating them into different lists that can be more manageable. One way to do it is using custom fields.

aNinja was designed to allow sending a large number of texts and emails. However, before sending your outbound, you might want to check the daily email sending limits allowed by your email provider.

You might also want to check the text sending limits that you registered for in your billing plan with aNinja.

That’s why aNinja recommends you segment your contacts before importing them to avoid any issues.

Segmenting leads before the import

One way to do it is using Custom fields.

Inside your CSV editor / Excel / Google sheets, etc.. and before uploading:

  • Add a column to your bulk import, and name it Custom.batch
  • Fill the cells of this column with e.g. 1 for the first 1000, 2 for the second batch of 1000, etc…

Importing the segmented CSV file

  • Import that CSV to aNinja and map the Custom.batch column to an aNinja Custom.batch field.
  • Now, all the contacts in the CSV file are saved in your aNinja account, with the number of the batch as a custom field.

Identifying the leads by batch number

  • In the top navigation bar, search for e.g. Custom.batch=2
  • You will get the leads that have 2 in the custom field,  shortlisted in the leads view.

Now you can send them Bulk texts sequences, Bulk email sequences, and even powerdial them.

Lastly, save that query as a Smartlist for a faster access in the future.

Where does the imported data appear

After the import, you can search your aNinja CRM for the imported leads. You can also search for any custom field, opportunities, and any other info that you have imported.

  • Lead’s contacts appear in the leads contact section in the lead view
  • Opportunities also appear in the opportunity section in the lead view
  • The company’s info appears on the top left of the lead view, in the Company section.
  • Custom fields appear in the custom field section of the lead view
  • Lead Search is a field that also appears in the bottom left of the lead view. Specifically, these are info/links on the lead or the organization found in Google search.

Launch a text or email sequence to a bulk import list

Here are the steps to bulk import a CSV list of leads and launch a text or email sequence targetting those leads.

Locating the bulk import list

  • After the import is complete, you can view the file imported in Settings > Bulk Import > Previous Bulk Imports.
  • Each file has an ID number that identifies it.

Launch a text or email sequence to a bulk import list

Launching a text or email sequence to a bulk import list

There are 2 ways to launch a text or email sequence to a bulk import list:

  1. Go to Settings > Bulk Import 
    • In the Previous Bulk Import section, locate the list you want.
    • Then, click on the number under Records.
    • As a result, this opens the leads view where you can see all the leads saved in that list.
    • Also, in the top navigation bar, you can see the query that was used to bring you the data. It looks like:

lead.bulkimport_id=THE BULK ID

    • Save the results as a Smartlist for future use.

2- In the top navigation bar

    • You can search for the bulk list using this query: lead.bulkimport_id=TYPE HERE THE BULK ID

Now, hit the “Bulk Email Sequence” or “Bulk Text Sequence” button to target those leads with your text or email sequence.

Need help? Leave us an email at support@aninja.com. We will happily assist you!

Assigning a bulk import list

Assigning a lead to a user allows you to efficiently follow up with your lead and close them quickly. Especially if you have distributed the tasks between your team members to better close leads. How about assigning a bulk import list to a specific user!

Assigning a bulk import list to a user

  • When preparing the leads file, add a column in your CSV sheet called User_id.
    • You can find the user_id in Settings > Users > next to the user name.
  • And set the column values to the User ID of the user you want to assign the leads to.

Mapping the user ID to aNinja field

When importing your CSV file, you want to map the user ID in your CSV file to user_id in aNinja fields.

Where does the user ID appear?

After the import, the user ID you’ve added to your contacts list will show in the lead view of the imported leads > in the Assigned to section.Assigning a bulk import list

Note: As long you have “Users can only see Leads assigned to them” enabled under Settings > Global Settings, then users (unless admin) can only see leads assigned to them.

Need help in assigning a bulk import list? Leave us an email at support@aninja.com and include the CSV file. Let us know the user you’d like to assign.

Importing your iCloud contacts into aNinja

In this article, we show you how importing your iCloud contacts into aNinja can be done in 3 steps.

1- Pull your contacts from your iClould account

  • Sign in to iCloud.com with your login credentials.
  •  And, select Contacts
  • Then, click the gear icon, then choose Select All to mark all of your contacts for export.

Importing iCloud contacts into aNinja

  •  Lastly, select the gear icon again, and choose ExportvCard to copy your contacts to a .vcf file. (Your contacts will still be available in your iCloud account.)

Choose the Actions menu, then choose Export.

  • As a result, your contacts are copied to a VCF file.

2- Converting the VCF file to CSV

aNinja enables bulk import using a CSV file.

Locate the VCF file in your documents. Select it and click the  Open button. Doing that will automatically load and convert the VCF to a CSV file opened in Excel.

3- Importing the CSV file to your aNinja account

If you don’t wish to import all the extracted contacts to aNinja, select the unwanted contacts and delete them from the CSV file before you import it.

To import the CSV file, go to Settings > Bulk Import.

Where does the imported data appear?

After the integration, you can search your aNinja CRM for the imported leads. You can also search for any custom field, opportunities, and any other info that you have imported.

  • Lead’s contact appear in the leads contact section in the lead view
  • Opportunities also appear in the opportunity section in the lead view
  • The company’s info appears on the top left of the lead view, in the Company section.
  • Custom fields appear in the custom field section of the lead view
  • Lead Search is a field that also appears in the bottom left of the lead view. Specifically, these are info/links on the lead or the organization found in Google search.

Need help in importing your iCloud contacts into aNinja? Please leave us an email at support@aninja.com. We will happily assist you!

Lead’s Contacts

The lead’s contact section in the Lead View, shows all the contacts saved under your lead (employees of the same company, relatives, etc…). It’s a good component for filtering based on contact info. The lead’s contacts are email, phone number, and URL.

You can mark a contact as “do not contact“. They will stop receiving your bulk sequences. You can still send them emails / texts from the lead view.

Relocate the contact in the lead’s contacts if you have multiple ones. Drag it to the top. The first one in order will be considered the primary contact.

Lead's contacts

Incorrect email address or phone number

It is important that the lead contact are correct so your outbound emails and texts reach your leads successfully.

Moreover, if you’re intending to use the phone number for texting, save the mobile number as the primary number (first number in the contact). Otherwise, your text will not reach the lead.

However, you will be notified that your outbound was not sent due to the incorrect email address or phone number.

Using the contact info for leads search

Just type the contact info on the top navigation bar, and aNinja will search all your CRM to find the lead(s) related to your search.

The results will show in the Leads View. For future use, go ahead and save the results as Smartlist. You can share your Smartlist with other users too.

Bulk Activities

Now, you can perform the below activities on the results in the Leads View: